Appearance
Spring Boot 简介
引子:
Spring 诞生时是 Java 企业版(Java Enterprise Edition,JEE,也称 J2EE)的轻量级代替品。无需开发重量级的 Enterprise JavaBean(EJB),Spring 为企业级Java 开发提供了一种相对简单的方法,通过依赖注入和面向切面编程,用简单的Java 对象(Plain Old Java Object,POJO)实现了 EJB 的功能。虽然 Spring 的组件代码是轻量级的,但它的配置却是重量级的。
- 第一阶段:xml配置。在Spring 1.x时代,使用Spring开发满眼都是xml配置的Bean,随着项目的扩大,需要把xml配置文件放到不同的配置文件里,那时需要频繁的在开发的类和配置文件之间进行切换
- 第二阶段:注解配置。在Spring 2.x 时代,随着JDK1.5带来的注解支持,Spring提供了声明Bean的注解(例如@Controller、@Service),大大减少了配置量。主要使用的方式是应用的基本配置(如数据库配置)用xml,业务配置用注解
- 第三阶段:java配置。Spring 3.0 引入了基于 Java 的配置能力,这是一种类型安全的可重构配置方式,可以代替 XML。现在Spring和Springboot都推荐使用java配置。
所有这些配置都代表了开发时的损耗。因为在思考 Spring 特性配置和解决业务问题之间需要进行思维切换,所以写配置挤占了写应用程序逻辑的时间。除此之外,项目的依赖管理也是件吃力不讨好的事情。决定项目里要用哪些库就已经够让人头痛的了,你还要知道这些库的哪个版本和其他库不会有冲突,这难题实在太棘手。并且,依赖管理也是一种损耗,添加依赖不是写应用程序代码。一旦选错了依赖的版本,随之而来的不兼容问题毫无疑问会是生产力杀手。
Spring Boot 是全新的 Spring 开发框架,其设计的初衷是简化 Spring 应用复杂的搭建及开发过程、所有内容自动化。该框架提供了一套简单的 Spring 模块依赖和管理工具,采用约定优于配置(为 Spring 平台及第三方库提供开箱即用的设置,即有默认设置)的概念,不用开发者做复杂配置,降低参数配错几率,将后续的管理、内嵌的外部服务器容器全部搞定,做到最小化依赖,最大程度降低程序运行后对开发人员的依赖性,也避免了开发人员处理复杂的模块依赖和版本冲突问题,同时提供打包即可用的 Web 服务,成为快速应用开发领域(Rapid Application Development)的领导者。
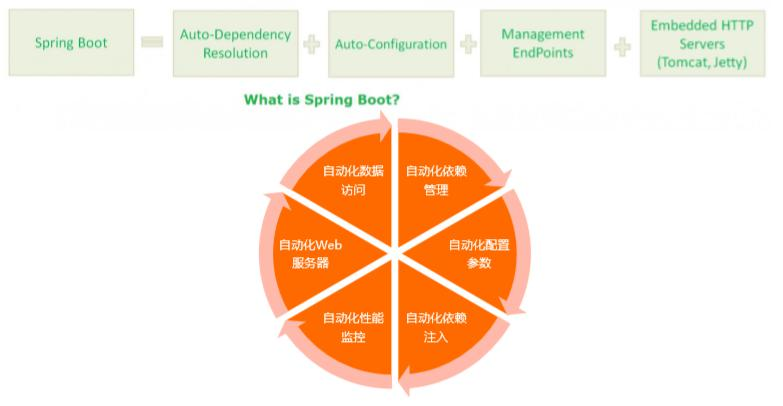
使用 Spring Boot 创建 java 应用,可以直接使用 java –jar 命令启动它,或者采用传统的 war 部署方式。
核心功能
- 核心能力:Spring容器、日志、自动配置 AutoCongfiguration、Starters
- web应用的能力:MVC、嵌入式容器
- 数据访问(持久化):关系型数据库、非关系型数据库
- 强大的整合其他技术的能力
- 测试:强悍的应用测试
开发环境要求
Notes: 示例使用 Spring Boot 2.1.7.RELEASES 版本
- JDK 版本:Java 8 或 Java 11
- Spring 版本:5.1.8 及以上
- 构建工具版本:Maven版本:3.3 及以上
Spring Boot 支持如下的嵌入式 Servlet 容器,Spring Boot 应用程序最低支持到 Servlet 3.1 的容器。
项目构建
强烈推荐选择一个支持依赖管理的构建系统,可以使用它将 artifact 发布到 Maven Central 仓库。所以建议选择 Maven 或者 Gradle。
Spring Boot 2.0 特性
Spring Boot2.0 里面有一个重大的变化叫响应式编程,相比于传统的 Serviet API 阻塞的 API,引入到非阻塞的编程模式,主要目标是提升高并发程序的吞吐量,包括底层数据库对接等。
Spring Boot 1.x 特性
- 创建独立运行的 Spring 应用程序
- 直接嵌入 Tomcat,Jetty 或 Undertow(无需部署 WAR 文件)
- 提供运行需要的“最低”依赖项以简化构建配置
- 尽可能自动配置 Spring 和第三方库
- 提供生产就绪功能,例如指标测试,健康检查和外部配置
- 没有代码生成,也不需 XML 配置
Spring Boot 2.x 新特性
- 增加 Reactive 响应式模块,如 Spring WebFlux
- HTTP/2 新协议支持
- Spring Boot 2.x 启用 HikariCP 替换 Tomcat 内置连接池
- 支持 Kotlin 1.2,支持性能监控 Micrometer 集成 Actuator
- 其他开发、测试、部署的小改进
Spring Boot 入门
环境准备
- DataBase:MySQL
- IDE:Eclipse/idea
- SpringBoot:
- 1.5.6 (官方网站:http://spring.io/) 2017年7月27日
- 2.0.3版本 2018年6月16日
- SpringBoot参考文档:
- Maven:3.3.9 (官方声明Springboot 1.5.6版本需要Maven 3.2+)
- Gradle:4.0.2 (官方网站https://gradle.org/)
Tips: 如果本地仓库是直接复制其他人的仓库中jar包时,eclipse 需要重新构建索引
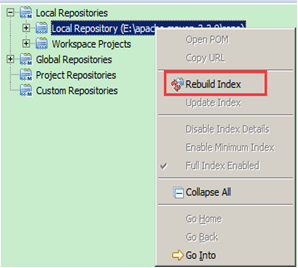
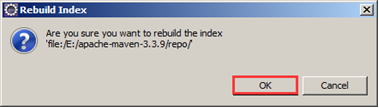
创建 Spring Boot 项目(eclipse 版)-已过时,有需要再更新!
创建Maven工程
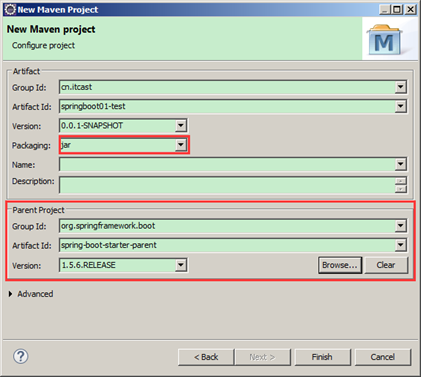
变更JDK版本(非必需)
- 默认情况下工程的JDK版本是1.6,但是通常使用的是1.7的版本
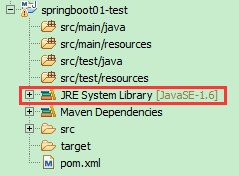
- 修改JDK为1.7,需要在pom.xml中添加以下配置
xml
<!-- 定义全局属性 -->
<properties>
  <!-- 定义更改JDK版本属性 -->
  <java.version>1.7</java.version>
</properties>- 使用Maven更新工程后,就发现版本已经变成1.7
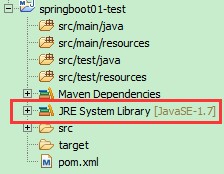
Notes:
- 虽然JDK1.6或者1.7都可以使用SpringBoot,但SpringBoot官方建议使用JDK1.8,要使用JDK1.8,首先必须要配置JDK1.8后,才可以使用上述方法设置。
- 如果是传统的maven项目,是需要配置jdk插件,但spring boot项目中,只需要配置
<properties>属性即可
创建 Spring Boot 项目(IDEA 版)
方式1 - 基于 Spring Intialzr(需联网)
IDEA 可以直接通过 Spring Initializr 创建 Spring boot 项目。(注意,此创建方式需要联网)
注:以下截图是基于 idea 2021.2.3,之前版本的 idea 中的 Spring Initializr 界面不一样,但流程相差不大
- 创建新模块/新项目,选择 Spring Initializr,并配置模块相关基础信息。选择 Java 版本和本地计算机上安装的 JDK 版本匹配即可,但是最低要求为 JDK8 或以上版本,推荐使用8或11
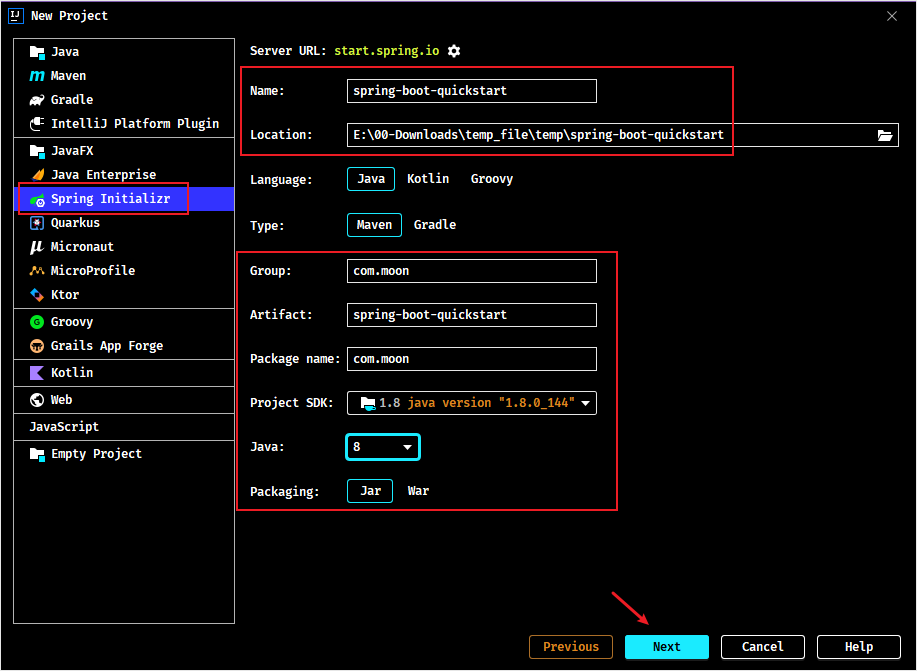
- 选择 Spring Boot 的版本与项目所需要的依赖
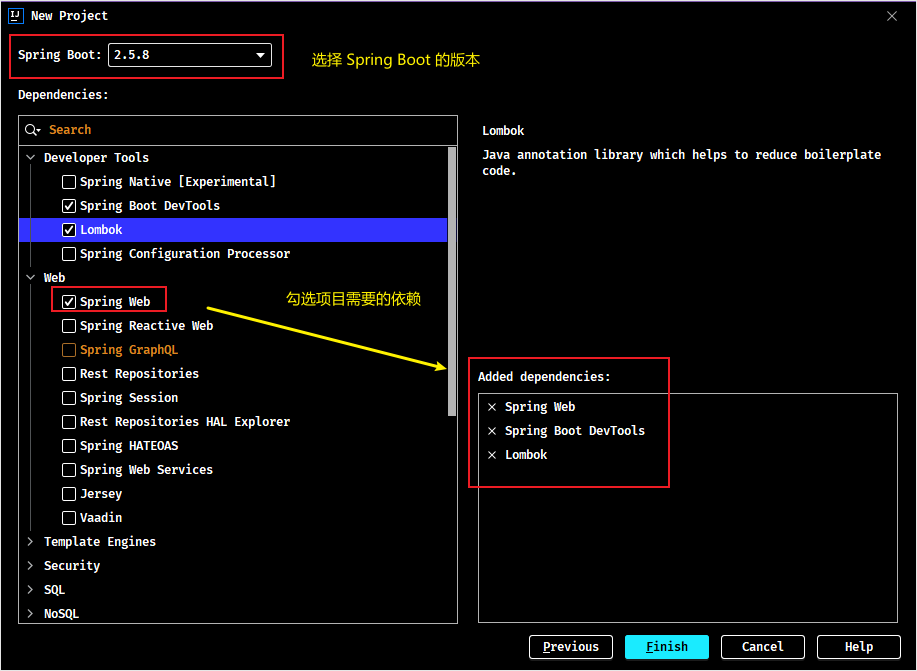
- 点击 Finish 即可创建新的 Spring Boot 项目。效果如下:
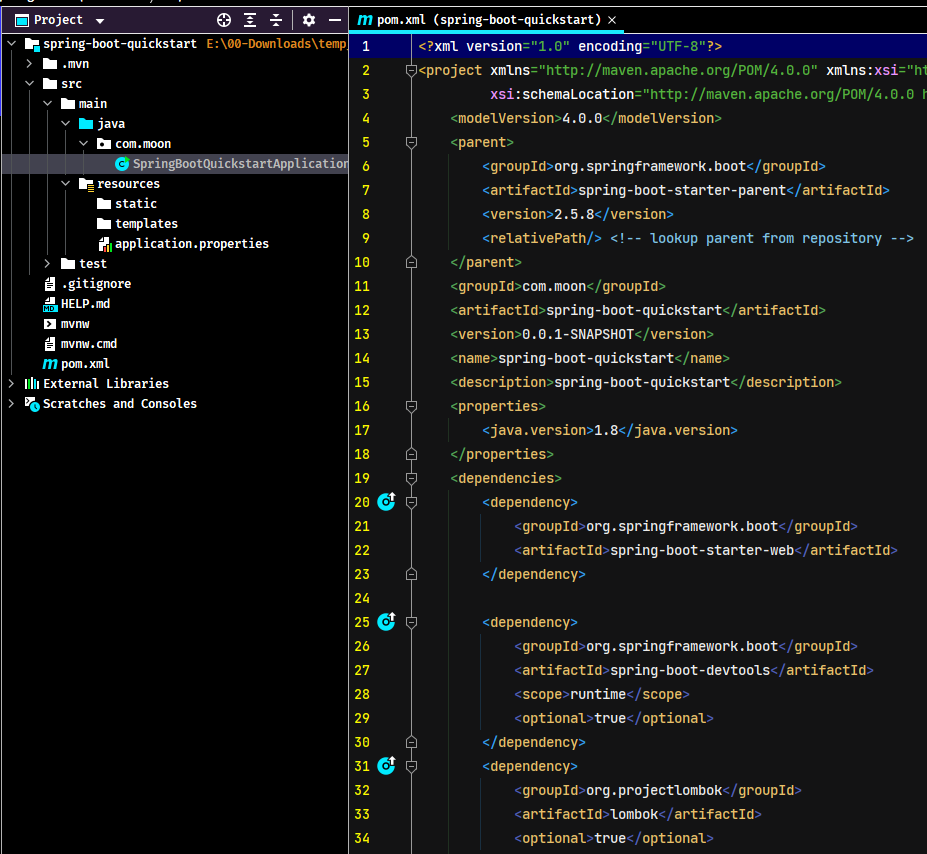
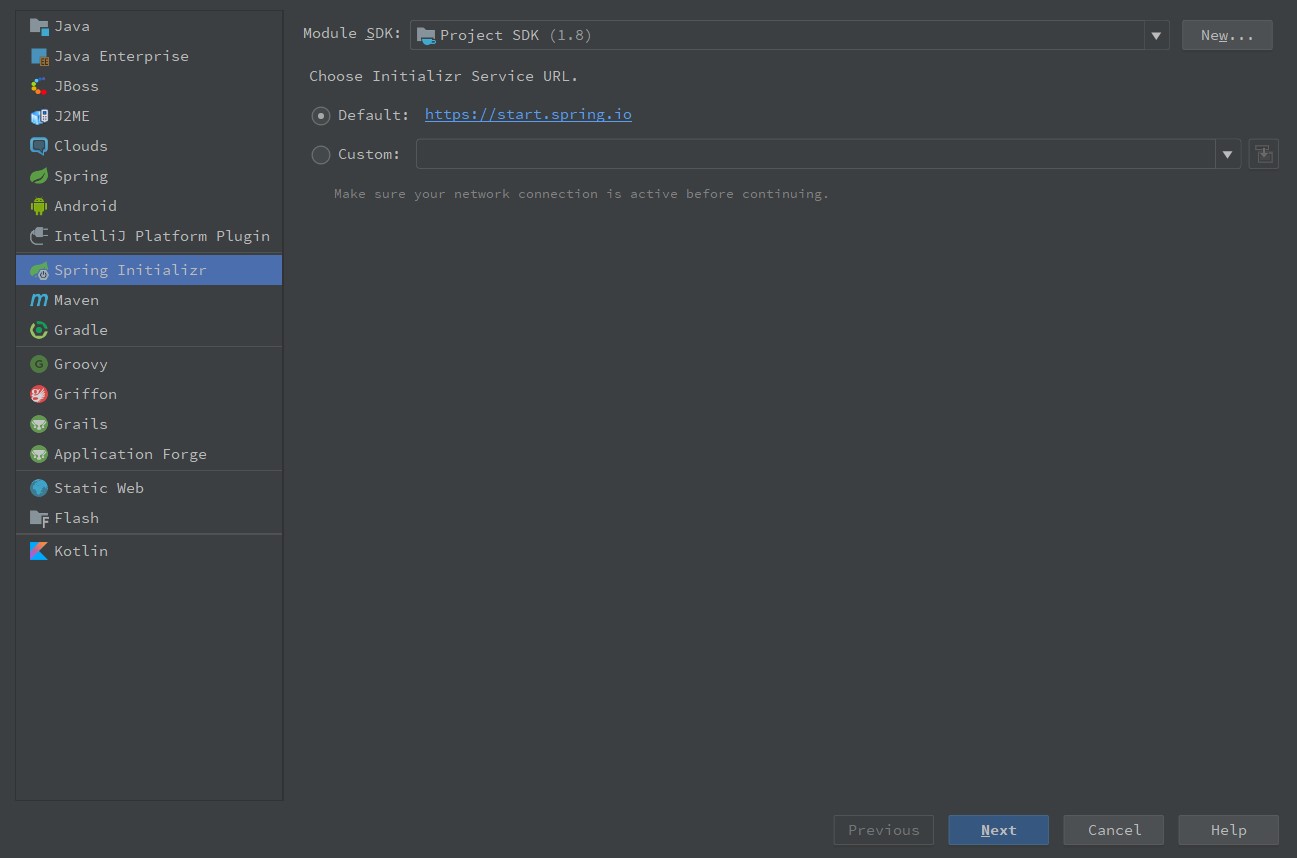
以下是旧版本的 IDEA 的 Spring Initializr 界面
- 新建Spring Intialzr项目
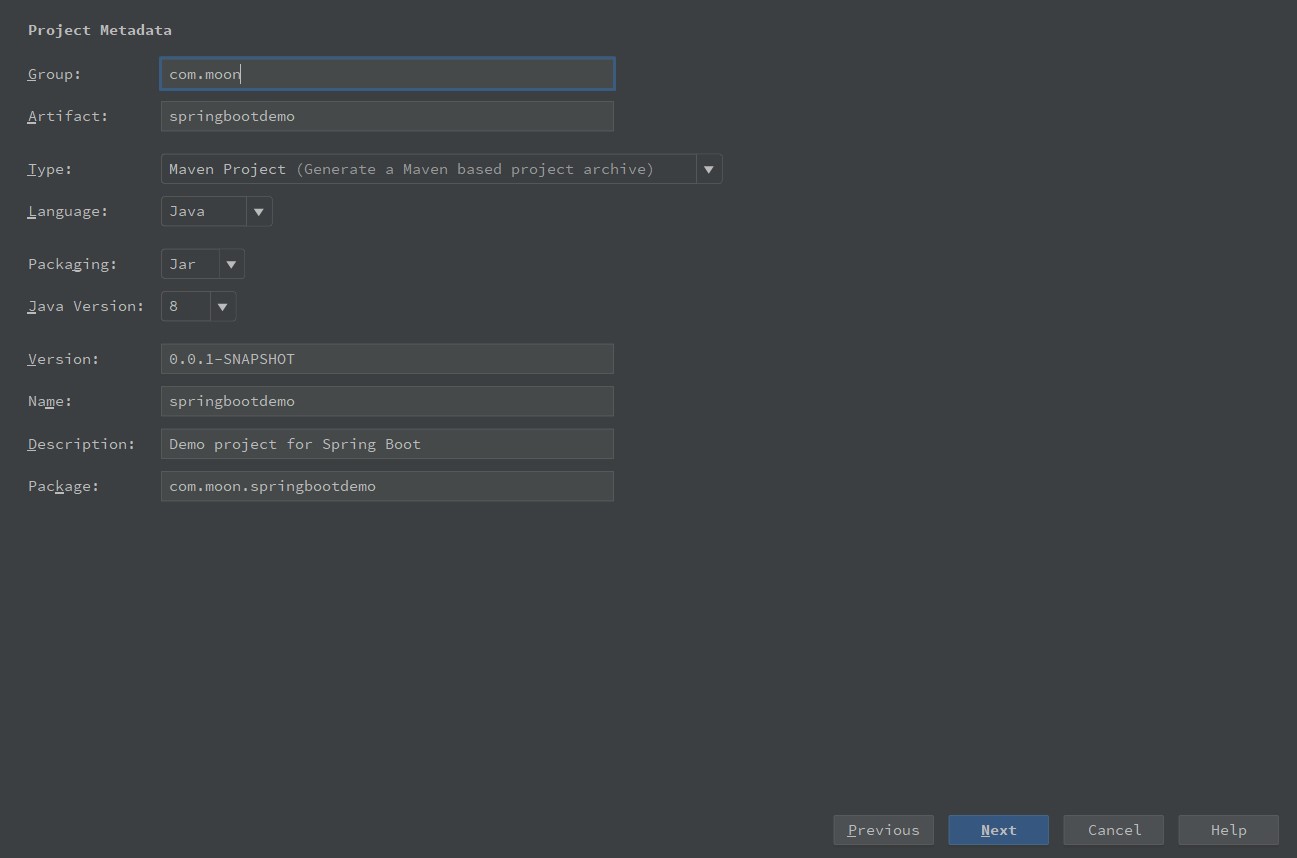
- 填写项目信息,选择Packaging为Jar。
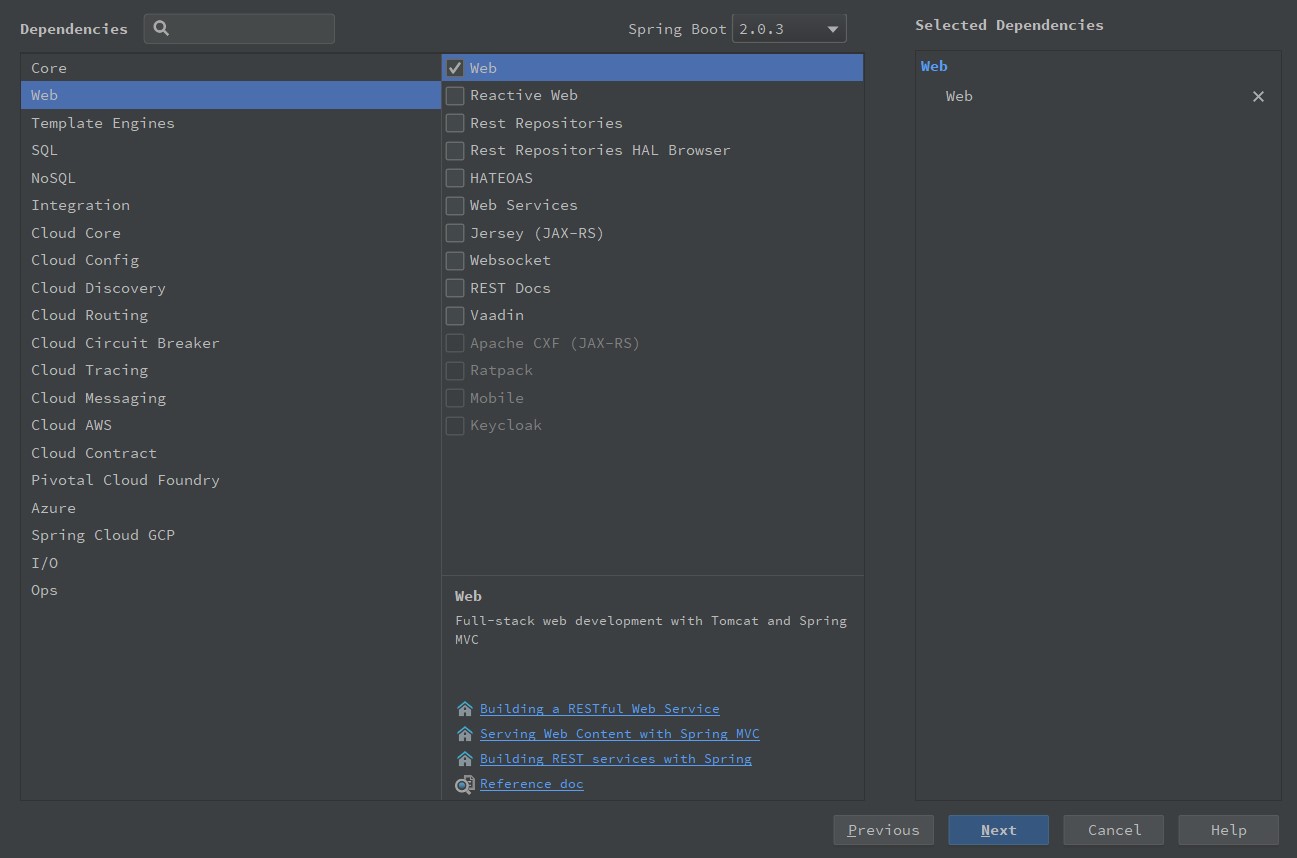
- 选择项目使用的技术
- 填写项目名称
- 将项目设置为Maven项目
- 项目结构与依赖与手动新建maven项目一致
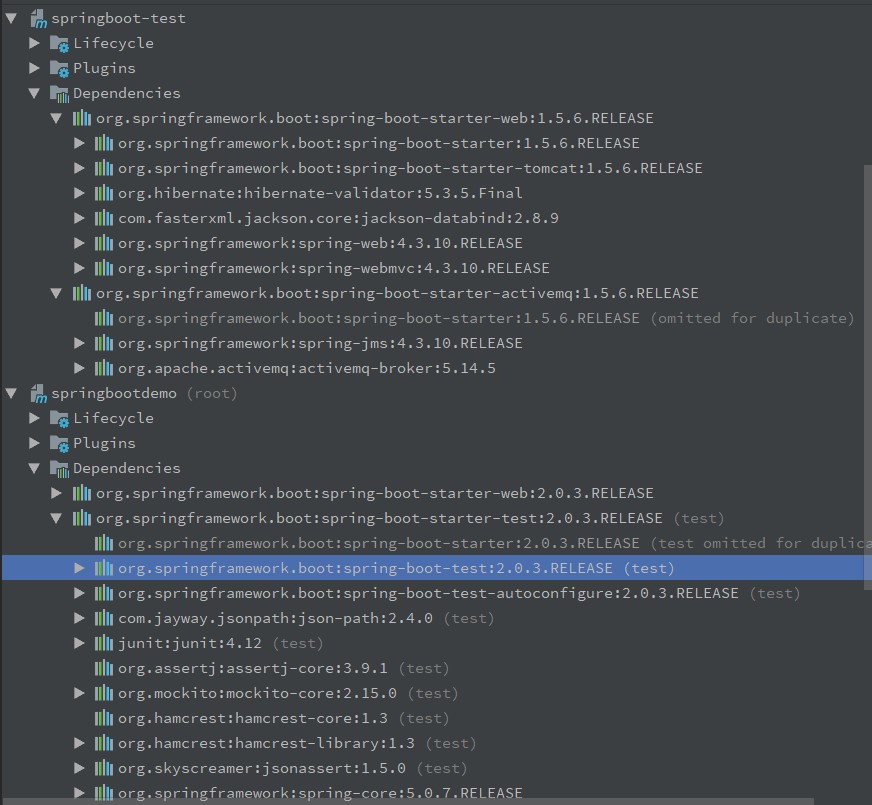
方式2 - 官网在线创建
直接访问官网的 Spring Initializr 也可创建 Spring Boot 项目。网址:https://start.spring.io/
- 跟 idea 中的 Spring Initializr 一样。其实本质 idea 也是联网访问此网站。在创建 Spring Boot 程序的界面上,根据需求,在左侧选择对应信息和输入对应的信息即可
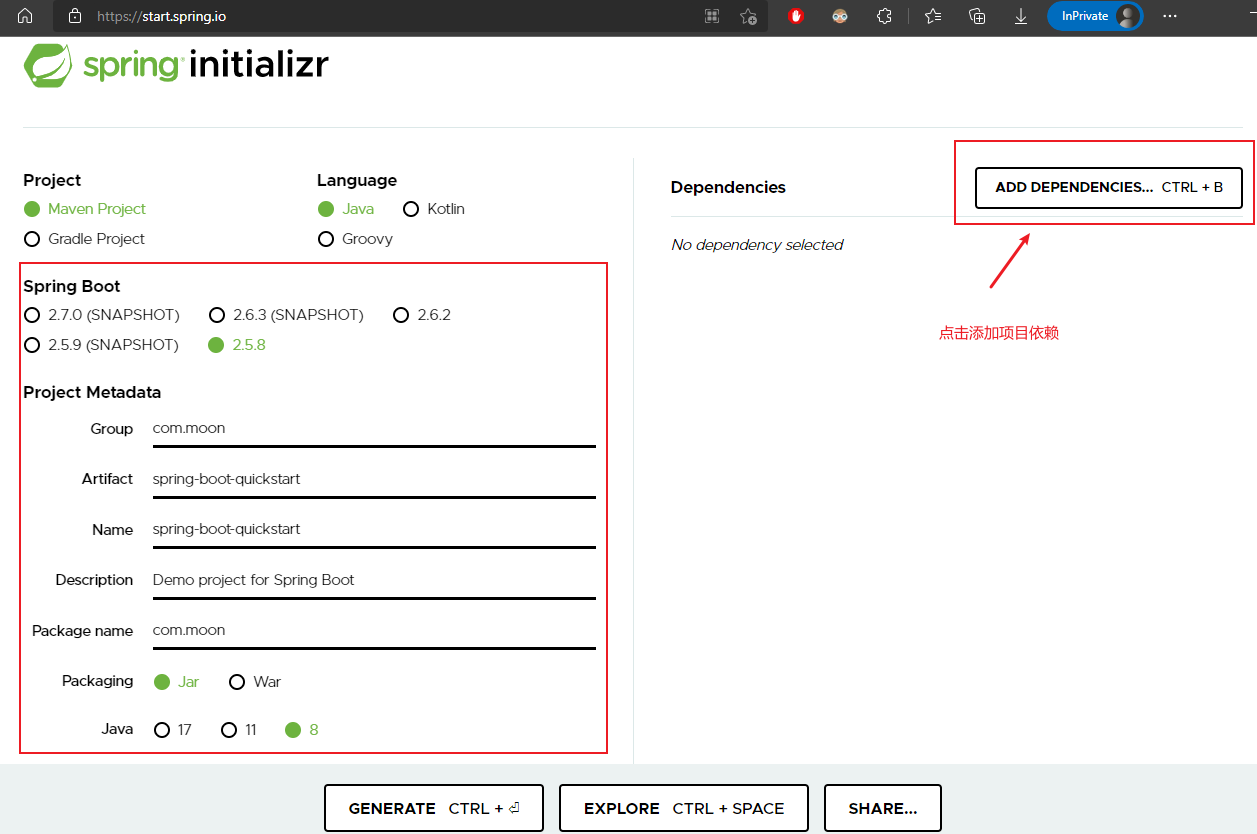
- 右侧的【ADD DEPENDENCIES】用于选择使用何种技术,仅仅是界面不同而已,点击后打开网页版的技术选择界面
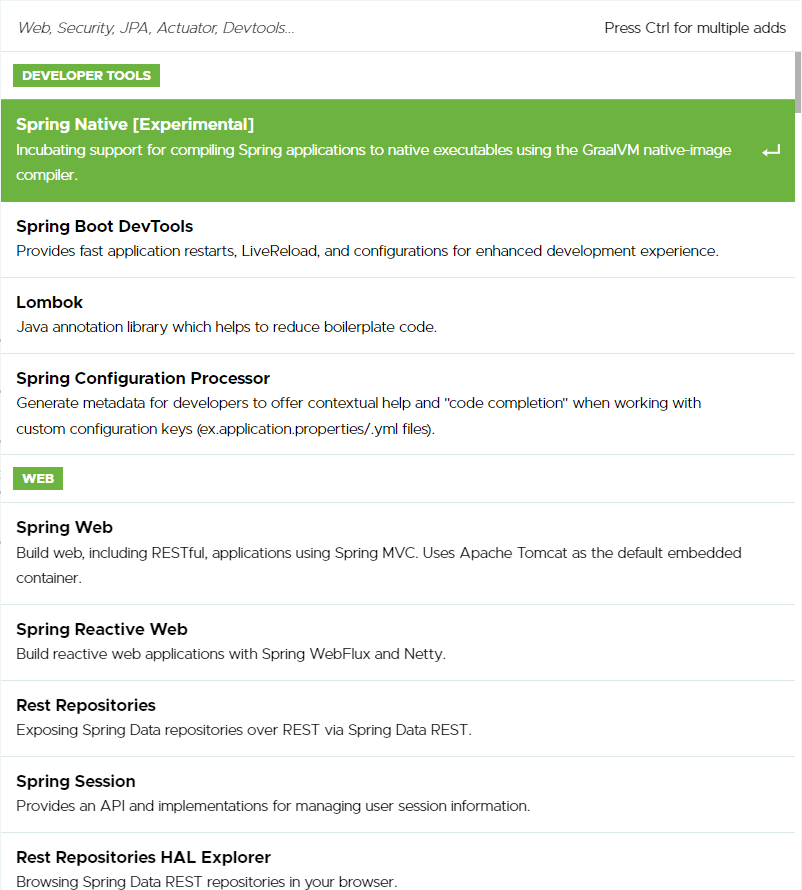
- 所有信息设置完毕后,点击下面左侧按钮,生成一个文件包并下载,该压缩包即是创建的 SpringBoot 工程文件夹
- 解压缩此文件后,得到工程目录,在 idea 中导入即可使用,和之前创建的东西完全一样。
方式3 - 选择阿里云创建
阿里在国内提供了一个创建 SpringBoot 项目的
在创建工程时,点击切换选择 Server URL 服务路径,然后输入阿里云提供给服务地址即可。地址:https://start.aliyun.com
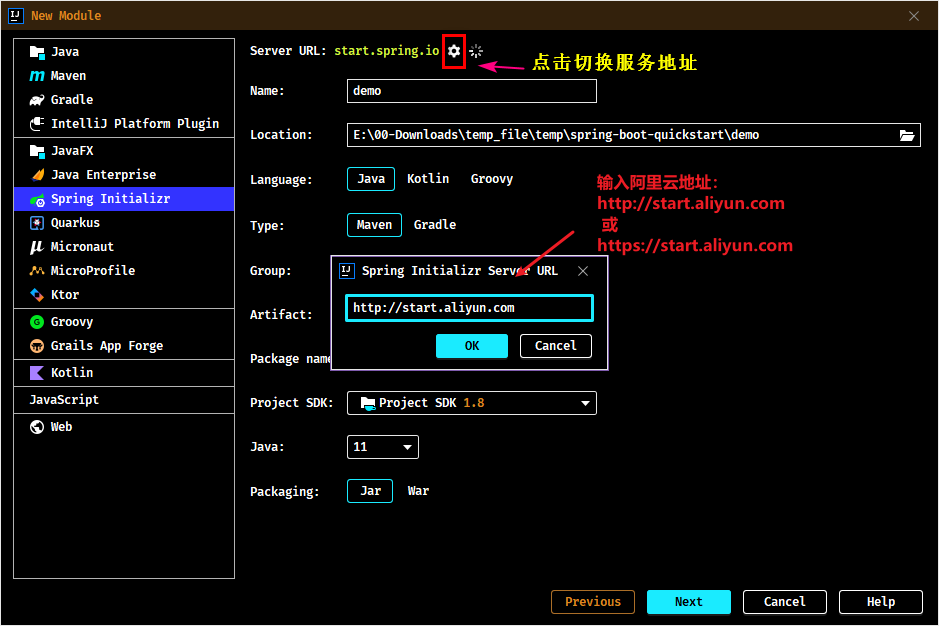
使用阿里提供的项目创建服务,会比官方的服务在依赖坐标中添加了一些阿里相关的技术,值得注意,阿里云地址默认创建的 SpringBoot 工程版本是 2.4.1,所以如果需更换其他的版本,创建项目后手工修改即可,别忘了刷新一下,加载新版本信息。
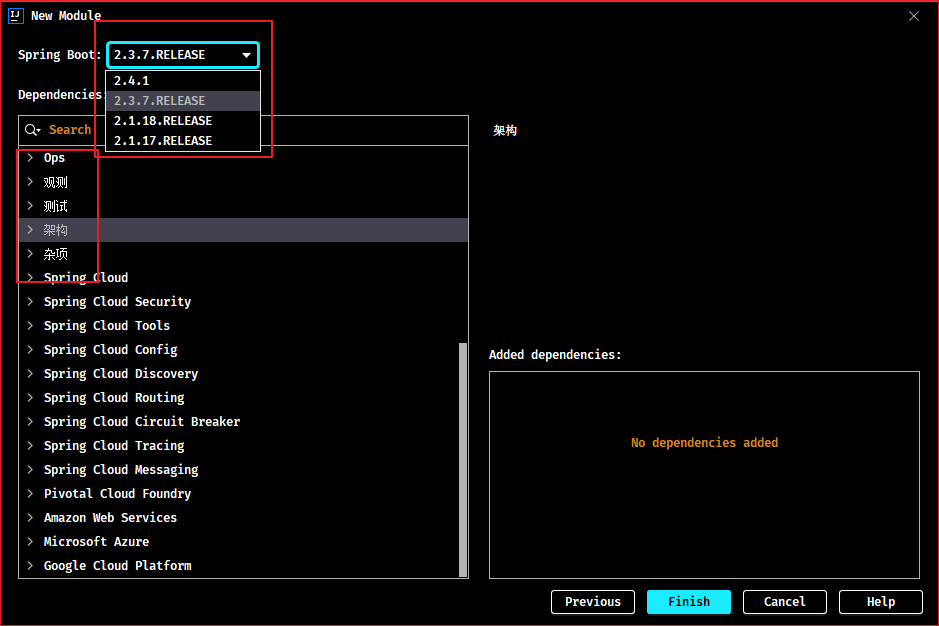
注意:阿里云提供的工程创建地址初始化创建的工程,和 SpringBoot 官网创建出来的工程略有区别。主要是在配置文件的形式上有区别。
方式4 - 基于手动创建 Maven 项目
个人通常习惯通过手动创建 maven 项目的方式,来创建 SpringBoot 项目
- 创建工程时,选择手工创建 Maven 工程
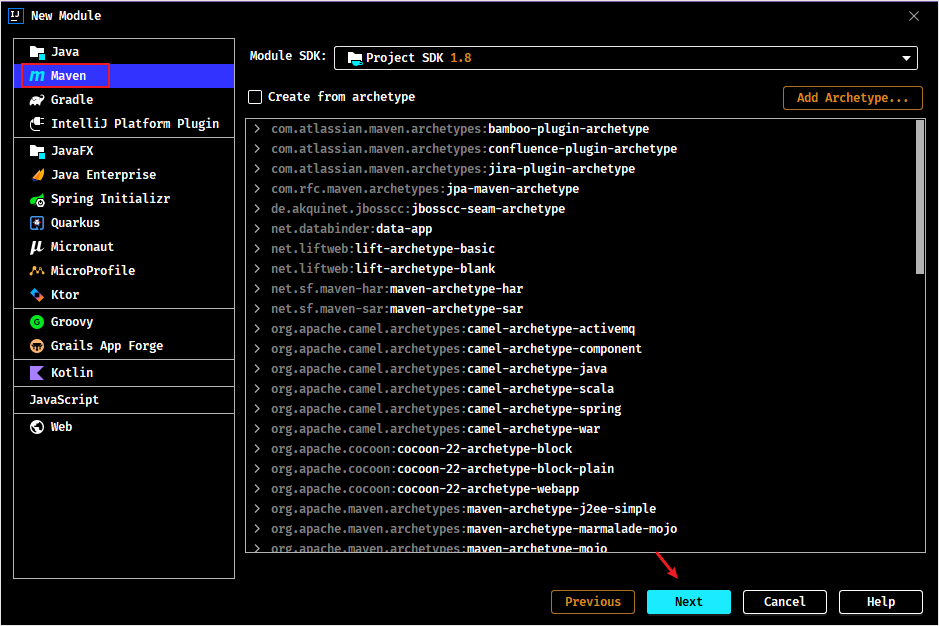
- 填写项目的相关信息
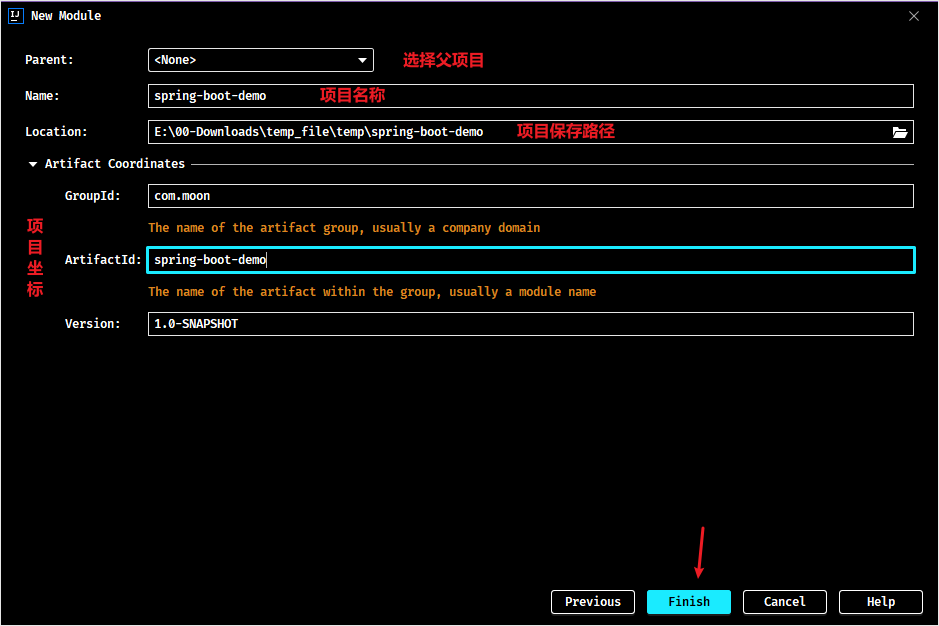
- 点击【Finish】创建项目,这种方式创建的项目十分清爽^o^
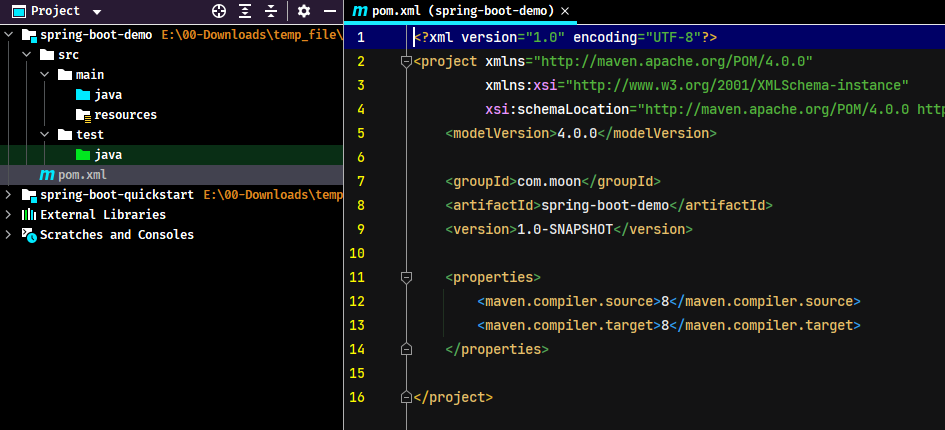
- 最后就是手动创建项目结构与参照标准 SpringBoot 工程的 pom 文件,编写项目的 pom 文件即可。SpringBoot 重点就是在 pom.xml 引入
spring-boot-starter-parent的依赖,详情参考下一章节。
创建 Spring Boot 项目(远程请求方式)
linux 环境
用以下命令即可获取 spring boot 的干净的骨架 pom.xml
bash
curl -G https://start.spring.io/pom.xml -d dependencies=web,mysql,mybatis -o pom.xml若要获取更多命令、参数及示例等信息,发送以下请求:
bash
curl https://start.spring.io/windows 环境
可以使用 postman 工具请求,命令与参数参考 linux 环境
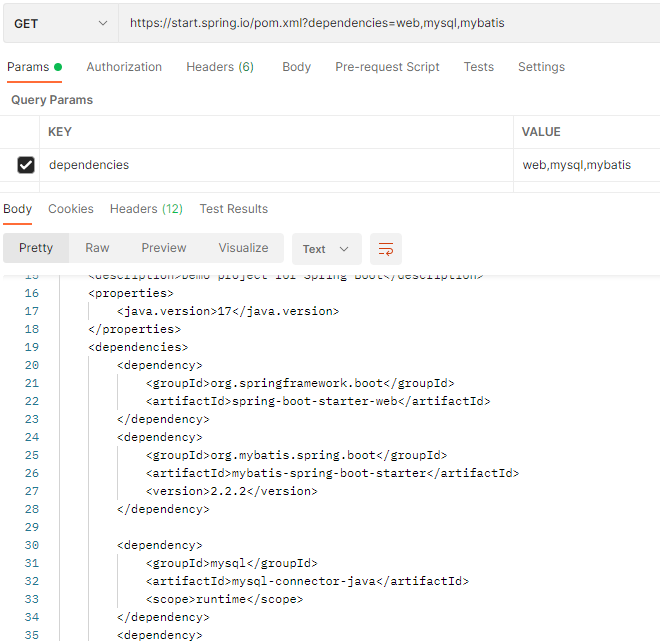
添加 maven 依赖
注:如果使用 Spring Initializr 创建的 SpringBoot 项目,通常都在 pom.xml 文件已经生成好相关依赖
手动添加 SpringBoot 项目的基础依赖。(以 spring web MVC 项目为示例)
xml
 <!-- 依赖 SpringBoot 父级工程 -->
<parent>
    <groupId>org.springframework.boot</groupId>
    <artifactId>spring-boot-starter-parent</artifactId>
    <version>2.5.8</version>
    <relativePath/> <!-- lookup parent from repository -->
</parent>

<modelVersion>4.0.0</modelVersion>
<groupId>com.moon</groupId>
<artifactId>spring-boot-demo</artifactId>
<version>1.0-SNAPSHOT</version>

<!-- 配置项目相关的依赖 -->
<dependencies>
    <!--
        配置WEB启动器,包括 SpringMVC、Restful、jackson
        如果是 spring-boot-starter-parent 所包含的 starter,都不需要再指定版本号
     -->
    <dependency>
        <groupId>org.springframework.boot</groupId>
        <artifactId>spring-boot-starter-web</artifactId>
    </dependency>
</dependencies>
启动类
创建 Application 启动类(类名随意命名):
java
@SpringBootApplication // 代表为SpringBoot应用的运行主类
public class Application {
  public static void main(String[] args) {
    /** 运行SpringBoot应用 */
    SpringApplication.run(Application.class, args);
  }
}
注:
@SpringBootApplication注解代表为 SpringBoot 应用的运行主类
Banner直接启动,控制台会出现Spring启动标识。
java
@SpringBootApplication // 代表为SpringBoot应用的运行主类
public class Application {
  public static void main(String[] args) {
    /** 创建SpringApplication应用对象 */
    SpringApplication springApplication = new SpringApplication(Application.class);
    /** 设置横幅模式(设置关闭) */
    springApplication.setBannerMode(Banner.Mode.OFF);
    /** 运行 */
    springApplication.run(args);
  }
}
可参考附录二的banner设置,可以通过修改配置文件制定自己的标识。
编写入门程序
需求:使用 Spring MVC 实现 Hello World 输出
以住的 Spring MVC 实现
现在开始使用spring MVC 框架,实现json 数据的输出。如果按照以往的做法,需要在 web.xml 中添加一个 DispatcherServlet 的配置,还需要添加一个 spring 的配置文件,配置文件如下配置
spring 加入配置
xml
<!-- controller注解扫描 -->
<context:component-scan base-package="com.moon.springboot.controller" />
<!-- 注解驱动 -->
<mvc:annotation-driven />
web.xml加入配置
xml
<!-- 配置前端控制器 -->
<servlet>
  <servlet-name> springboot01-test</servlet-name>
  <servlet-class>org.springframework.web.servlet.DispatcherServlet</servlet-class>
  <init-param>
    <param-name>contextConfigLocation</param-name>
    <param-value>classpath:spring/*.xml</param-value>
  </init-param>
</servlet>
<servlet-mapping>
  <servlet-name> springboot01-test</servlet-name>
  <url-pattern>/</url-pattern>
</servlet-mapping>
还要编写 Controller。。。
SpringBoot 的实现
不需要配置文件,直接编写Controller类即可
java
@RestController
public class HelloController {
  // http://localhost:8080/hello
  @GetMapping("/hello")
  public String hello(){
    return "Hello World";
  }
}
@RestController注解:其实就是@Controller和@ResponseBody注解加在一起
启动运行项目
- 启动方式一:直接右键启动编写的引导类即可
- 启动方式二:使用 Maven 命令执行
bash
spring-boot:run- 在浏览器地址栏输入 http://localhost:8080/hello 即可看到运行结果
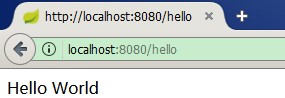
Notes: 更多启动 Spring Boot 项目的方式详见《Spring Boot 项目部署运维篇》笔记
使用 Gradle 构建 Spring Boot 项目
前面章节都是 Maven 的方式构建 Spring Boot 项目。若要了解如何使用 Gradle 来构建 Spring Boot,请参阅 Spring Boot 的 Gradle 插件文档:
Spring Boot 项目基础组成分析
根据快速入门案例,一个最基础的 SpringBoot 项目包括:
- 起步依赖(简化依赖配置)
- 自动配置(简化常用工程相关配置)
- 辅助功能(内置服务器,……)
spring-boot-starter-parent
通常一个项目需要依赖各种不同的技术,而各个技术的依赖版本之间可能会存在冲突。而 SpringBoot 于是所有的技术版本的常见使用方案都给开发者整理了出来,以后开发者使用时直接用它提供的版本方案,不用担心版本冲突问题了,相当于 SpringBoot 做了无数个技术版本搭配的列表,这个技术搭配列表的名字叫做 spring-boot-starter-parent
spring-boot-starter-parent 自身具有很多个版本,每个 parent 版本中包含有几百个其他技术的版本号,不同的 parent 间使用的各种技术的版本号有可能会发生变化。当开发者使用某些技术时,直接使用 SpringBoot 提供的 parent 即可,由 parent 来统一的进行各种技术的版本管理
spring-boot-starter-parent 仅仅只是进行版本的统一管理,需要开发者导入相应的坐标依赖,
Spring Boot 依赖引入实现原理
在项目的 pom.xm 文件中继承父工程 spring-boot-starter-parent,查阅 SpringBoot 的配置源码
xml
<!-- Inherit defaults from Spring Boot -->
<parent>
    <groupId>org.springframework.boot</groupId>
    <artifactId>spring-boot-starter-parent</artifactId>
    <version>2.5.8</version>
</parent>
点击 spring-boot-starter-parent 查看,里面定义一些插件,又继承了 spring-boot-dependencies。
xml
<parent>
    <groupId>org.springframework.boot</groupId>
    <artifactId>spring-boot-dependencies</artifactId>
    <version>2.5.8</version>
</parent>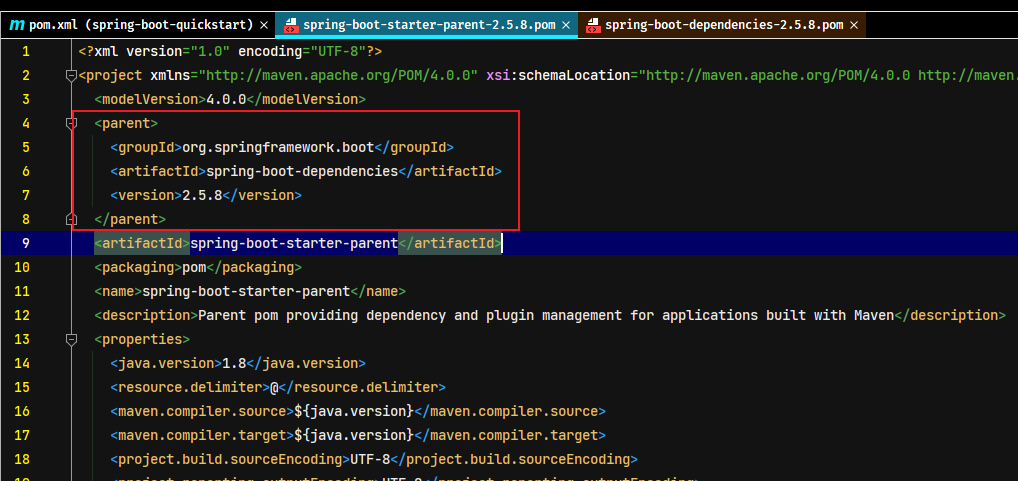
点击查看 spring-boot-dependencies。这个坐标中定义了两组信息,
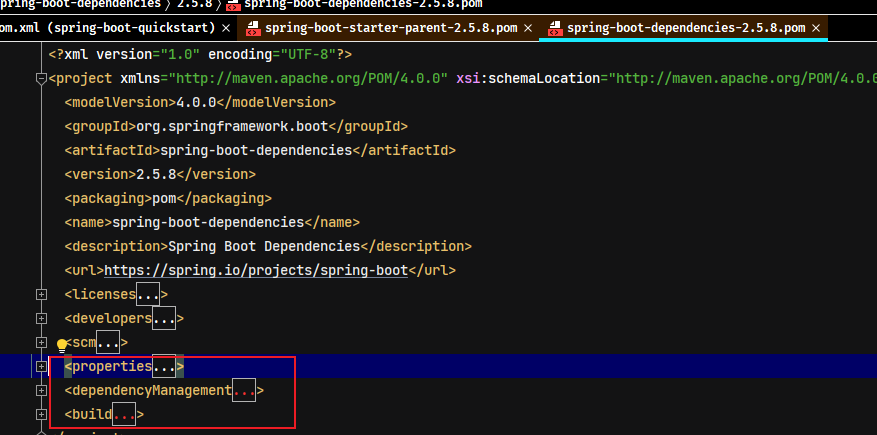
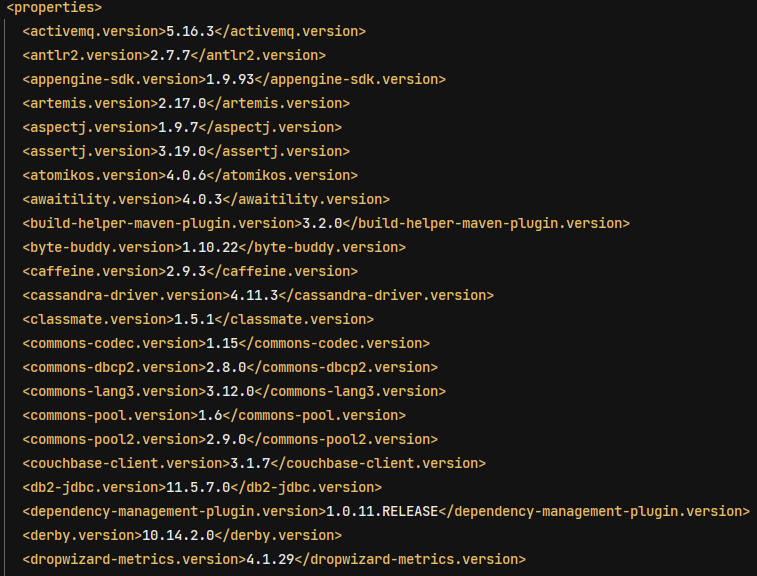
- 第一组是在
<properties>中定义各种技术的依赖版本号属性。下面列出依赖版本属性的部分内容
- 第二组是在
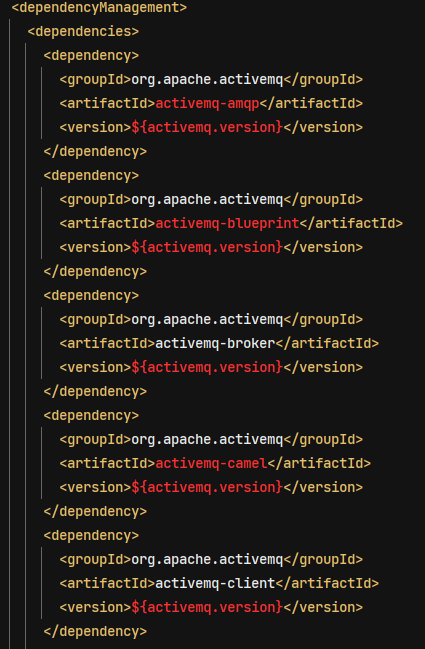
<dependencyManagement>中定义各种技术的依赖坐标信息,依赖坐标定义具体的依赖版本号是引用了第一组信息中定义的依赖版本属性值。值得注意的是,依赖坐标定义是出现在<dependencyManagement>标签中的,其实是对引用坐标的依赖管理,并不是实际使用的坐标。因此项目中继承了这组parent信息后,在不使用对应坐标的情况下,前面的这组定义是不会具体导入某个依赖的
总结:通过 maven 的依赖传递从而实现继承 spring boot 的父依赖后,可以依赖 spring boot 项目相关的 jar
小结
- 开发 SpringBoot 程序需要继承
spring-boot-starter-parent父项目 spring-boot-starter-parent中定义了各种技术的依赖管理- 继承 parent 模块可以避免多个依赖使用相同技术时出现依赖版本冲突
- 继承 parent 的形式也可以采用
<scope>引入依赖的形式实现效果(详见《引入 SpringBoot 父工程依赖的方式》章节)
Spring Boot Application Starters
概述
Spring Boot Application Starters 可以理解为启动器,是一组资源依赖描述,定义了某种技术各种依赖的固定搭配格式的集合,其格式一般为spring-boot-starter-xxx。如:spring-boot-starter-web,里面定义了若干个具体依赖的坐标
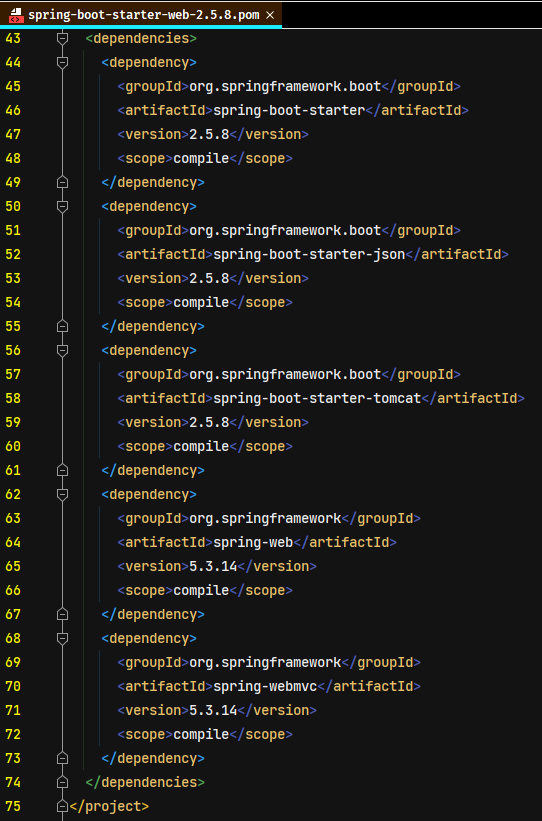
Starters 的作用主要是为不同的 Spring Boot 应用提供一站式服务,具体的依赖细节由 starters 统一处理,使用 starter 可以帮助开发者减少依赖配置,也不必像传统的 Spring 项目需要开发人员处理应用程序中各种 jar 包之间的复杂依赖关系。例如,如果要使用 Spring 的 JPA 功能进行数据库访问,只需要应用程序在项目中加入 spring-boot-starter-jpa 依赖即可。
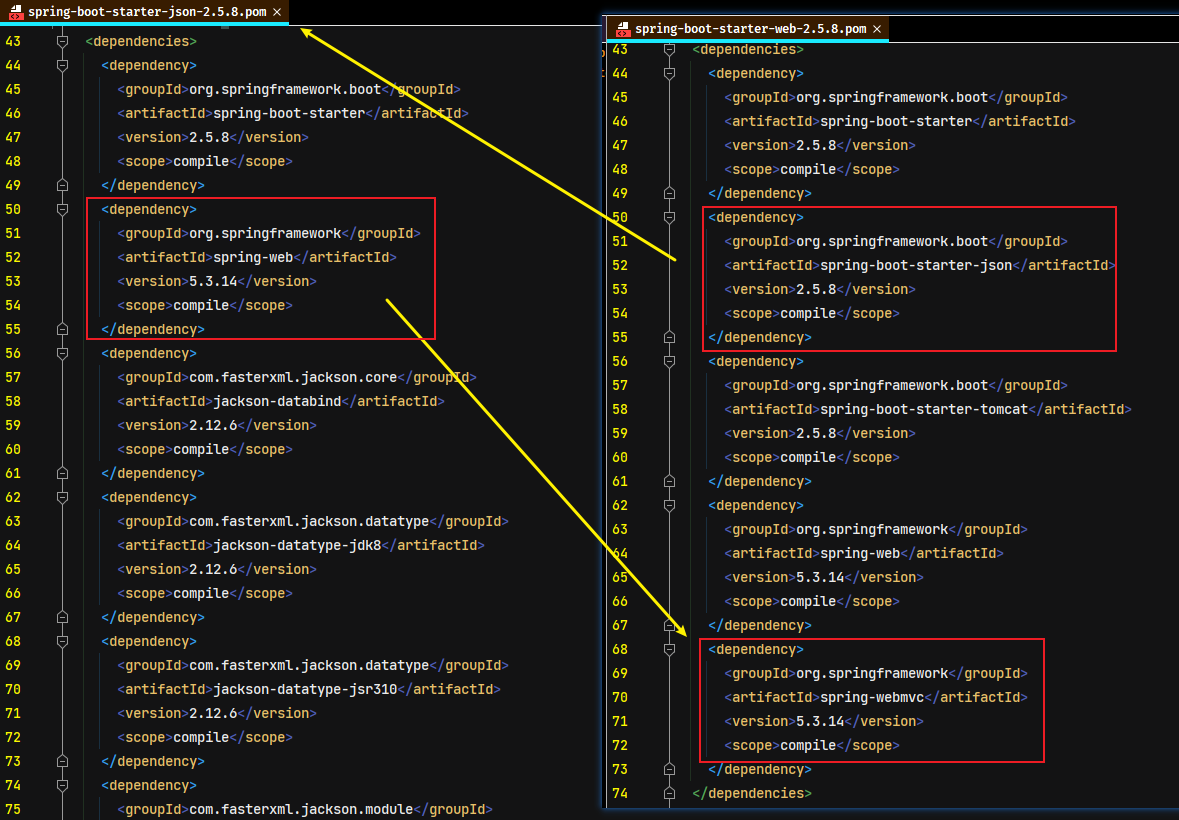
使用官方的 starter 引入技术可能会存在一些问题,就是会出现这种过量导入依赖的可能性,不过可以通过 maven 中的排除依赖剔除掉一部分。对于项目影响不大。
另外,Spring Boot 还提供了开发者自定义 starter 的功能,具体的详见后面的《自定义 starter 功能》章节
实际开发应用方式
实际开发中如果需要用什么技术,先去找有没有这个技术对应的 starter
- 如果有对应的 starter,直接使用 starter,而且无需指定版本,版本由 parent 提供
- 如果没有对应的 starter,手写坐标即可
实际开发中如果发现坐标出现了冲突现象,确认你要使用的可行的版本号,使用手工书写的方式添加对应依赖,覆盖 SpringBoot 提供给开发者的配置管理
- 方式一:直接写坐标
- 方式二:覆盖
<properties>中定义的版本号
常用的 starter 列表
官方文档:https://docs.spring.io/spring-boot/docs/current/reference/htmlsingle/#using.build-systems.starters
Table 1. Spring Boot application starters
| Name | Description |
|---|---|
spring-boot-starter | 核心 Starter,包括自动配置支持,日志记录和 YAML |
spring-boot-starter-amqp | 构建 Spring AMQP 和 Rabbit MQ 的 Starter |
spring-boot-starter-aop | 集成 Spring AOP 和 AspectJ 面向切面编程的 Starter |
spring-boot-starter-artemis | 使用 Apache Artemis 进行 JMS 消息传递的 Starter |
spring-boot-starter-batch | 使用 Spring Batch 的 Starter |
spring-boot-starter-cache | 支持使用 Spring Framework 的缓存的 Starter |
spring-boot-starter-data-cassandra | 使用 Cassandra 分布式数据库和 Spring Data Cassandra 的 Starter |
spring-boot-starter-data-cassandra-reactive | 使用 Cassandra 分布式数据库和响应式 Spring Data Cassandra 的 Starter |
spring-boot-starter-data-couchbase | Starter for using Couchbase document-oriented database and Spring Data Couchbase |
spring-boot-starter-data-couchbase-reactive | Starter for using Couchbase document-oriented database and Spring Data Couchbase Reactive |
spring-boot-starter-data-elasticsearch | 使用 Elasticsearch 搜索和分析引擎和 Spring Data Elasticsearch 的 Starter |
spring-boot-starter-data-jdbc | 使用 Spring Data JDBC 的 Starter |
spring-boot-starter-data-jpa | 使用 Spring Data JPA 与 Hibernate 的 Starter |
spring-boot-starter-data-ldap | Starter for using Spring Data LDAP |
spring-boot-starter-data-mongodb | 使用 MongoDB 文档数据库和 Spring Data MongoDB 的 Starter |
spring-boot-starter-data-mongodb-reactive | 使用 MongoDB 文档数据库和响应式 Spring Data MongoDB 的 Starter |
spring-boot-starter-data-neo4j | 使用 Neo4j 图数据库和 Spring Data Neo4j 的 Starter |
spring-boot-starter-data-r2dbc | Starter for using Spring Data R2DBC |
spring-boot-starter-data-redis | 使用 Redis 键值数据存储的 Spring Data Redis 和 Lettuce 客户端的 Starter |
spring-boot-starter-data-redis-reactive | 使用 Redis 键值数据存储的响应式的 Spring Data Redis 和 Lettuce 客户端的 Starter |
spring-boot-starter-data-rest | 使用 Spring Data REST 通过 REST 暴露 Spring 数据存储库的 Starter |
spring-boot-starter-freemarker | 使用 FreeMarker 视图构建 MVC Web 应用程序的 Starter |
spring-boot-starter-graphql | Starter for building GraphQL applications with Spring GraphQL |
spring-boot-starter-groovy-templates | 使用 Groovy 模板视图构建 MVC Web 应用程序的 Starter |
spring-boot-starter-hateoas | 使用 Spring MVC 和 Spring HATEOAS 构建基于超媒体的 RESTful Web 应用程序的 Starter |
spring-boot-starter-integration | Starter for using Spring Integration |
spring-boot-starter-jdbc | 使用 HikariCP 连接池的 JDBC 的 Starter |
spring-boot-starter-jersey | 使用 JAX-RS 和 Jersey 构建 RESTful Web 应用程序的入门。spring-boot-starter-web 的替代方案 |
spring-boot-starter-jooq | 使用 jOOQ 的 JDBC 技术访问 SQL 数据库。spring-boot-starter-data-jpa或spring-boot-starter-jdbc的替代方案 |
spring-boot-starter-json | 支持 json 读写的 Starter |
spring-boot-starter-mail | 使用 Java Mail 和 Spring Framework 发送电子邮件支持的 Starter |
spring-boot-starter-mustache | 使用 Mustache 视图构建 MVC Web 应用程序的 Starter |
spring-boot-starter-oauth2-client | Starter for using Spring Security’s OAuth2/OpenID Connect client features |
spring-boot-starter-oauth2-resource-server | Starter for using Spring Security’s OAuth2 resource server features |
spring-boot-starter-quartz | 使用 Quartz scheduler 任务调度的 Starter |
spring-boot-starter-rsocket | Starter for building RSocket clients and servers |
spring-boot-starter-security | 使用 Spring Security 安全框架的 Starter |
spring-boot-starter-test | 使用 JUnit Jupiter,Hamcrest 和 Mockito 等测试框架的 Starter |
spring-boot-starter-thymeleaf | 使用 Thymeleaf 视图构建 MVC Web 应用程序的 Starter |
spring-boot-starter-validation | 使用 Hibernate 校验器对 Java Bean 校验的 Starter |
spring-boot-starter-web | 使用 Spring MVC 构建 web 应用程序,包括 RESTful 等支持的 Starter。使用 Tomcat 作为默认嵌入式容器 |
spring-boot-starter-web-services | 使用 Spring Web Services 的 Starter |
spring-boot-starter-webflux | 使用 Spring Framework的响应式 Web 支持构建 WebFlux 应用程序的 Starter |
spring-boot-starter-websocket | 使用 Spring Framework MVC 构建 WebSocket 应用程序的 Starter |
Table 2. Spring Boot production starters
| Name | Description |
|---|---|
spring-boot-starter-actuator | 使用 Spring Boot 提供生产监控的功能 Actuator,以帮助监视和管理应用程序的 Starter |
Table 3. Spring Boot technical starters
| Name | Description |
|---|---|
spring-boot-starter-jetty | 使用 Jetty 作为嵌入式 servlet 容器的 Starter。spring-boot-starter-tomcat 的替代方案 |
spring-boot-starter-log4j2 | 使用 Log4j2 进行日志记录的 Starter。 spring-boot-starter-logging 的替代方案 |
spring-boot-starter-logging | 使用 Logback 进行日志记录的 Starter。默认的日志启动器 |
spring-boot-starter-reactor-netty | Starter for using Reactor Netty as the embedded reactive HTTP server. |
spring-boot-starter-tomcat | 使用 Tomcat 作为嵌入式 servlet 容器的 Starter。是 spring-boot-starter-web 默认使用的 servlet 容器 |
spring-boot-starter-undertow | 使用 Undertow 作为嵌入式 servlet 容器的 Starter。spring-boot-starter-tomcat 的替代方案 |
小结
- 开发 SpringBoot 程序需要导入某些技术时,通常导入对应的 starter 即可
- 每个不同的 starter 根据功能不同,通常包含多个依赖坐标
- 使用 starter 可以实现快速配置的效果,达到简化配置的目的
starter 与 parent 的区别
- starter 是一个坐标中定义了若干个坐标,引入一个坐标相当于引入多个坐标,是用来减少依赖配置的书写量的。
- parent 是定义了几百个依赖版本号,由 SpringBoot 统一管理控制版本,是用来减少各种技术的依赖冲突
starter 命名规范
- SpringBoot 官方定义了很多 starter,命名格式:
spring-boot-starter-技术名称。 - 第三方 starter 则不能以
spring-boot-*命名开头,一般建议命名格式是:第三方技术名称-spring-boot-starter,如mybatis-spring-boot-starter。
引导类
概述
SpringBoot 引导类是指程序运行的入口,即快速开始案例中标识 @SpringBootApplication 注解,并带有 main 方法的那个类,运行这个类就可以启动 SpringBoot 工程,并创建了一个 Spring 容器对象。
java
@SpringBootApplication // 代表为SpringBoot应用的运行主类
public class Application {
  public static void main(String[] args) {
    /** 运行SpringBoot应用 */
    SpringApplication.run(Application.class, args);
  }
}
也可以通过 scanBasePackages 属性来指定扫描的基础包,值得注意的是:如果指定扫描基础包后,原来默认扫描当前引导类所在包及其子包的值就会被覆盖
java
// SpringBoot 应用启动类
@SpringBootApplication(scanBasePackages={"com.moon.springboot"}) // 指定扫描的基础包
注:如果配置 @SpringBootApplication 注解,不指定注解扫描的包,默认约定是扫描当前引导类所在的同级包下的所有包和所有类以及下级包的类(若为 JPA 项目还可以扫描标注 @Entity 的实体类),建议入口类放置的位置在 groupId + arctifactID 组合的包名下;如果需要指定扫描包使用注解 @SpringBootApplication(scanBasePackages = 'xxx.xxx.xx')
上面的@SpringBootApplication相当于下面的3个注解
@Configuration:用于定义一个配置类@EnableAutoConfiguration:Spring Boot会自动根据你jar包的依赖来自动配置项目@ComponentScan:告诉Spring 哪个packages 的用注解标识的类会被spring自动扫描并且装入bean 容器。
小结
- SpringBoot 工程提供引导类用来启动程序
- SpringBoot 工程启动后创建并初始化 Spring 容器
内嵌 web 容器(如 tomcat)
什么是嵌入式服务器
首先回想一下在虚拟机上部署应用程序需要哪些步骤:
- 安装 JDK 环境
- 安装 Web 或者是应用程序的服务器(Tomat/Wbesphere/Weblogic 等等)
- 部署 Web 应用程序的 war 包
而嵌入式服务就是为简化以上步骤,当创建一个可以部署的应用程序的时候,会将服务器(例如,tomcat)嵌入到可部署的服务器中。例如一个 Spring Boot 应用程序,就会生成一个包含 Embedded Tomcat 的应用程序 jar 文件,即可执行单元包含服务器的二进制文件(例如,tomcat.jar)。
内嵌 tomcat 定义与运行原理概述
SpringBoot 内嵌的 web 服务器,需要引入 spring-boot-starter-web 的依赖
xml
<dependency>
    <groupId>org.springframework.boot</groupId>
    <artifactId>spring-boot-starter-web</artifactId>
</dependency>s
starter 其中有引入 spring-boot-starter-tomcat 的依赖,具体如下:
xml
<dependencies>
  <dependency>
    <groupId>jakarta.annotation</groupId>
    <artifactId>jakarta.annotation-api</artifactId>
    <version>1.3.5</version>
    <scope>compile</scope>
  </dependency>
  <dependency>
    <groupId>org.apache.tomcat.embed</groupId>
    <artifactId>tomcat-embed-core</artifactId>
    <version>9.0.56</version>
    <scope>compile</scope>
    <exclusions>
      <exclusion>
        <artifactId>tomcat-annotations-api</artifactId>
        <groupId>org.apache.tomcat</groupId>
      </exclusion>
    </exclusions>
  </dependency>
  <dependency>
    <groupId>org.apache.tomcat.embed</groupId>
    <artifactId>tomcat-embed-el</artifactId>
    <version>9.0.56</version>
    <scope>compile</scope>
  </dependency>
  <dependency>
    <groupId>org.apache.tomcat.embed</groupId>
    <artifactId>tomcat-embed-websocket</artifactId>
    <version>9.0.56</version>
    <scope>compile</scope>
    <exclusions>
      <exclusion>
        <artifactId>tomcat-annotations-api</artifactId>
        <groupId>org.apache.tomcat</groupId>
      </exclusion>
    </exclusions>
  </dependency>
</dependencies>其中有一个核心的坐标,tomcat-embed-core 叫做 Tomcat 内嵌核心。就是此依赖把 Tomcat 功能引入到了程序中。而 Tomcat 服务器运行其实是以对象的形式保存到 Spring 容器,并在 SpringBoot 程序启动时运行起来。
更换内嵌默认内嵌 web 服务器
SpringBoot 提供了 3 款内置的服务器
- tomcat(默认):apache 出品,粉丝多,应用面广,负载了若干较重的组件
- jetty:更轻量级,负载性能远不及 tomcat
- undertow:负载性能勉强跑赢 tomcat
更新内嵌服务,只需要加入相应的坐标,把默认的 tomcat 排除掉即可,因为 tomcat 是默认加载的。
xml
<dependencies>
    <dependency>
        <groupId>org.springframework.boot</groupId>
        <artifactId>spring-boot-starter-web</artifactId>
        <exclusions>
            <exclusion>
                <groupId>org.springframework.boot</groupId>
                <artifactId>spring-boot-starter-tomcat</artifactId>
            </exclusion>
        </exclusions>
    </dependency>
    <dependency>
        <groupId>org.springframework.boot</groupId>
        <artifactId>spring-boot-starter-jetty</artifactId>
    </dependency>
</dependencies>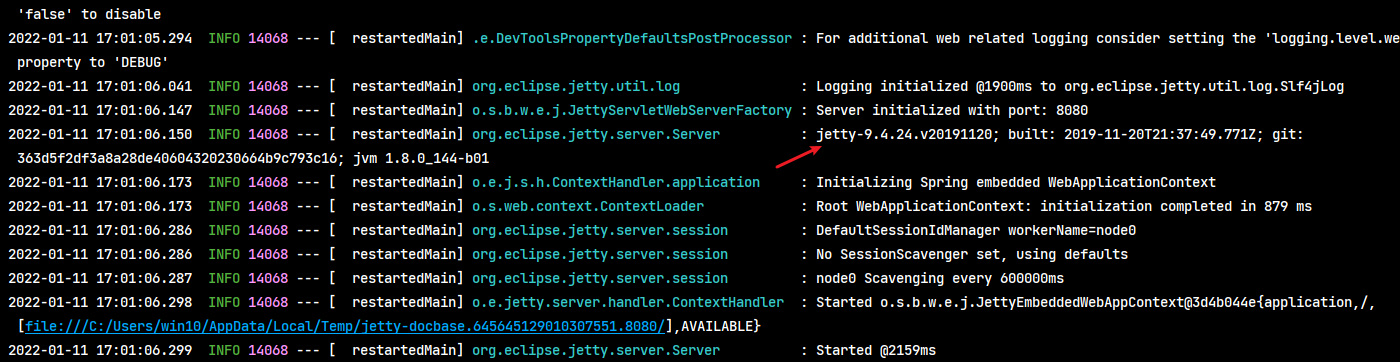
小结
- 内嵌 Tomcat 服务器是 SpringBoot 辅助功能之一
- 内嵌 Tomcat 工作原理是将 Tomcat 服务器作为对象运行,并将该对象交给 Spring 容器管理
- Spring Boot 提供可以配置替换默认 tomcat 内嵌服务器的功能
引入 SpringBoot 父工程依赖的方式
方式1 - 使用 parent 标签
在pom.xml中添加依赖,效果如下:
xml
<?xml version="1.0" encoding="UTF-8"?>
<project xmlns="http://maven.apache.org/POM/4.0.0"
         xmlns:xsi="http://www.w3.org/2001/XMLSchema-instance"
         xsi:schemaLocation="http://maven.apache.org/POM/4.0.0 http://maven.apache.org/xsd/maven-4.0.0.xsd">

    <!-- 依赖 SpringBoot 父级工程 -->
    <parent>
        <groupId>org.springframework.boot</groupId>
        <artifactId>spring-boot-starter-parent</artifactId>
        <version>2.5.8</version>
        <relativePath/> <!-- lookup parent from repository -->
    </parent>

    <modelVersion>4.0.0</modelVersion>
    <groupId>com.moon</groupId>
    <artifactId>spring-boot-demo</artifactId>
    <version>1.0-SNAPSHOT</version>
    <name>${project.artifactId}</name>
    <description>SpringBoot 快速开始</description>

    <!-- 配置项目相关的依赖 -->
    <dependencies>
        <!--
            配置WEB启动器,包括 SpringMVC、Restful、jackson
            如果是 spring-boot-starter-parent 所包含的 starter,都不需要再指定版本号
         -->
        <dependency>
            <groupId>org.springframework.boot</groupId>
            <artifactId>spring-boot-starter-web</artifactId>
        </dependency>
    </dependencies>
</project>
工程自动添加了好多jar包,而这些jar包正是开发时需要导入的jar包。
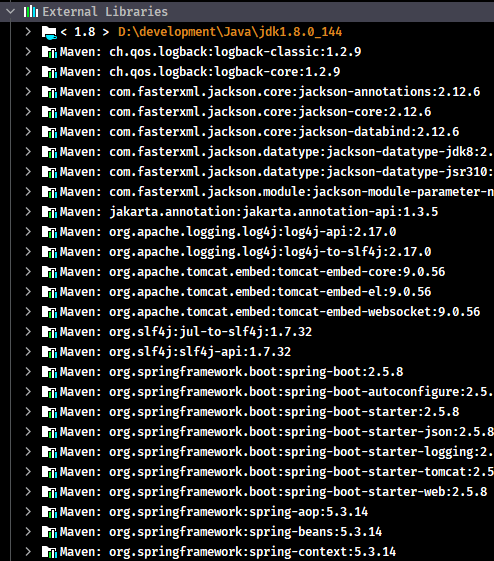
这些jar包被刚才加入的 spring-boot-starter-web 所引用了,所以添加 spring-boot-starter-web 后会自动把依赖传递过来。
方式2 - 定义范围 scope 为 import
在 SpringBoot 项目的 POM 文件中,可以通过在 POM 文件中继承 Spring-boot-starter-parent 来引用 Srping boot 默认依赖的 jar 包。但使用 parent 这种继承的方式,只能继承一个 spring-boot-start-parent。实际开发中,很可能需要继承自己公司的标准 parent 配置,此时可以使用 <scope>import</scope> 来实现多继承。如下例:
xml
<dependencyManagement>
    <dependencies>
        <!-- Override Spring Data release train provided by Spring Boot -->
        <dependency>
            <groupId>org.springframework.data</groupId>
            <artifactId>spring-data-releasetrain</artifactId>
            <version>Fowler-SR2</version>
            <type>pom</type>
            <scope>import</scope>
        </dependency>
        <dependency>
            <groupId>org.springframework.boot</groupId>
            <artifactId>spring-boot-dependencies</artifactId>
            <version>2.2.4.RELEASE</version>
            <type>pom</type>
            <scope>import</scope>
        </dependency>
    </dependencies>
</dependencyManagement>
变更自动配置
Spring Boot 支持对自动配置的流程做一些高级定制,比如禁用一些自动配置的加载。具体操作有如下几种方式:
方式1:配置文件排除
通过修改 Spring Boot 配置文件的 spring.autoconfigure.exclude 选项,排除指定的自动配置处理类
yml
spring:
  autoconfigure:
    exclude:
      - org.springframework.boot.autoconfigure.task.TaskExecutionAutoConfiguration
方式2:注解属性排除
通过 @EnableAutoConfiguration 排除指定的自动配置处理类
exclude属性:指定排除的多个配置处理类字节码(数组)excludeName属性:指定排除的多个配置处理类全限定名称(数组)
java
@EnableAutoConfiguration(
        exclude = {MongoDataAutoConfiguration.class, DataSourceAutoConfiguration.class},
        excludeName = {"org.springframework.boot.autoconfigure.amqp.RabbitAutoConfiguration", "org.springframework.boot.autoconfigure.jms.JmsAutoConfiguration"}
)
// 或者
@SpringBootApplication(
        exclude = {MongoDataAutoConfiguration.class, DataSourceAutoConfiguration.class},
        excludeName = {"org.springframework.boot.autoconfigure.amqp.RabbitAutoConfiguration", "org.springframework.boot.autoconfigure.jms.JmsAutoConfiguration"}
)
方式3:排除坐标(应用面较窄)
此时可以通过检测条件的控制来管理自动配置是否启动。例如 web 程序启动时会自动启动 tomcat 服务器,可以通过排除坐标的方式,让加载 tomcat 服务器的条件失效。
xml
<dependencies>
    <dependency>
        <groupId>org.springframework.boot</groupId>
        <artifactId>spring-boot-starter-web</artifactId>
        <!-- web起步依赖环境中,排除Tomcat起步依赖,匹配自动配置条件 -->
        <exclusions>
            <exclusion>
                <groupId>org.springframework.boot</groupId>
                <artifactId>spring-boot-starter-tomcat</artifactId>
            </exclusion>
        </exclusions>
    </dependency>
    <!-- 添加Jetty起步依赖,匹配自动配置条件 -->
    <dependency>
        <groupId>org.springframework.boot</groupId>
        <artifactId>spring-boot-starter-jetty</artifactId>
    </dependency>
</dependencies>
不过需要值得注意的是,如把 tomcat 排除掉,记得要增加一个新的可以运行的服务器依赖。
Spring Boot 配置文件
默认情况下,Spring Boot 会加载 resources 目录下的名称为 application.properties 或 application.yml 来获得配置的参数。
Spring Boot 配置信息的查询
SpringBoot 的配置文件,主要的目的就是对配置信息进行修改的,而全部可配置项可以查阅 SpringBoot 的官方文档(当前最新版本)。
Spring Boot 支持的配置文件类型
properties 与 yml 类型配置
SpringBoot 支持三种类型格式的配置文件,分别如下:
- application.properties(键值对风格配置文件)
- application.yml(层级树键值对风格配置文件)
- application.yaml(与yml完全一样)
后缀为 .yml 是一种由 SpringBoot 框架自制的配置文件格式。yml后缀的配置文件的功能和properties后缀的配置文件的功能是一致的。
不同类型的配置文件优先级
如果 SpringBoot 工程中,3种类型的配置文件同时存在,其加载的优先级顺序如下:
application.properties > application.yml > application.yaml还有,不同配置文件中相同配置按照加载优先级相互覆盖,不同配置文件中不同配置将全部保留。如下例:
- application.properties(properties格式)
properties
server.port=80
spring.main.banner-mode=off- application.yml(yml格式)
YML
server:
  port: 81
logging:
  level:
root: debug- application.yaml(yaml格式)
yaml
server:
  port: 82
不管什么类型的配置文件,SpringBoot 最终会将其渲染成 .properties 文件,上面示例最终的配置项为:
properties
server.port=80
spring.main.banner-mode=off
logging.level.root=debug
番外 - xml 类型配置
Spring Boot 推荐无 xml 配置,但实际项目中,可能有一些特殊要求必须使用 xml 配置,在引导类中通过 Spring 提供的 @ImportResource 来加载 xml 配置
java
@SpringBootApplication(scanBasePackages = {"com.moon.controller"})
@ImportResource({"classpath:xxx1.xml", "classpath:xxx2.xml"})
public class SpringbootdemoApplication {
  public static void main(String[] args) {
    SpringApplication.run(SpringbootdemoApplication.class, args);
  }
}
YAML 文件
yml 配置文件简介
YML 文件格式是YAML (YAML Aint Markup Language)层级树键值对格式文件。YAML是一种直观的能够被电脑识别的的数据序列化格式,并且容易被人类阅读,容易和脚本语言交互的,可以被支持YAML库的不同的编程语言程序导入,比如: C/C++, Ruby, Python, Java, Perl, C#, PHP等。YML文件是以数据为核心的、重数据轻的格式,比传统的xml方式更加简洁。
YML 文件的扩展名可以使用 .yml 或者 .yaml
YAML 基本语法
- 大小写敏感
- 数据值前边必须有空格,作为分隔符。(属性名与属性值之间使用
冒号+空格作为分隔) - 使用缩进表示层级关系,同层级左侧对齐。缩进时不允许使用 Tab 键,只允许使用空格(各个系统 Tab 对应的 空格数目可能不同,导致层次混乱)。
- 缩进的空格数目不重要,只要相同层级的元素左侧对齐即可
#表示注释,从这个字符一直到行尾,都会被解析器忽略。
常见的数据书写格式
yml
boolean: TRUE  						 # TRUE,true,True,FALSE,false,False均可
float: 3.14    						 # 6.8523015e+5  #支持科学计数法
int: 123       						 # 0b1010_0111_0100_1010_1110    #支持二进制、八进制、十六进制
null: ~        						 # 使用~表示null
string: HelloWorld      			 # 字符串可以直接书写
string2: "Hello World"  			 # 可以使用双引号包裹特殊字符
date: 2018-02-17        			 # 日期必须使用yyyy-MM-dd格式
datetime: 2018-02-17T15:02:31+08:00  # 时间和日期之间使用T连接,最后使用+代表时区
数据类型转换
某项目数据库配置如下:
yml
spring:
  datasource:
    driver-class-name: com.mysql.cj.jdbc.Driver
    url: jdbc:mysql://localhost:3306/ssm_db?serverTimezone=UTC
    username: root
    password: 0127
当程序运行时出现问题,一直显示报错信息是密码错误,但使用客户端连接数据库正常操作
bash
java.sql.SQLException: Access denied for user 'root'@'localhost' (using password: YES)在 yml 配置中是支持二进制,八进制,十六进制。这个问题就出在这里了,因为 0127 在开发者眼中是一个字符串 "0127",但是在 spring boot 眼中却认作一个数字,而且是一个八进制的数字。当后台使用 String 类型接收数据时,如果配置文件中配置了一个整数值,它是先安装整数进行处理,读取后再转换成字符串。刚好 0127 又是八进制的格式,所以最终以十进制数字 87 的结果存在了。
总结两个注意点:第一,字符串标准书写加上引号包裹,养成习惯;第二,遇到 0 开头的数据多注意
YAML 数据语法格式
配置普通数据
语法:key: value。注意:value之前有一个空格
yml
name: haohao还有一种比较特殊的常量,使用单引号与双引号包裹
yml
msg1: 'hello \n world'  # 单引号忽略转义字符
msg2: "hello \n world"  # 双引号识别转义字符
配置对象数据
- 语法:
yml
# 方式一:
key:
    key1: value1
    key2: value2
# 方式二:
key: {key1: value1,key2: value2}- 示例代码:
yml
# 方式一:
person:
    name: haohao
    age: 31
    addr: beijing
# 方式二:
person: {name: haohao,age: 31,addr: beijing}- 注意:key1前面的空格个数不限定,在yml语法中,相同缩进代表同一个级别
配置Map数据
同上面的对象写法
配置数组(List、Set)数据
- 语法:
yml
# 方式一:
key:
    - value1
    - value2
# 方式二:
key: [value1,value2]- 示例代码:
yml
# 基础类型数组方式一:
city:
    - beijing
    - tianjin
    - shanghai
    - chongqing
# 基础类型数组方式二:
city: [beijing,tianjin,shanghai,chongqing]

# 对象类型数组方式一:
student:
    - name: zhangsan
      age: 18
      score: 100
    - name: lisi
      age: 28
      score: 88
    - name: wangwu
      age: 38
      score: 90
# 对象类型数组方式二:
student:
    -
      name: zhangsan
      age: 18
      score: 100
    -
      name: lisi
      age: 28
      score: 88
    -
      name: wangwu
      age: 38
      score: 90
# 对象类型数组方式三:
student: [{name: zhangsan, age: 18, score: 100}, {name: lisi, age: 28, score: 88}]- 注意:value1与之间的“
-”之间存在一个空格
参数引用
通过${}可以引用yml内容定义的其他参数的值
yml
name: MooN
person:
    name: ${name} # 引用上边定义的name值
YAML 文件缺点
值得注意的是:YAML 文件中的属性不能通过 @PropertySource 注解来导入。所以,如果项目中使用了一些自定义属性文件,建议不要用 YAML,改用 properties 类型文件。
如果需要自定义属性存放在yaml文件中,可以使用 spring.profiles.active 属性指定多个后缀名的配置文件的方式来引入
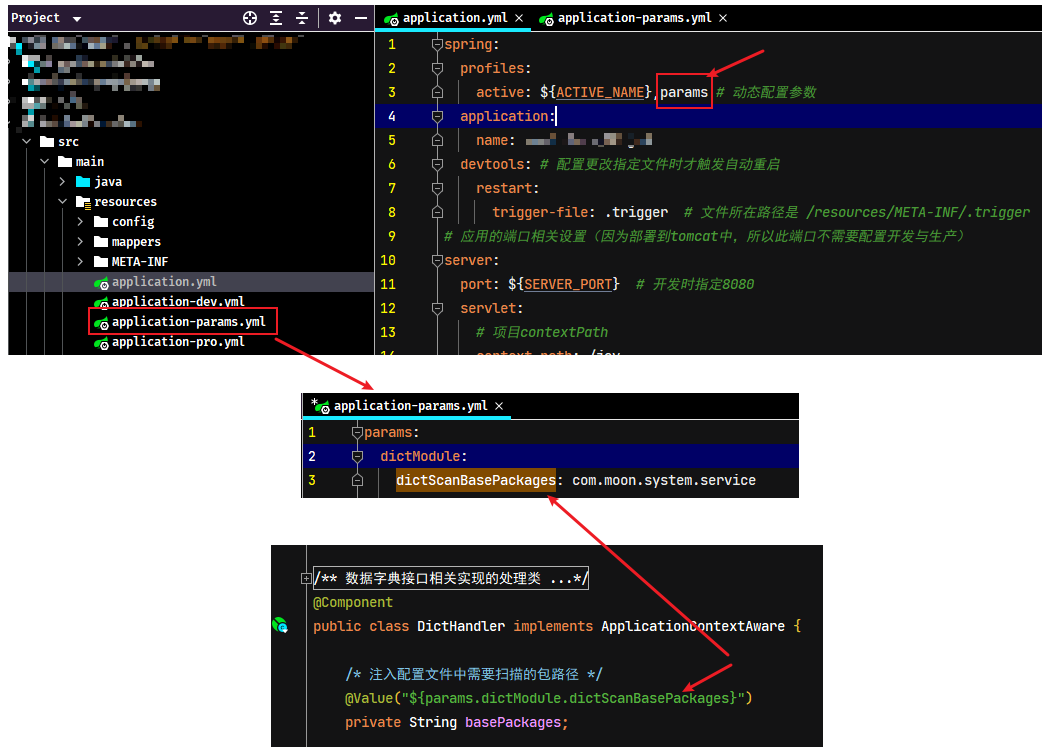
读取项目配置文件
注:以下读取的方法 properties 与 yml 文件通用。
方式一:Environment 对象
SpringBoot 提供了org.springframework.core.env.Environment 类,此类能够将所有配置数据都封装到这一个实例中,通过该对象的 getProperty() 方法,可以获取到任意指定的配置项的值。
读取 properties 类型
- 在工程的 src/main/resources 下修改核心配置文件 application.properties,添加内容如下
properties
name=月之哀伤
url=http://www.moon.com- 在Controller中添加测试:
java
import org.springframework.beans.factory.annotation.Autowired;
import org.springframework.core.env.Environment;
import org.springframework.web.bind.annotation.GetMapping;
import org.springframework.web.bind.annotation.RestController;

@RestController
public class HelloController {
  @Autowired
  private Environment environment;

  @GetMapping("/hello")
  public String hello(){
    System.out.println(environment.getProperty("name"));
    System.out.println(environment.getProperty("url"));
    return "Hello World";
  }
}
读取 yml 类型示例
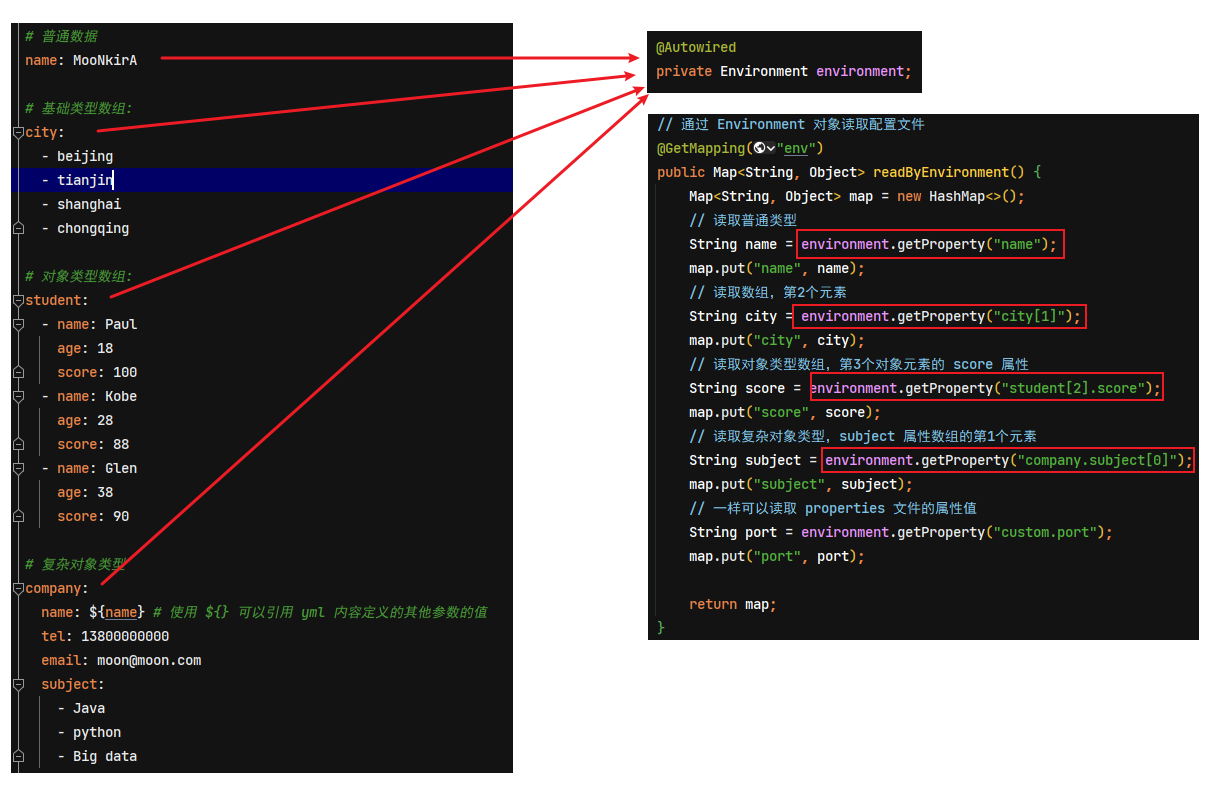
方式二:@Value 注解
还是上面的例子,可以使用 Spring 的 @value 注解,标识在指定的 Spring 管控的 bean 的属性名上,即可获取配置文件相应的内容。
java
import org.springframework.beans.factory.annotation.Autowired;
import org.springframework.beans.factory.annotation.Value;
import org.springframework.core.env.Environment;
import org.springframework.web.bind.annotation.GetMapping;
import org.springframework.web.bind.annotation.RestController;

@RestController
public class HelloController {
    @Autowired
    private Environment environment;
    @Value("${name}")
    private String name;
    @Value("${url}")
    private String url;

    @GetMapping("/hello")
    public String hello(){
        System.out.println(environment.getProperty("name"));
        System.out.println(environment.getProperty("url"));
        System.out.println(name);
        System.out.println(url);
        return "Hello World";
    }
}
注:使用
@Value注解,只能映射配置文件的字符串类型的值,不能直接映射对象与数组,只能依次逐个层级点
读取 yml 类型示例
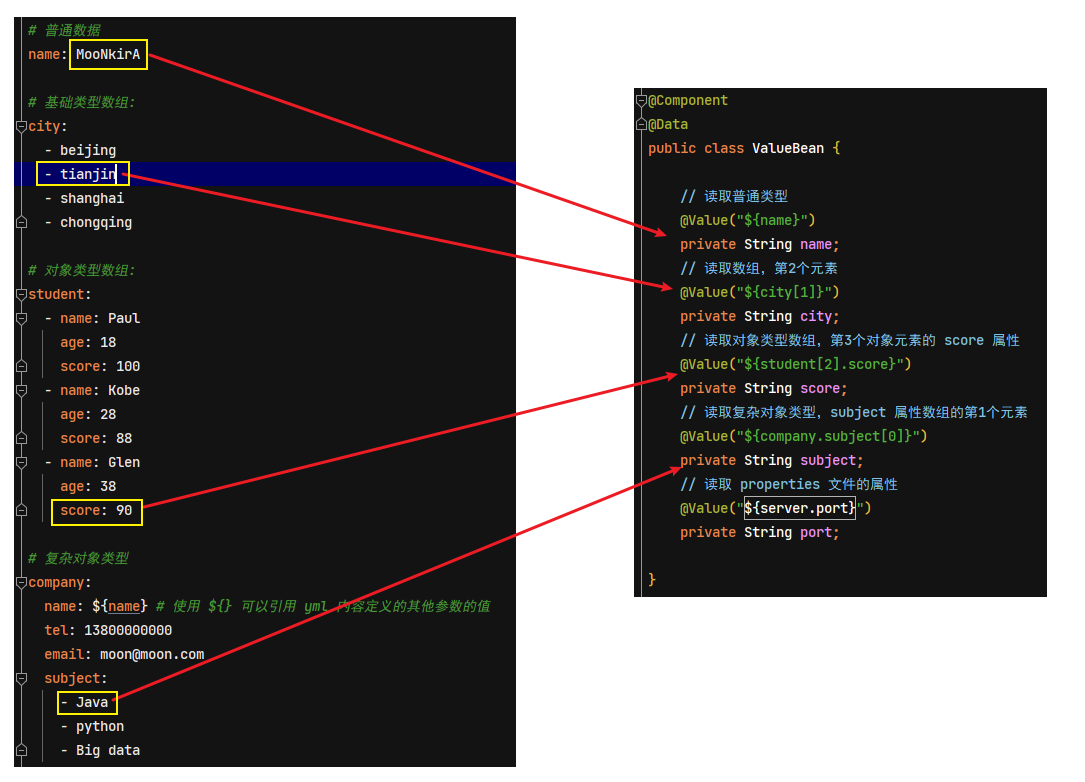
方式三:@ConfigurationProperties 注解(将配置文件的属性值封装到实体类)
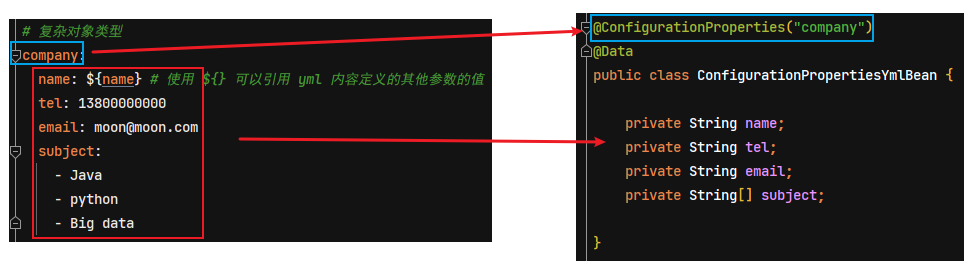
上面使用 @Value 注入每个配置在实际项目中麻烦。Spring Boot 提供了一个 @ConfigurationProperties(prefix="配置文件中的key的前缀") 注解,可以将配置文件中的某个指定前缀的配置项自动与实体进行映射。Spring Boot 将此方式称为:基于类型安全的配置方式,通过 @ConfigurationProperties 将 properties 属性和一个 Bean 及其属性关联,从而实现类型安全的配置
值得注意的是,要实现配置与实体类映射的前提条件是:该映射的类需要交 Spring 容器管理。
读取默认配置文件(yml 与 properties 格式均可用)
- 在 pom.xml 文件引入 configuration-processor 的依赖
xml
<!-- @ConfigurationProperties执行器的配置 -->
<dependency>
    <groupId>org.springframework.boot</groupId>
    <artifactId>spring-boot-configuration-processor</artifactId>
    <optional>true</optional>
</dependency>- 在 yml 中定义一个对象类型的配置
yml
company:
  name: MooNkirA
  tel: 13800000000
  email: moon@moon.com
  subject:
    - Java
    - python
- Big data- 在自定义配置映射类中,加上注解
@ConfigurationProperties,表明该类为配置映射类,并通过属性prefix指定默认配置文件(application.properties/application.yml)中某个指定前缀的,从而实现配置自动与实体进行映射。其中有如下两种方式让配置映射对象交给 Spring 容器管理:
方式1:直接在配置映射类上标识 @Component 等注解,让 Spring boot 在启动时通过包扫描将该类作为一个 Bean 注入 IOC 容器。如:
java
@Component
// prefix 用来选择属性的前缀,也就是在配置文件中的“company”以下的属性
// ignoreUnknownFields 是用来告诉 SpringBoot 在有属性不能匹配到声明的域时抛出异常
@ConfigurationProperties(prefix = "company", ignoreUnknownFields = false)
@Data
// 注:如果使用@Configuration注解,则同时需要加上@EnableConfigurationProperties指定加载的配置类
// @Configuration
// @EnableConfigurationProperties(Company.class)
public class Company {
    private String name;
    private String tel;
    private String email;
    private String[] subject;
}方式2:在引导类中(或者本身自定义配置类),加上 @EnableConfigurationProperties 注解,并指明需要映射的 JavaBean 类。当使用 @EnableConfigurationProperties 注解时,spring 会默认将其标注的类定义为 bean,因此配置映射类就无需再次标识 @Component 注解,如:
java
@ConfigurationProperties("company") // 直接使用 @ConfigurationProperties 进行属性绑定
@Data
public class Company {
    private String name;
    private String tel;
    private String email;
    private String[] subject;
}


@SpringBootApplication
// 在配置类上开启 @EnableConfigurationProperties 注解,并标注要使用 @ConfigurationProperties 注解绑定属性的类
@EnableConfigurationProperties({Company.class})
public class Application {
    ....
}
建议使用
@EnableConfigurationProperties声明引入的配置类,如此在不使用此类的时候,就不会出现因为配置类标识了@Component注解,而加入到 Spring 容器的情况,从而减少 spring 管控的资源数量。
读取 yml 类型示例映射示意图
- 在控制类注入安全配置映射类,测试读取配置文件内容
java
@RestController
@RequestMapping("config")
public class DemoController {
    // 自动注入映射配置类
    @Autowired
    private Company company;

    // 通过 @ConfigurationPropertiesBean 注解方式进行配置与实体映射读取
    @GetMapping("config-properties")
    public Company readByConfigurationProperties() {
        return company;
    }
}
配合 @PropertySource 注解读取自定义的配置文件
上面方式1是写在默认配置文件 application.properties 中,如果属性太多,实际项目可能会根据模块去拆分一些配置,并配置在不同的自定义配置文件中。通过 Spring 的 @PropertySource 注解可以读取自定义的配置文件,值得注意的是:此方式只能读取 properties 格式文件,该注解并不支持加载 yml 文件!
读取自定义的配置文件的具体步骤如下:
- 在 pom.xml 文件中引入 configuration-processor 依赖
xml
<dependency>
    <groupId>org.springframework.boot</groupId>
    <artifactId>spring-boot-configuration-processor</artifactId>
    <optional>true</optional>
</dependency>- 创建自定义配置文件 config/cat.properties (配置文件存放位置随意)
properties
cat.name=HelloKitty
cat.age=5
cat.color=pink- 在引导类中(或者本身自定义配置类)中,使用
@PropertySource注解,引入自定义 properties 配置文件。需要注意,如果在Spring Boot版本为1.4或1.4之前,则需要@PropertySource注解上加location属性,并指明该配置文件的路径
java
@SpringBootApplication
// 通过 @PropertySource 注解手动导入 properties 文件,测试使用 @ConfigurationProperties 注解进行配置和实体映射
@PropertySource("classpath:config/cat.properties")
public class Application {
    ....
}- 在自定义配置映射类中,加上注解
@ConfigurationProperties,表明该类为配置映射类,并通过属性prefix指定自定义配置文件(示例是 cat.properties)中某个指定前缀的,从而实现配置自动与实体进行映射。与加载默认配置文件操作一样,同样有如下两种方式让配置映射对象交给 Spring 容器管理:
方式1:直接在配置映射类上标识 @Component 等注解,让 Spring boot 在启动时通过包扫描将该类作为一个 Bean 注入 IOC 容器。如:
java
@Component
@ConfigurationProperties(prefix = "cat", ignoreUnknownFields = false)
@Data
// 注:如果使用@Configuration注解,则同时需要加上@EnableConfigurationProperties指定加载的配置类
// @Configuration
// @EnableConfigurationProperties(Cat.class)
public class Cat {
    private String name;
    private int age;
    private String color;
}方式2:在引导类中(或者本身自定义配置类),加上@EnableConfigurationProperties注解,并指明需要映射的 JavaBean 类。此时配置映射类就不需要标识 @Component 等注解,如:
java
// prefix用来选择属性的前缀,也就是在cat.properties文件中的 "cat" 以下的属性
// ignoreUnknownFields 是用来告诉 SpringBoot 在有属性不能匹配到声明的域时抛出异常
@ConfigurationProperties(prefix = "cat", ignoreUnknownFields = false)
@Data
public class Cat {
    private String name;
    private String tel;
    private String email;
    private String[] subject;
}


@SpringBootApplication
@EnableConfigurationProperties({Cat.class})
@PropertySource("classpath:config/cat.properties")
public class Application {
    ....
}- 在控制类注入安全配置映射类,测试读取配置文件内容
java
@RestController
@RequestMapping("config")
public class DemoController {
    // 自动注入映射配置类
    @Autowired
    private Cat cat;

    // 通过 @ConfigurationPropertiesBean 注解方式进行配置与实体映射读取
    @GetMapping("config-properties")
    public Cat readByConfigurationProperties() {
        return cat;
    }
}
注:方式1的读取默认配置文件的方式,此方式也可以实现。省略
@PropertySource注解即可
@EnableConfigurationProperties与@Component注解不能同时使用
第三方 jar 包中 bean 加载配置属性值
上面都自定义的 bean 加载配置属性值,@ConfigurationProperties 注解是标识在类定义的上,而又不可能到第三方 jar 包中开发的 bean 源代码中去添加 @ConfigurationProperties 注解,那如何解决第三方 bean 加载配置属性值的问题?
- 步骤1:在配置类中,使用
@Bean注解创建第三方 bean 实例
java
@Configuration
public class DruidConfig {
    /* 1. 使用 @Bean 注解创建第三方 bean 实例 */
    @Bean
    public DruidDataSource datasource() {
        return new DruidDataSource();
    }
}- 步骤2:在 application.yml/application.properties 中定义要绑定的属性,注意:示例配置中
datasource是全小写,非 spring boot 原生spring.datasource.driver-class-name的配置
yml
datasource:
driverClassName: com.mysql.jdbc.Driver- 步骤3:使用
@ConfigurationProperties注解标识在创建第三方 bean 实例的方法,进行属性绑定,注意前缀是全小写的 datasource
java
@Bean
/* 2. 使用 @ConfigurationProperties 注解标识在创建第三方 bean 实例的方法,进行属性绑定,注意前缀是全小写的 datasource */
@ConfigurationProperties(prefix = "datasource")
public DruidDataSource datasource(){
    DruidDataSource ds = new DruidDataSource();
    return ds;
}
@ConfigurationProperties 属性绑定的规则
宽松绑定/松散绑定
在进行属性绑定时,可能会遇到如下情况,为了进行标准命名,开发者会将属性名严格按照驼峰命名法书写,在 yml 配置文件中将 datasource 修改为 dataSource,如下:
yml
dataSource:
  driverClassName: com.mysql.jdbc.Driver
此时程序可以正常运行,然后又将代码中 @ConfigurationProperties 的前缀 datasource 修改为 dataSource
java
@Bean
@ConfigurationProperties(prefix = "dataSource")
public DruidDataSource datasource(){
    DruidDataSource ds = new DruidDataSource();
    return ds;
}
此时就会发生编译错误,提示配置属性名 dataSource 是无效的,报错信息如下:
bash
Configuration property name 'dataSource' is not valid:

    Invalid characters: 'S'
    Bean: datasource
    Reason: Canonical names should be kebab-case ('-' separated), lowercase alpha-numeric characters and must start with a letter

Action:
Modify 'dataSource' so that it conforms to the canonical names requirements.
spring boot 进行属性绑定时,进行编程时人性化设计,几乎主流的命名格式都支持,称为属性名称的宽松绑定,也可以称为宽松绑定。即配置文件中的命名格式与变量名的命名格式可以进行格式上的最大化兼容,例如,在 ServerConfig 中有的 ipAddress 属性名
java
@Component
@Data
@ConfigurationProperties(prefix = "servers")
public class ServerConfig {
    private String ipAddress;
}
其中 ipAddress 属性与下面的配置属性名规则全兼容
yml
servers:
  ipAddress: 192.168.0.2       # 驼峰模式
  ip_address: 192.168.0.2      # 下划线模式
  ip-address: 192.168.0.2      # 烤肉串模式
  IP_ADDRESS: 192.168.0.2      # 常量模式
也可以说,以上 4 种配置名称模式,最终都可以匹配到 ipAddress 这个属性名。其中原因就是在进行匹配时,配置中的名称要去掉中划线和下划线后,忽略大小写的情况下去与 java 代码中的属性名进行忽略大小写的等值匹配,而以上 4 种命名去掉下划线中划线忽略大小写后都是一个词 ipaddress,java 代码中的属性名忽略大小写后也是 ipaddress,因此就可以进行等值匹配了,这就是为什么这4种格式都能匹配成功的原因。不过spring boot 官方推荐配置名称使用烤肉串模式,也就是中划线模式。
分析上面报错信息,其中 Reason 描述了报错的原因,规范的名称应该是烤肉串(kebab)模式(case),即使用-分隔,使用小写字母数字作为标准字符,且必须以字母开头。所以当配置 @ConfigurationProperties 的前缀为 dataSource 时,会出现问题。
值得注意:以上规则仅针对 springboot 中
@ConfigurationProperties注解进行属性绑定时有效,对@Value注解进行属性映射无效。
常用计量单位绑定
在项目的配置中,经常需要一些数值类型配置值,但就会造成有些人理解的偏差,就这些数值的配置值单位是什么?比如线上服务器完成一次主从备份,配置超时时间240,这个240如果单位是秒就是超时时间4分钟,如果单位是分钟就是超时时间4小时。
为了消除每个人对配置理解的偏差,除了加强约定之外,springboot 充分利用了 JDK8 中提供的全新的用来表示计量单位的新数据类型,从根本上解决这个问题。以下模型类中添加了两个 JDK8 中新增的类,分别是 Duration 和 DataSize,使用此两个单位就可以有效避免因沟通不同步或文档不健全导致的配置信息不对称问题,从根本上解决了问题,避免产生误读。
yml
servers:
  ip-address: 192.168.0.2       # 官方推荐配置名称使用烤肉串模式,也就是中划线模式
  serverTimeOut: 3    # 使用常用计量单位绑定
  dataSize: 10        # 使用常用计量单位绑定
java
@Data
@ConfigurationProperties("servers")
public class ServerConfig {
    private String ipAddress;
    // Duration 时间类型,@DurationUnit 指定单位为 hour
    @DurationUnit(ChronoUnit.HOURS)
    private Duration serverTimeOut;
    // DataSize 数据大小类型,@DataSizeUnit 指定单位为 MB
    @DataSizeUnit(DataUnit.MEGABYTES)
    private DataSize dataSize;
}org.springframework.boot.convert.DurationUnit:表示时间间隔,可以通过@DurationUnit注解描述时间单位,例如上例中描述的单位为小时(ChronoUnit.HOURS)org.springframework.util.unit.DataSize:表示存储空间,可以通过@DataSizeUnit注解描述存储空间单位,例如上例中描述的单位为 MB(DataUnit.MEGABYTES)
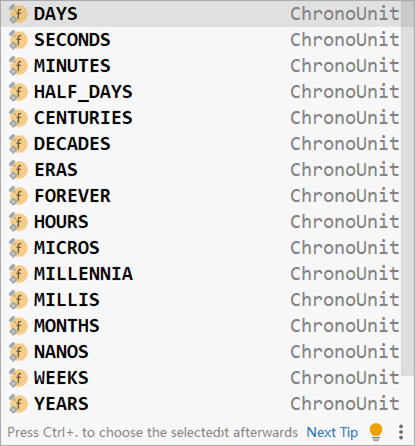
Druation 常用单位如下:
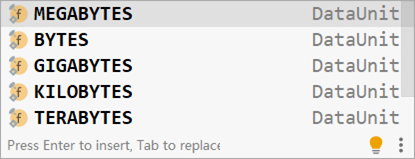
DataSize 常用单位如下:
测试:
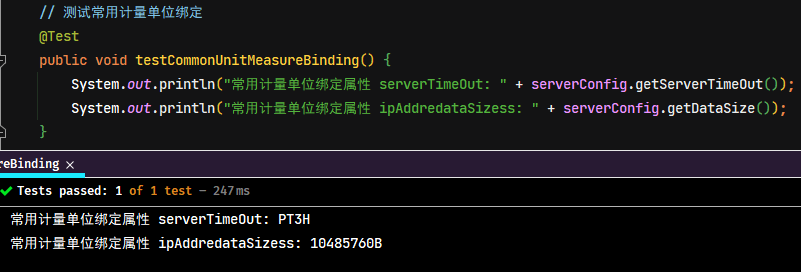
番外:关于项目配置文件实践的说明
@ConfigurationProperties 与 @Value 读取配置的区别
- 使用
@ConfigurationProperties方式可以进行配置文件与实体字段的自动映射,但需要字段必须提供setter方法才可以 - 使用
@Value注解修饰的字段不需要提供setter方法
关于 spring-boot-configuration-processor 的说明
在上面示例中,spring-boot-configuration-processor 此依赖非必须,不依赖也能实现属性映射功能,但 IDEA 会在使用了 @ConfigurationProperties 注解的类文件中出现以下提示信息

补充说明:其实 spring-boot-configuration-processor 工具只是给实体类的属性注入时开启提示,即在定义需要注入的实体后,在编写 application.properties 和 application.yml 中给相应实体类注入属性时会出现提示,仅此而已,其实用处不大。还有就是如果依赖此工具后,在打包时最好在 build 的标签中排除对该工具的打包,从而减少打成 jar 包的大小。
xml
<build>
    <plugins>
        <plugin>
            <groupId>org.springframework.boot</groupId>
            <artifactId>spring-boot-maven-plugin</artifactId>
            <configuration>
                <excludes>
                    <exclude>
                        <groupId>org.springframework.boot</groupId>
                        <artifactId>spring-boot-configuration-processor</artifactId>
                    </exclude>
                </excludes>
            </configuration>
        </plugin>
    </plugins>
</build>
解决 IDEA 对 SpringBoot 配置文件无自动提示的问题
无自动提示的原因是:IDEA 没有识别此文件是 SpringBoot 的配置文件
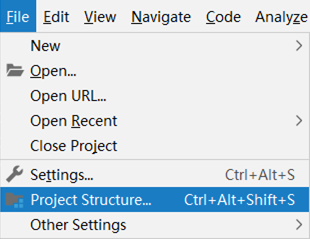
步骤1:打开设置,【Files】 -> 【Project Structure...】
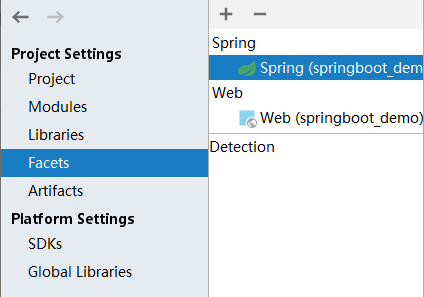
步骤2:在弹出窗口中左侧选择【Facets】,右侧选中 Spring 路径下对应的模块名称,也就是自动提示功能消失的那个模块
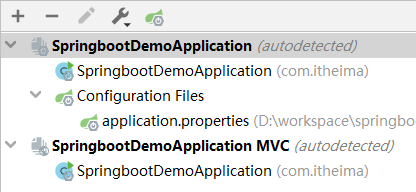
步骤3:点击【Customize Spring Boot】按钮,此时可以看到当前模块对应的配置文件是哪些了。如果没有想要称为配置文件的文件格式,就有可能无法弹出提示
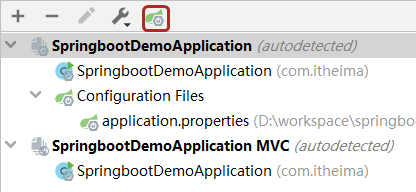
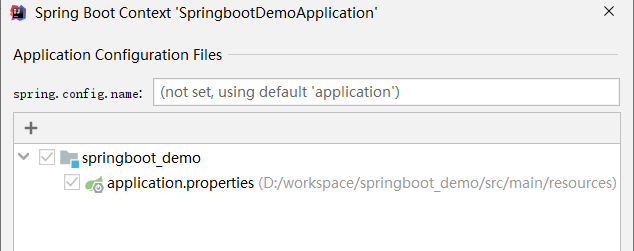
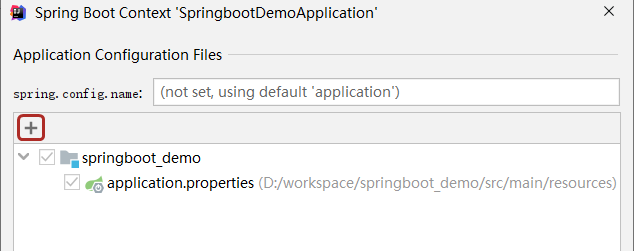
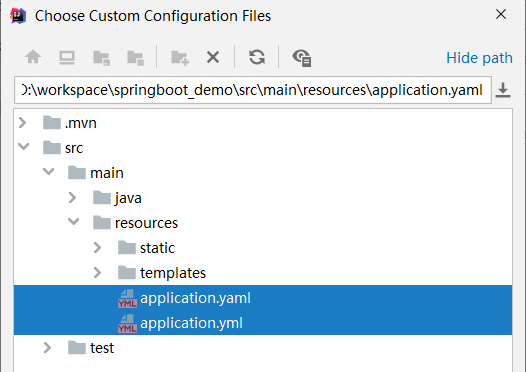
步骤4:选择添加配置文件,然后选中要作为配置文件的具体文件就OK了
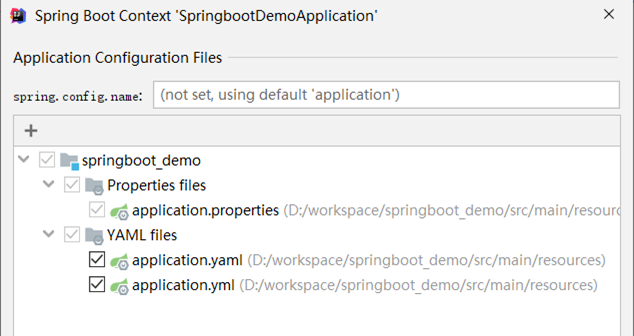
Spring Boot 日志配置
日志格式
Spring Boot 默认日志输出类似于以下示例:

日志输出项说明:
- 日期和时间:毫秒精度,易于排序。
- 日志级别:
ERROR、WARN、INFO、DEBUG或TRACE。 - PID:进程 ID。用于表明当前操作所处的进程,当多服务同时记录日志时,该值可用于协助程序员调试程序
- 一个
---分隔符,用于区分实际日志内容的开始。 - 线程名称:在方括号中(可能会截断控制台输出)。
- 日志记录器名称:这通常是源类名称(通常为缩写)。
- 日志内容。
注意:Logback 没有
FATAL级别。该级别映射到ERROR。
设置日志输出级别
Spring Boot 默认日志配置会在写入时将消息回显到控制台。默认情况下,会记录 ERROR、WARN 和 INFO 级别的日志。
命令行开启调试模式
通过命令参数 --debug 来调整应用程序日志输出级别为调试模式
bash
java -jar springboot-demo.jar --debug注:以上命令行方式相当在 application.properties 文件中指定
debug=true。
还可以通过使用 --trace 标志(或在 application.properties 中的设置 trace=true)启动应用程序来启用跟踪模式。这样做可以为选择的核心日志记录器(内嵌容器、Hibernate 模式生成和整个 Spring 组合)启用日志追踪。
配置文件设置日志输出级别
通过项目的配置文件来指定日志输出级别
- 开启 debug 模式,输出调试信息,常用于检查系统运行状况
yml
debug: true # 开启debug模式properties
debug=true # 开启debug模式- 对 root 根节点设置日志级别,即整体应用日志级别
yml
logging:
  level:
    root: debug # 设置日志级别,root表示根节点,即整体应用日志级别
properties
logging.level.root=debug # 设置日志级别,root表示根节点,即整体应用日志级别- 对包级别节点设置日志级别,即指定的包内的日志级别
yml
logging:
  level:
    com.moon.foo: debug # 对指定的包设置日志输出级别
properties
logging.level.com.moon.foo=debug- 设置日志组,分别对组内所有包设置日志输出级别
yml
logging:
  group: # 设置日志组
    # 自定义组名,设置当前组中所包含的包
    fooGroup: com.moon.foo,com.moon.bar
    barGroup: com.zero.foo,com.zero.bar
  level:
    fooGroup: debug # 设置指定的组的日志级别
    barGroup: warn
properties
# 设置日志组
logging.group.fooGroup=com.moon.foo,com.moon.bar
logging.group.barGroup=com.zero.foo,com.zero.bar
# 设置指定的组的日志级别
logging.level.fooGroup=debug
logging.level.barGroup=warn
自定义日志输出格式
logging.pattern.console 可以配置日志输出的格式,示例如下:
yml
logging:
  pattern:
    console: "%d %clr(%p) --- [%16t] %clr(%-40.40c){cyan} : %m %n"
上面参数的意思是
%d:日期;%m:消息;%n:换行。
日志文件输出
Spring Boot 对于日志文件的使用存在各种各样的策略,例如每日记录,分类记录,报警后记录等。需要设置 logging.file 或 logging.path 属性
logging.file.name:用于指定日志保存的文件名称,配置此属性后,即可将程序运行的日志都会追加到此日志文件中logging.file.path:用于指定日志文件保存的位置。如果不指定,日志文件默认保存路径在项目同级目录下logging.file.max-history:用于限制日志文件的大小,否则会无限期归档到文件中。
yml
logging:
  file:
    name: server.log # 写入指定的日志文件。名称可以是绝对位置或相对于当前目录。
path: /log # 将日志文件写入指定的目录。名称可以是绝对位置或相对于当前目录。- 设置分文件存储日志,并限制每个日志文件的大小。下面以logback日志框架配置为例,常用配置如下:
yml
logging:
  file:
    name: server.log # 指定日志的文件名称
    path: /log # 指定日志文件的保存地址
  logback: # logback 配置
    rollingpolicy:
      max-file-size: 3kb
      file-name-pattern: server.%d{yyyy-MM-dd}.%i.log
热部署
在开发中反复修改类、页面等资源,每次修改后都是需要重新启动才生效,这样每次启动都很麻烦,浪费了大量的时间。在修改程序代码后,不需要重启程序就能让修改的内容生效,称为热部署
热部署底层工作原理 - 重启与重载
一个 springboot 项目在运行时实际上是分两个过程进行的,根据加载的东西不同,划分成 base 类加载器与 restart 类加载器。
- base 类加载器:用来加载 jar 包中的类,jar 包中的类和配置文件由于不会发生变化,因此不管加载多少次,加载的内容不会发生变化
- restart 类加载器:用来加载开发者自己开发的类、配置文件、页面等信息,这一类文件受开发者影响
当 springboot 项目启动时,base 类加载器执行,加载 jar 包中的信息后,restart 类加载器执行,加载开发者制作的内容。当执行构建项目后,由于 jar 中的信息不会变化,因此 base 类加载器无需再次执行,所以仅仅运行 restart 类加载即可,也就是将开发者自己制作的内容重新加载就行了,这就完成了一次热部署的过程,也可以说热部署的过程实际上是重新加载 restart 类加载器中的信息。
热部署配置
引入依赖
- 可以在 pom.xml 配置文件中添加
spring-boot-devtools工具,就可以实现热部署功能
xml
<!-- 使用spring-boot-devtools提供的开发者工具,配置devtools开启热部署 -->
<dependency>
    <!--
       devtools可以实现页面热部署(即页面修改后会立即生效,这个可以直接在application.properties文件中配置spring.thymeleaf.cache=false来实现),
       实现类文件热部署(类文件修改后不会立即生效),实现对属性文件的热部署。
       即devtools会监听classpath下的文件变动,并且会立即重启应用(发生在保存时机),注意:因为其采用的虚拟机机制,该项重启是很快的
    -->
    <groupId>org.springframework.boot</groupId>
    <artifactId>spring-boot-devtools</artifactId>
    <!-- 表示依赖不会向下传递 -->
    <optional>true</optional>
</dependency>- 仅仅加入 devtools 后,idea 还是不起作用,这时候还需要添加的
spring-boot-maven-plugin插件
xml
<build>
    <plugins>
        <!--
            用于将应用打成可直接运行的jar(该jar就是用于生产环境中的jar) 值得注意的是,如果没有引用spring-boot-starter-parent做parent,
               且采用了上述的第二种方式,这里也要做出相应的改动
         -->
        <plugin>
            <groupId>org.springframework.boot</groupId>
            <artifactId>spring-boot-maven-plugin</artifactId>
            <configuration>
                <!-- fork : 如果没有该项配置,这个devtools不会起作用,即应用不会restart -->
                <fork>true</fork>
            </configuration>
        </plugin>
    </plugins>
</build>
将依赖关系标记为可选
<optional>true</optional>是一种最佳做法,可以防止使用项目将devtools传递性地应用于其他模块。
IDEA 配置自动启动热部署
在引入 spring-boot-devtools 依赖,此时修改代码后,项目是不会自动重启,需要手动点击菜单【Build】 -> 【Build Project】(或者使用快捷键 CTRL+F9)
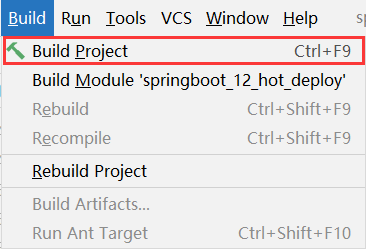
出现这种情况,并不是热部署配置问题,其根本原因是因为 Intellij IEDA 默认情况下不会自动编译,需要对IDEA进行自动编译的设置,如下:
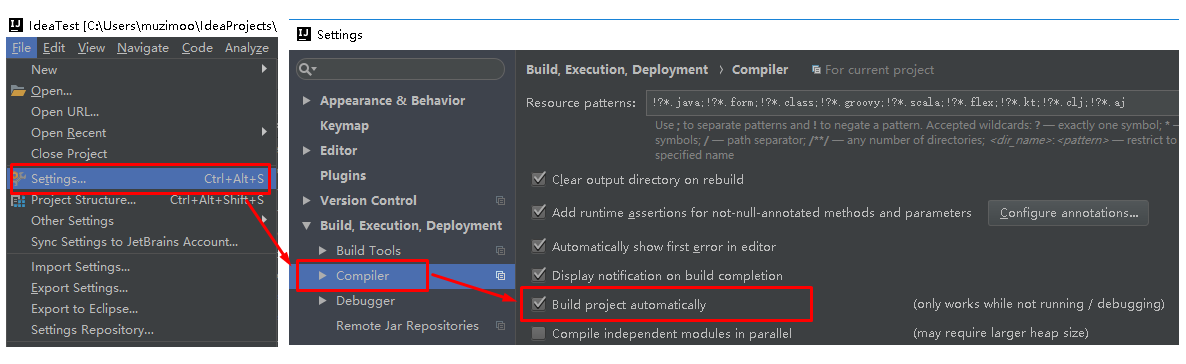
然后使用快捷键 Shift + Ctrl + Alt + /,选择【Registry】,勾选【compiler.automake.allow.when.app.running】
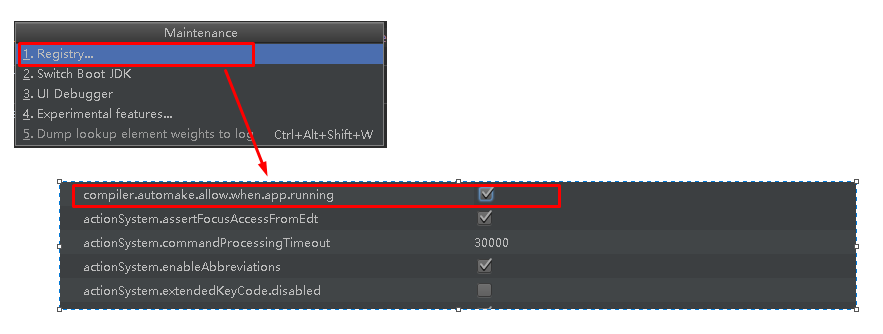
这样程序在运行的时候就可以进行自动构建了,实现了热部署的效果。但值得注意的是:IDEA 不会在每次修改都马上进行构建,只在 IDEA 失去焦点5秒后进行热部署,即从 idea 切换到其他软件时进行热部署,比如改完程序需要到浏览器上去调试,这个时候 idea 就自动进行热部署操作。
排除静态资源文件
在 Spring Boot 项目中某些资源在更改时不一定需要触发重启程序。例如 Thymeleaf 模板文件就可以实时编辑等。默认情况下,有些资源是不会触发重启,而是触发live reload(devtools内嵌了一个 LiveReload server,当资源发生改变时,浏览器刷新)。如下:
- /META-INF/maven
- /META-INF/resources
- /resources
- /static
- /public
- /templates
如果自定义排除触发热部署的资源,可以设置 spring.devtools.restart.exclude 配置项。示例如下:
properties
# 仅排除 /static 和 /public 的内容
spring.devtools.restart.exclude=static/**,public/**
# 如果想保留默认配置,同时增加新的配置,则可使用
# spring.devtools.restart.additional-exclude属性
yml
spring:
  devtools:
    restart:
      # 设置不参与热部署的文件或文件夹
      exclude: static/**,public/**,config/application.yml
设置触发热部署的文件
若不想每次修改都触发自动重启,可以在application.xml设置spring.devtools.restart.trigger-file指向某个文件,只有更改这个文件时才触发自动重启。示例如下:

yml
spring:
  devtools: # 配置更改指定文件时才触发自动重启
    restart:
      trigger-file: .trigger  # 文件所在路径是 /resources/META-INF/.trigger
全局设置
可以通过向$HOME文件夹添加名为.spring-boot-devtools.properties的文件来配置全局devtools设置(请注意,文件名以“.”开头)。 添加到此文件的任何属性将适用于计算机上使用devtools的所有 Spring Boot应用程序。 例如,要配置重启始终使用触发器文件 ,可以添加以下内容:
〜/ .spring-boot-devtools.propertiesDevtools 在 Spring Boot 中的可选配置
properties
# Whether to enable a livereload.com-compatible server.
spring.devtools.livereload.enabled=true

# Server port.
spring.devtools.livereload.port=35729

# Additional patterns that should be excluded from triggering a full restart.
spring.devtools.restart.additional-exclude=

# Additional paths to watch for changes.
spring.devtools.restart.additional-paths=

# Whether to enable automatic restart.
spring.devtools.restart.enabled=true

# Patterns that should be excluded from triggering a full restart.
spring.devtools.restart.exclude=META-INF/maven/**,META-INF/resources/**,resources/**,static/**,public/**,templates/**,**/*Test.class,**/*Tests.class,git.properties,META-INF/build-info.properties

# Whether to log the condition evaluation delta upon restart.
spring.devtools.restart.log-condition-evaluation-delta=true

# Amount of time to wait between polling for classpath changes.
spring.devtools.restart.poll-interval=1s

# Amount of quiet time required without any classpath changes before a restart is triggered.
spring.devtools.restart.quiet-period=400ms

# Name of a specific file that, when changed, triggers the restart check. If not specified, any classpath file change triggers the restart.
spring.devtools.restart.trigger-file=
关闭热部署
线上环境运行时是不可能使用热部署功能的,所以需要强制关闭此功能。可通过 Spring Boot 配置文件来关闭此功能,修改 application.yml 如下配置即可:
yml
spring:
  devtools:
    restart:
      enabled: false
扩展:在项目开发过程中,有可能别的开发人员配置文件层级过高导致相符覆盖最终引起配置失效,此时可以提高配置的层级,在更高层级中配置关闭热部署。例如在启动容器前通过系统属性设置关闭热部署功能:
java
@SpringBootApplication
public class DemoApplication {
    public static void main(String[] args) {
        System.setProperty("spring.devtools.restart.enabled", "false");
        SpringApplication.run(DemoApplication.class);
    }
}
总结:线上环境的维护是不可能出现修改代码的操作,配置关闭热部署功能,最终的目的是降低线上程序的资源消耗
其他热部署工具
由于Spring Boot应用只是普通的Java应用,所以JVM热交换(hot-swapping)也能开箱即用。不过JVM热交换能替换的字节码有限制,想要更彻底的解决方案可以使用Spring Loaded项目或JRebel。spring-boot-devtools 模块也支持应用快速重启(restart)。
SpringBoot 监听机制(整理中)
SpringBoot 在项目启动时,会对几个内置的监听器进行回调,开发者可以实现这些监听器接口,在项目启动时完成一些操作。
ApplicationContextInitializer(补充示例)
如果想让这些监听器自动注册,不管应用程序是如何创建的,可以在项目中添加一个META-INF/spring.plants文件,并通过使用 org.springframework.context.ApplicationListener 键来指定相应的自定义监听器(ApplicationContextInitializer的实现类),如下例:
properties
org.springframework.context.ApplicationContextInitializer=com.moon.springboot.listener.MyApplicationContextInitializerSpringApplicationRunListener(补充示例)
properties
org.springframework.boot.SpringApplicationRunListener=com.moon.springboot.listener.MySpringApplicationRunListenerCommandLineRunner 与 ApplicationRunner
简介
如果需要在 SpringApplication 启动后运行一些特定的代码,可以实现 SpringBoot 提供的 ApplicationRunner 或 CommandLineRunner 接口。这两个接口的工作方式相同,并提供一个单一的运行方法,该方法会在 SpringApplication.run(...) 完成之前被调用。两者的区别是 run 方法都可以获取启动时命令行参数,但其中一个是封装成 ApplicationArguments 对象;另一个是封装成字符串数组。
java
@FunctionalInterface
public interface ApplicationRunner {
    void run(ApplicationArguments args) throws Exception;
}


@FunctionalInterface
public interface CommandLineRunner {
    void run(String... args) throws Exception;
}
注:这两个监听回调接口,适合运用在项目应用启动后做一些数据的预处理等工作。例如,将读取一些数据库的数据到 Redis 缓存中,完成数据的预热。
基础使用
CommandLineRunner 接口的 run 方法入参是字符串数组,是应用程序的相关参数。
java
@Component
public class MyCommandLineRunner implements CommandLineRunner {

    @Override
    public void run(String... args) {
        // Do something...
    }

}
而 ApplicationRunner 接口的run方法是入参是 ApplicationArguments 接口,此接口提供了对应用原始的 String[] 参数以及经过解析的选项和非选项参数的访问。
java
@Component
public class MyApplicationRunner implements ApplicationRunner {

    @Override
    public void run(ApplicationArguments args) throws Exception {
        // Do something...
    }

}
使用注意事项
- 如果项目中定义多个
CommandLineRunner与ApplicationRunner接口的实现。那需要注意它们这些实现的调用顺序,以免发生不可预测的问题。另外,可以通过实现org.springframework.core.Ordered接口或使用org.springframework.core.annotation.Order注解来指定实现类调用的顺序。 CommandLineRunner与ApplicationRunner接口的实现不需要到META-INF/spring.plants进行配置相关映射。
Spring Boot 视图
静态资源 html 视图
SpringBoot 默认有四个静态资源文件夹:
- classpath:/static/
- classpath:/public/
- classpath:/resources/
- classpath:/META-INF/resources/
在 spring-boot-autoconfigure-x.x.x.RELEASE.jar 的 web 包
ResourceProperties 类中作了默认的配置:
java
private static final String[] CLASSPATH_RESOUTCE_LOCATIONS = {
    "classpth:/META-INF/resources/", "classpath:/resources/",
"classpath:/static/", "classpath:/public/" };- 第一步:提供src/main/resources/public/html/user.html
html
<!DOCTYPE html>
<html>
  <head>
    <title>SpringBoot</title>
    <meta charset="UTF-8"/>
    <meta http-equiv="pragma" content="no-cache"/>
    <link rel="shortcut icon" type="image/x-icon" href="logo.ico"/>
  </head>
  <body>
    user
  </body>
</html>- 第二步:提供HelloController处理器
java
@Controller
public class HelloController {
    @Autowired
    private Environment environment;
    @Value("${name}")
    private String name;
    @Value("${url}")
    private String url;

    // 响应数据为json格式:http://localhost:8080/hello
    @GetMapping("/hello")
    @ResponseBody
    public String hello(){
        System.out.println(environment.getProperty("name"));
        System.out.println(environment.getProperty("url"));
        System.out.println(name);
        System.out.println(url);
        return "Hello World";
    }

    // 响应数据为静态html页面: http://localhost:8080/user
    @GetMapping("/user")
    public String user(){
        return "/html/user.html";
    }
}
Jsp视图(不推荐)
- 第一步:创建Maven项目(war包)
- 第二步:配置依赖
xml
<project xmlns="http://maven.apache.org/POM/4.0.0"
    xmlns:xsi="http://www.w3.org/2001/XMLSchema-instance"
    xsi:schemaLocation="http://maven.apache.org/POM/4.0.0
                        http://maven.apache.org/xsd/maven-4.0.0.xsd">
  <modelVersion>4.0.0</modelVersion>
  <parent>
    <groupId>org.springframework.boot</groupId>
    <artifactId>spring-boot-starter-parent</artifactId>
    <version>1.5.6.RELEASE</version>
  </parent>
  <groupId>com.moon</groupId>
  <artifactId>springboot02-jsp-test</artifactId>
  <version>0.0.1-SNAPSHOT</version>
  <packaging>war</packaging>

  <!-- 定义全局属性 -->
  <properties>
    <!-- 更改JDK版本 -->
    <java.version>1.7</java.version>
  </properties>

  <!-- 配置依赖关系 -->
  <dependencies>
    <!-- 配置web启动器(spring mvc) -->
    <dependency>
      <groupId>org.springframework.boot</groupId>
      <artifactId>spring-boot-starter-web</artifactId>
    </dependency>
    <!-- 配置devtools实现热部署 -->
    <dependency>
      <groupId>org.springframework.boot</groupId>
      <artifactId>spring-boot-devtools</artifactId>
    </dependency>
    <!-- 配置servlet-api、jsp-api、el-api依赖 -->
    <dependency>
      <groupId>org.apache.tomcat.embed</groupId>
      <artifactId>tomcat-embed-jasper</artifactId>
      <scope>provided</scope>
    </dependency>
    <!-- 配置jstl依赖 -->
    <dependency>
      <groupId>javax.servlet</groupId>
      <artifactId>jstl</artifactId>
    </dependency>
  </dependencies>
</project>- 第三步:提供application.properties属性文件
properties
# 开启jsp视图
# 设置视图前缀
spring.mvc.view.prefix=/WEB-INF/jsp/
# 设置视图后缀
spring.mvc.view.suffix=.jsp- 第四步:开发处理器ItemController
java
@Controller
public class ItemController {
  /** 查询得到数据 */
  @GetMapping("/item")
  public String item(Model model){
    /** 添加响应数据 */
    model.addAttribute("itemArr", new String[]{"iphone7手机","华为手机","小米手机"});
    /** 返回视图 */
    return "item";
  }
}- 第五步:提供src/main/webapp/WEB-INF/jsp/item.jsp
html
<%@ page language="java" contentType="text/html; charset=UTF-8" pageEncoding="UTF-8"%>
<%@ taglib prefix="c"  uri="http://java.sun.com/jsp/jstl/core"%>
<!DOCTYPE html PUBLIC "-//W3C//DTD HTML 4.01 Transitional//EN" "http://www.w3.org/TR/html4/loose.dtd">
<html>
  <head>
    <title>SpringBoot</title>
    <meta http-equiv="Content-Type" content="text/html; charset=UTF-8" />
  </head>
  <body>
    <ul>
      <c:forEach items="${itemArr}" var="item">
        <li>${item }</li>
      </c:forEach>
    </ul>
  </body>
</html>- 第六步:开发Application作为SpringBoot引启类
java
@SpringBootApplication // 代表为SpringBoot应用的运行主类
public class Application {
  public static void main(String[] args) {
    /** 创建SpringApplication应用对象 */
    SpringApplication springApplication = new SpringApplication(Application.class);
    /** 设置横幅模式(设置关闭) */
    springApplication.setBannerMode(Banner.Mode.OFF);
    /** 运行 */
    springApplication.run(args);
  }
}访问地址:http://localhost:8080/item
FreeMarker 视图
详见《Spring Boot 整合 FreeMarker》笔记。
Spring Boot 异常处理
Spring MVC no handler 异常处理
当请求不存在时,Spring MVC 在处理 404 异常时,会自动返回如下内容:
json
{
    "timestamp": "2022-02-19T01:01:10.907+0000",
    "status": 404,
    "error": "Not Found",
    "message": "No message available",
    "path": "/account/sms1/13800000000"
}
但通常程序都需要由开发者来进行异常处理,所以需要在 Spring Boot 中修改 application.properties 中的配置:
properties
spring.mvc.throw-exception-if-no-handler-found=true配置 spring.mvc.throw-exception-if-no-handler-found 为 true,Spring MVC 在 404 时就会抛出 DispatcherServlet 中的 throwExceptionIfNoHandlerFound。此时开发者可以在全局异常处理中利用@ExceptionHandler 注解捕获 NoHandlerFoundException 异常,再做自定义处理即可
自定义 starter 功能
自定义的 starter 开发规范,可以参考官方定义的 starter 或者一些其他框架整合的 starter
starter 工程结构规范
参考官方 starter 与其他第三方的 starter 会发现,有些第三方的 starter 不一定按约定的规范来命名;还有官方的 starter 依赖与自动配置类是分开两个包,但有些第三方的 starter 是放到同一个包中。因此自定义 starter 的可以参考选择以下的某种方式进行开发即可
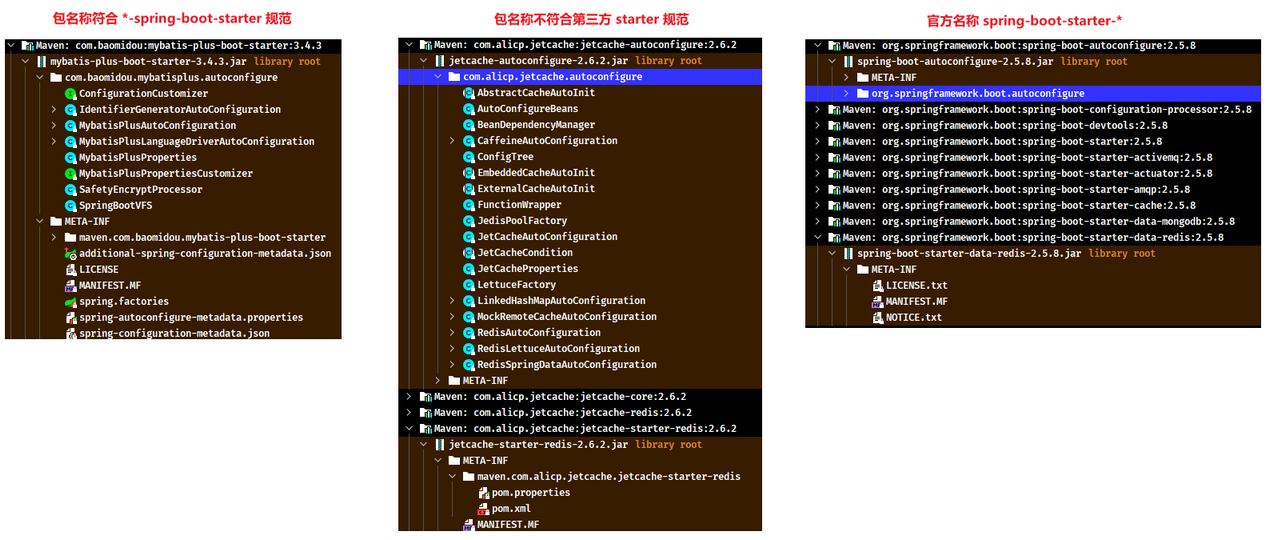
案例需求说明
本自定义 starter 案例的功能是统计网站独立 IP 访问次数的功能,并将访问信息在后台持续输出。整体功能是在后台每 10 秒输出一次监控信息(格式:IP+访问次数),当用户访问网站时,对用户的访问行为进行统计。
例如:张三访问网站功能15次,IP地址:192.168.0.135,李四访问网站功能20次,IP地址:61.129.65.248。那么在网站后台就输出如下监控信息,此信息每10秒刷新一次。
         IP访问监控
+-----ip-address-----+--num--+
|     192.168.0.135  |   15  |
|     61.129.65.248  |   20  |
+--------------------+-------+
具体功能实现分析
- 统计的数据存储:最终记录的数据结构是一个字符串(IP地址)对应一个数字(访问次数),可以使用 java 提供的 Map 模型,也就是 key-value 的键值对模型,或者具有 key-value 键值对模型的存储技术,例如 redis 技术。本案例使用 Map 作为实现方案
- 统计功能触发的位置:因为每次 web 请求都需要进行统计,因此使用拦截器作为实现方案
- 配置项:为了提升统计数据展示的灵活度,可以通过 Spring Boot 配置项来控制输出频度,输出的数据格式,统计数据的显示模式等
- 输出频度,默认 10 秒
- 数据特征:累计数据 / 阶段数据,默认累计数据
- 输出格式:详细模式 / 极简模式
自定义 starter 功能实现
创建 maven 工程 counter-spring-boot-starter
添加依赖
xml
<?xml version="1.0" encoding="UTF-8"?>
<project xmlns="http://maven.apache.org/POM/4.0.0"
         xmlns:xsi="http://www.w3.org/2001/XMLSchema-instance"
         xsi:schemaLocation="http://maven.apache.org/POM/4.0.0 http://maven.apache.org/xsd/maven-4.0.0.xsd">
    <parent>
        <groupId>org.springframework.boot</groupId>
        <artifactId>spring-boot-starter-parent</artifactId>
        <version>2.5.8</version>
        <relativePath/> <!-- lookup parent from repository -->
    </parent>

    <modelVersion>4.0.0</modelVersion>
    <groupId>com.tools</groupId>
    <artifactId>counter-spring-boot-starter</artifactId>
    <version>1.0-SNAPSHOT</version>
    <name>${project.artifactId}</name>
    <description>自定义 starter 示例</description>

    <dependencies>
        <dependency>
            <groupId>org.springframework.boot</groupId>
            <artifactId>spring-boot-starter-web</artifactId>
        </dependency>
    </dependencies>

</project>
定义业务功能接口与实现
创建功能接口,分别定义统计与输出数据的问题
java
public interface IpCountService {

    /**
     * 统计
     */
    void count();

    /**
     * 输出统计数据
     */
    void print();
}
创建实现类,声明一个 Map 对象,用于记录 ip 访问次数,key 是 ip 地址,value 是访问次数。值得注意:这里不需要将其设置为静态属性,也能实现在每次请求时进行数据共享,因为使用 Spring 容器的管理的的对象默认都是单例的,不存在多个对象共享变量的问题。
java
public class IpCountServiceImpl implements IpCountService {

    private final Map<String, Integer> ipCounter = new HashMap<>();

    @Override
    public void count() {}

    @Override
    public void print() {}
}
定义自动配置
自定义 starter 需要在导入当前模块的时候就要开启功能,因此需要编写自动配置类,在启动项目时自动加载功能。
- 创建自动配置类,使用
@Bean注解创建ip统计的实现类实例
java
public class IpCountAutoConfiguration {
    @Bean
    public IpCountService ipCountService() {
        return new IpCountServiceImpl();
    }
}- 创建 resources 目录中创建
META-INF/spring.factories文件,配置自动配置类的全限定名称映射
properties
# Auto Configure
org.springframework.boot.autoconfigure.EnableAutoConfiguration=com.tool.autoconfigure.IpCountAutoConfiguration
使用配置属性设置功能参数
为了提高 IP 统计报表信息显示的灵活性,可以让调用者通过 yml 配置文件设置一些参数,用于控制报表的显示格式。
- 定义参数格式:设置3个属性,分别用来控制显示周期(cycle),阶段数据是否清空(cycle-reset),数据显示格式(model)
yml
tools:
  ip:
    cycle: 1
    cycle-reset: false
    model: "detail"
注:以上配置是由此 starter 导入者配置
- 定义封装参数的配置属性类,读取配置参数。日志输出模式是在若干个类别选项中选择某一项,对于此种分类性数据建议制作枚举定义分类数据
java
@ConfigurationProperties("tools.ip")
public class IpCountProperties {

    /**
     * 日志显示周期
     */
    private Long cycle = 5L;

    /**
     * 是否周期内重置数据
     */
    private Boolean cycleReset = false;

    /**
     * 日志输出模式  detail:详细模式  simple:极简模式
     */
    private String model = LogModel.DETAIL.value;

    // 日志模式枚举
    public enum LogModel {
        DETAIL("detail"),
        SIMPLE("simple");

        private final String value;

        LogModel(String value) {
            this.value = value;
        }

        public String getValue() {
            return value;
        }
    }
    // ...省略 getter/setter
}
注:为防止项目组定义的参数种类过多,产生冲突,通常设置属性前缀会至少使用两级属性作为前缀进行区分。
- 在自动配置类中,使用
@EnableConfigurationProperties注解加载属性配置类IpCountProperties
java
@EnableConfigurationProperties(IpCountProperties.class)
public class IpCountAutoConfiguration {
    ...
}
业务功能实现
- 实现统计功能。
实现统计操作对应的方法,每次访问后对应 ip 的记录次数 +1。需要分情况处理,如果当前没有对应 ip 的数据,新增一条数据,否则就修改对应 key 的值 +1 即可。因为当前功能最终会导入到其他 web 项目中,所以可以从容器中直接获取请求对象,因此在此业务类中可以通过自动装配得到 HttpServletRequest 请求对象,然后获取对应的访问 IP 地址。
java
// 当前的 HttpServletRequest 对象的注入工作由使用当前 starter 的工程提供自动装配
@Autowired
private HttpServletRequest httpServletRequest;

@Override
public void count() {
    // 1.获取当前操作的IP地址
    String ip = httpServletRequest.getRemoteAddr();
    // 2.根据IP地址从Map取值,并递增
    Integer count = ipCounter.get(ip);
    ipCounter.put(ip, count == null ? 1 : count + 1);
}- 实现显示统计数据的功能。
本案例使用 Spring Boot 内置 task 实现。在自动配置类上标识 @EnableScheduling 注解,开启定时任务功能
java
@EnableScheduling // 开启 Spring Task 定时任务
@EnableConfigurationProperties(IpCountProperties.class)
public class IpCountAutoConfiguration {
    ...
}
在 print() 方法中实现显示统计功能的操作,并设置定时任务,当前是硬编码设置每 5 秒运行一次统计数据。在应用配置属性的功能类中,使用自动装配加载对应的配置属性类,然后根据配置信息做分支处理。注意:清除数据的功能一定要在输出后运行,否则每次查阅的数据均为空白数据。
java
@Scheduled(cron = "0/5 * * * * ?")
@Override
public void print() {
    String model = ipCountProperties.getModel();
    if (IpCountProperties.LogModel.DETAIL.getValue().equals(model)) {
        // 日志输出详细模式
        System.out.println("         IP访问监控");
        System.out.println("+-----ip-address-----+--num--+");
        for (Map.Entry<String, Integer> entry : ipCounter.entrySet()) {
            String key = entry.getKey();
            Integer value = entry.getValue();
            System.out.println(String.format("|%18s  |%5d  |", key, value));
        }
        System.out.println("+--------------------+-------+");
    } else if (IpCountProperties.LogModel.SIMPLE.getValue().equals(model)) {
        // 日志输出极简模式
        System.out.println("     IP访问监控");
        System.out.println("+-----ip-address-----+");
        for (String key : ipCounter.keySet()) {
            System.out.println(String.format("|%18s  |", key));
        }
        System.out.println("+--------------------+");
    }

    // 判断是否周期内重置数据
    if (ipCountProperties.getCycleReset()) {
        ipCounter.clear();
    }
}
功能测试
新建一个或者使用原有的 web 项目,由于当前 starter 的功能需要在对应的调用的工程进行坐标导入,因此必须保证本地仓库中具有当前开发的功能,所以每次原始代码修改后,需要重新编译并安装到仓库中。为防止问题出现,建议每次安装之前先 clean 然后 install,保障资源进行了更新。
- 在 web 工程中引入自定义 starter 依赖
xml
<dependency>
    <groupId>com.tools</groupId>
    <artifactId>counter-spring-boot-starter</artifactId>
    <version>1.0-SNAPSHOT</version>
</dependency>- 推荐选择测试工程中调用方便的功能做测试,推荐选择查询操作,当然也可以换其他功能位置进行测试。目前暂时在代码中硬编码调用统计
java
@Autowired
private IpCountService ipCountService;

@GetMapping("{id}")
public Book get(@PathVariable Integer id) {
    ipCountService.count();
    return bookService.getById(id);
}- 启动工程,发送数次查询请求后,观察控制台日志
         IP访问监控
+-----ip-address-----+--num--+
|   0:0:0:0:0:0:0:1  |   11  |
+--------------------+-------+- 在测试工程中修改配置文件,选择简单模式日志输出
yml
tools:
  ip:
    cycle: 1
    cycle-reset: false
model: "simple"- 重新安装自定义 starter 工程到本地仓库,启动测试工程,发送数次查询请求后,观察控制台日志
     IP访问监控
+-----ip-address-----+
|   0:0:0:0:0:0:0:1  |
+--------------------+
示例功能优化1:使用配置设置定时器参数
按目前的代码,在使用属性配置中的显示周期数据时会出现问题,在 @Scheduled 注解如果要使用直接使用配置数据,则可能通过EL表达式 #{} 来读取 bean 属性值,但前提是要知道 bean 在 Spring 容器中的名称。如果不设置 bean 的访问名称,Spring 会使用自己的命名生成器生成bean的长名称(如:xxx.xx.xx.Xxxx),在 #{} 中会将第一点开始后面都当成属性,因此无法实现属性的读取。所以,优化方案是放弃使用 @EnableConfigurationProperties 注解对应的功能,改成最原始的 bean 定义格式。
- 步骤一:使用
@Component来初始化配置属性类并指定 bean 的访问名称
java
@Component("ipCountProperties")
@ConfigurationProperties("tools.ip")
public class IpCountProperties {
    ...
}- 步骤二:弃用
@EnableConfigurationProperties注解,改为使用@Import注解导入 bean 的形式加载配置属性类
java
@EnableScheduling // 开启 Spring Task 定时任务
// @EnableConfigurationProperties(IpCountProperties.class)
@Import({IpCountProperties.class})
public class IpCountAutoConfiguration {
    ...
}- 步骤三:修改
@Scheduled注解中的 cron 表达式,使用#{}读取bean属性值
java
@Scheduled(cron = "0/#{ipCountProperties.cycle} * * * * ?")
@Override
public void print() {
    ...
}
重装安装 starter 工程到仓库,在 web 端程序中通过 yml 文件中的 tools.ip.cycle 属性配置参数对统计信息的显示周期进行控制,观察控制台日志输出的间隔
示例功能优化2:使用拦截器进行统计
- 步骤一:编写拦截器,在前置拦截的方法中,调用功能业务类的统计方法
java
public class IpCountInterceptor implements HandlerInterceptor {

    @Autowired
    private IpCountService ipCountService;

    @Override
    public boolean preHandle(HttpServletRequest request, HttpServletResponse response, Object handler) throws Exception {
        ipCountService.count();
        return HandlerInterceptor.super.preHandle(request, response, handler);
    }
}- 步骤二:配置拦截器,设置拦截对应的请求路径。此示例拦截所有请求,用户可以根据使用需求来设置要拦截的请求。还可以加载
IpCountProperties中的属性,根据配置来设置拦截器拦截的请求
java
@Configuration
public class SpringMvcConfig implements WebMvcConfigurer {

    /** 增加拦截器 */
    @Override
    public void addInterceptors(InterceptorRegistry registry) {
        registry.addInterceptor(ipCountInterceptor()).addPathPatterns("/**");
    }

    @Bean
    public IpCountInterceptor ipCountInterceptor() {
        return new IpCountInterceptor();
    }
}- 步骤三:设置包扫描。值得注意的是,目前整个 starter 工程都没有设置包扫描,所以上面配置的
@Configuration注解不会生效。因为自动配置类上标识@ComponentScan注解进行包扫描
java
@EnableScheduling // 开启 Spring Task 定时任务
@Import({IpCountProperties.class})
@ComponentScan("com.tool")
public class IpCountAutoConfiguration {
    ...
}
使用拦截器实现统计后,可以移除上面测试中硬编码调用统计业务功能接口的代码
示例功能优化3:开启 yml/properties 配置文件提示功能
提示信息功能配置
在 Spring Boot 配置属性时,IDE 都会出现配置相关提示,Spring Boot 提供有专用的工具实现配置提示的功能,仅需要导入下列坐标。
xml
<dependency>
    <groupId>org.springframework.boot</groupId>
    <artifactId>spring-boot-configuration-processor</artifactId>
    <optional>true</optional>
</dependency>
程序重新编译后,在 META-INF 目录中会生成对应的提示文件,然后拷贝生成出的文件到工程源码的 META-INF 目录中,并对其进行编辑。
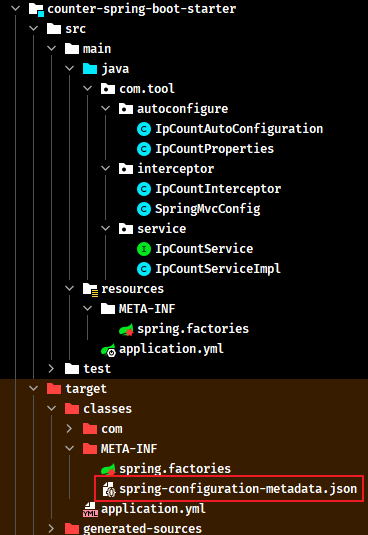
打开生成的文件,可以看到如下信息。
json
{
  "groups": [
    {
      "name": "tools.ip",
      "type": "com.tool.autoconfigure.IpCountProperties",
      "sourceType": "com.tool.autoconfigure.IpCountProperties"
    }
  ],
  "properties": [
    {
      "name": "tools.ip.cycle",
      "type": "java.lang.Long",
      "description": "日志显示周期",
      "sourceType": "com.tool.autoconfigure.IpCountProperties"
    },
    {
      "name": "tools.ip.cycle-reset",
      "type": "java.lang.Boolean",
      "description": "是否周期内重置数据",
      "sourceType": "com.tool.autoconfigure.IpCountProperties"
    },
    {
      "name": "tools.ip.model",
      "type": "java.lang.String",
      "description": "日志输出模式  detail:详细模式  simple:极简模式",
      "sourceType": "com.tool.autoconfigure.IpCountProperties"
    }
  ],
  "hints": [
    {
      "name": "tools.ip.model",
      "values": [
        {
          "value": "detail",
          "description": "详细模式."
        },
        {
          "value": "simple",
          "description": "极简模式."
        }
      ]
    }
  ]
}groups属性定义了当前配置的提示信息总体描述,当前配置属于哪一个属性封装类properties属性描述了当前配置中每一个属性的具体设置,包含名称、类型、描述、默认值等信息。注意:这些提示信息都是来自配置属性类中的文档注释hints属性默认是空白的,用于设置指定属性,取值的提示信息。(可以参考 Spring Boot 源码中的写法,上面是)
配置信息提示:
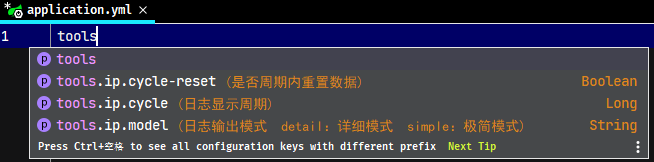
model 属性的取值提示:
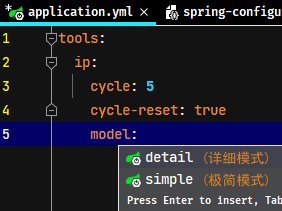
注意问题
上述配置完成后,会出现提示信息重复的问题:
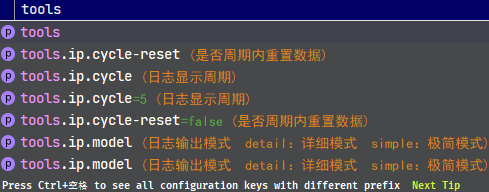
这是因为打包时也生成一个 spring-configuration-metadata.json 文件,只需要打包发布是移除 spring-boot-configuration-processor 依赖即可。
最终效果测试
在 web 程序端导入自定义 starter 后功能开启,去掉坐标后功能消失。
自定义 stater 的开发其实就是创建独立模块,导出独立功能,在需要使用的工程中导入对应的 starter 即可。如果是在企业中开发,记得不仅需要将开发完成的 starter 模块 install 到本地仓库中,开发完毕后还要 deploy 到私服上,否则别人就无法使用了。