Appearance
Spring Boot 整合 JavaMail
本笔记基于 Spring Boot 2.5.8 版本进行开发
简述
发送邮件应该是网站的必备功能之一,什么注册验证,忘记密码或者是给用户发送营销信息。最早期的时候会使用 JavaMail 相关 api 来写发送邮件的相关代码,后来 Spring 推出了 JavaMailSender 更加简化了邮件发送的过程,在之后 Spring Boot 对此进行了封装就有了现在的 spring-boot-starter-mail
邮件发送的3个概念,这些概念规范了邮件操作过程中的标准。
- SMTP(Simple Mail Transfer Protocol):简单邮件传输协议,用于发送电子邮件的传输协议
- POP3(Post Office Protocol - Version 3):用于接收电子邮件的标准协议
- IMAP(Internet Mail Access Protocol):互联网消息协议,是 POP3 的替代协议
简单说就是 SMPT 是发邮件的标准,POP3 是收邮件的标准,IMAP 是对 POP3 的升级。在开发程序中操作邮件,通常是发邮件,所以 SMTP 是使用的重点,收邮件大部分都是通过邮件客户端完成,所以开发收邮件的代码极少。除非要读取邮件内容,然后解析,做邮件功能的统一处理。例如 HR 的邮箱收到求职者的简历,可以读取后统一处理。但是还不如直接开发独立的投递简历的系统,因为要想收邮件就要规范发邮件的人的书写格式,有点强人所难,并且极易收到外部攻击,不可能使用白名单来收邮件。如果能使用白名单来收邮件然后解析邮件,还不如开发个系统给白名单中的人专用呢,更安全。
基础整合使用
引入依赖
在 Spring Boot 中发送邮件,在 pom.xml 文件里面引入整合 javamail 的依赖 spring-boot-starter-mail
xml
<dependency>
    <groupId>org.springframework.boot</groupId>
    <artifactId>spring-boot-starter-mail</artifactId>
</dependency>
邮件参数配置
- 在 application.yml 中添加邮箱配置参数。
username与password通过系统参数传递
yml
spring:
  mail: # 配置邮件功能
    host: smtp.126.com # 邮箱服务器地址
    username: ${uname} # 邮箱账号
    password: ${pwd} # 密码
default-encoding: UTF-8 # 默认编码,默认值是 UTF-8- application.properties 配置
properties
spring.mail.host=smtp.126.com
spring.mail.username=${uname}
spring.mail.password=${pwd}
spring.mail.default-encoding=UTF-8
java 程序仅用于发送邮件,邮件的功能还是邮件供应商提供的,因为要配置对应信息才能用邮件服务。
host 配置的是提供邮件服务的主机协议,当前程序仅用于发送邮件,因此配置的是smtp的协议。
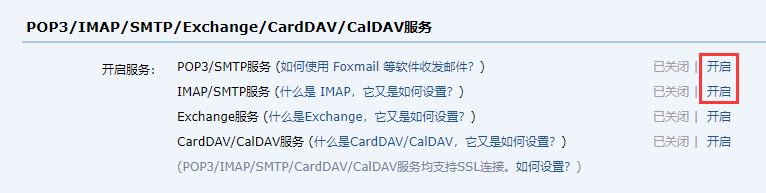
password 并不是邮箱账号的登录密码,是邮件供应商提供的一个加密后的密码,也是为了保障系统安全性。不然外部人员通过地址访问下载了配置文件,直接获取到了邮件密码就会有极大的安全隐患。有关该密码的获取每个邮件供应商提供的方式都不一样,此处略过。可以到邮件供应商的设置页面找 POP3 或 IMAP 这些关键词找到对应的获取位置。下面以 QQ 邮箱为例仅供参考:
编写接口与测试
- 编写 mailService 接口与实现类
java
public interface MailService {
    /**
     * 发送简单邮件
     *
     * @param to      目标邮箱
     * @param subject 邮件主题
     * @param content 邮件内容
     */
    void sendSimpleMail(String to, String subject, String content);
}

@Service
public class MailServiceImpl implements MailService {

    private static final Logger LOGGER = LoggerFactory.getLogger(MailService.class);

    /* 注入邮件发送类 */
    @Autowired
    private JavaMailSender javaMailSender;

    /* 读取配置文件邮件发送地址 */
    @Value("${spring.mail.username}")
    private String from;

    /**
     * 发送简单邮件
     *
     * @param to      目标邮箱
     * @param subject 邮件主题
     * @param content 邮件内容
     */
    @Override
    public void sendSimpleMail(String to, String subject, String content) {
        // 创建邮件对象
        SimpleMailMessage simpleMailMessage = new SimpleMailMessage();

        // 设置邮件相关参数
        simpleMailMessage.setFrom(from);
        simpleMailMessage.setTo(to);
        simpleMailMessage.setSubject(subject);
        simpleMailMessage.setText(content);

        // 发送邮件
        javaMailSender.send(simpleMailMessage);
        LOGGER.info("发送简单邮件成功");
    }
}- 编写 test 类测试
java
@SpringBootTest(properties = {"activeName=dev"})
public class MailSendTest {

    /* 注入邮件服务接口 */
    @Autowired
    private MailService mailService;

    @Test
    public void testSendSimpleMail() {
        mailService.sendSimpleMail("moon@126.com", "测试发送邮件", "hello JavaMail for Spring boot");
    }

}
发送 html 格式邮件
- 其他配置不需要改
java
/**
 * 发送 html 格式邮件
 *
 * @param to      目标邮箱
 * @param subject 邮件主题
 * @param content 邮件内容
 */
@Override
public void sendHtmlMail(String to, String subject, String content) {
    // 创建MimeMessage邮件对象
    MimeMessage mimeMessage = javaMailSender.createMimeMessage();

    try {
        // 参数true表示需要创建一个multipart message
        MimeMessageHelper mimeMessageHelper = new MimeMessageHelper(mimeMessage, true);

        mimeMessageHelper.setFrom(from);
        mimeMessageHelper.setTo(to);
        mimeMessageHelper.setSubject(subject);
        // 第二参数表示内容是否为html文本
        mimeMessageHelper.setText(content, true);

        // 发送邮件
        javaMailSender.send(mimeMessage);
        LOGGER.info("发送简单邮件成功");
    } catch (MessagingException e) {
        e.printStackTrace();
        LOGGER.debug("发送 html 格式邮件失败,{}", e.getMessage());
    }
}- 测试
java
@Test
public void testHtmlMail() {
    String content = "<html>\n" +
            "<body>\n" +
            "    <h3>hello world ! 这是一封Html邮件!</h3>\n" +
            "</body>\n" +
            "</html>";
    mailService.sendHtmlMail("moon@126.com", "测试发送Html邮件", content);
}
发送带附件的邮件
- 本示例是指定一个上传的文件夹,将文件夹中所有文件作为附件上传,一个文件一封邮件
- 配置application.yml文件,设置上传文件夹
yml
# 发送邮件相关参数
mail:
uploadPath: E:\\autoUpload\\- 编写上传附件的邮件接口与实现类
java
/**
 * 发送带附件的邮件
 *
 * @param to       目标邮箱
 * @param subject  邮件主题
 * @param content  邮件内容
 * @param fileList 邮件附件对象数组
 */
@Override
public void sendAttachmentsMail(String to, String subject, String content, File[] fileList) {
    // 设置系统参数,取消发送邮件附件名称长度限制
    System.setProperty("mail.mime.splitlongparameters", "false");

    if (fileList != null && fileList.length > 0) {
        try {
            for (File filePath : fileList) {
                // 创建MimeMessage邮件对象
                MimeMessage mimeMessage = javaMailSender.createMimeMessage();
                // 参数true表示需要创建一个multipart message
                MimeMessageHelper mimeMessageHelper = new MimeMessageHelper(mimeMessage, true, "UTF-8");
                mimeMessageHelper.setFrom(from);
                mimeMessageHelper.setTo(to);
                mimeMessageHelper.setText(content, true);

                // 读取文件
                FileSystemResource fileSystemResource = new FileSystemResource(filePath);
                // 获取文件名称
                String fileName = fileSystemResource.getFilename();

                // 设置附件,添加多个附件可以使用多条 helper.addAttachment(fileName, file)
                mimeMessageHelper.addAttachment(MimeUtility.encodeWord(fileName, "UTF-8", "B"), fileSystemResource);

                // 判断是否有主题名称,如果主题为空,则以文件名称做为邮件主题名称
                if (StringUtils.isBlank(subject)) {
                    mimeMessage.setSubject(fileName);
                } else {
                    mimeMessageHelper.setSubject(subject);
                }

                // 发送邮件
                javaMailSender.send(mimeMessage);
                LOGGER.info("{}邮件发送成功", fileName);
            }
        } catch (Exception e) {
            e.printStackTrace();
            LOGGER.debug("发送附件邮件失败,{}", e.getMessage());
        }
    }
}

@Override
public void sendAttachmentsMail(String to, File[] fileList) {
    this.sendAttachmentsMail(to, "", "", fileList);
}- 测试方法
java
/* 附件上传文件存储路径 */
@Value("${mail.uploadPath}")
private String uploadPath;

@Test
public void sendAttachmentsMail() {
    // 读取配置文件,获取上传文件夹对象
    File file = new File(uploadPath);

    // 判断是否为文件夹
    if (file.isDirectory()) {
        // 获取文件夹所有文件名称
        File[] fileList = file.listFiles();
        mailService.sendAttachmentsMail("moon@126.com", fileList);
    }
}
发送带静态资源的邮件
发送带静态资源的邮件其实就是在发送HTML邮件的基础上嵌入静态资源(比如图片),嵌入静态资源的过程和传入附件类似,唯一的区别在于需要标识资源的cid
java
package com.springboot.demo.controller;

import java.io.File;

import javax.mail.internet.MimeMessage;

import org.springframework.beans.factory.annotation.Autowired;
import org.springframework.beans.factory.annotation.Value;
import org.springframework.core.io.FileSystemResource;
import org.springframework.mail.SimpleMailMessage;
import org.springframework.mail.javamail.JavaMailSender;
import org.springframework.mail.javamail.MimeMessageHelper;
import org.springframework.web.bind.annotation.RequestMapping;
import org.springframework.web.bind.annotation.RestController;

@RestController
@RequestMapping("/email")
public class EmailController {

    @Autowired
    private JavaMailSender jms;

    @Value("${spring.mail.username}")
    private String from;

    @RequestMapping("sendInlineMail")
    public String sendInlineMail() {
        MimeMessage message = null;
        try {
            message = jms.createMimeMessage();
            MimeMessageHelper helper = new MimeMessageHelper(message, true);
            helper.setFrom(from);
            helper.setTo("888888@qq.com"); // 接收地址
            helper.setSubject("一封带静态资源的邮件"); // 标题
            helper.setText("<html><body>博客图:<img src='cid:img'/></body></html>", true); // 内容
            // 传入附件
            FileSystemResource file = new FileSystemResource(new File("src/main/resources/static/img/sunshine.png"));
            helper.addInline("img", file);
            jms.send(message);
            return "发送成功";
        } catch (Exception e) {
            e.printStackTrace();
            return e.getMessage();
        }
    }
}
helper.addInline("img", file);方法中的img和图片标签里cid后的名称相对应。启动项目访问http://localhost/email/sendInlineMail,提示发送成功
使用模板发送邮件
- 在发送验证码等情况下可以创建一个邮件的模板,唯一的变量为验证码。这个例子中使用的模板解析引擎为Thymeleaf,所以首先引入Thymeleaf依赖:
xml
<dependency>
    <groupId>org.springframework.boot</groupId>
    <artifactId>spring-boot-starter-thymeleaf</artifactId>
</dependency>- 在template目录下创建一个emailTemplate.html模板
html
<!DOCTYPE html>
<html lang="zh" xmlns:th="http://www.thymeleaf.org">
<head>
    <meta charset="UTF-8" />
    <title>模板</title>
</head>

<body>
    您好,您的验证码为{code},请在两分钟内使用完成操作。
</body>
</html>- 发送模板邮件,本质上还是发送HTML邮件,只不过多了绑定变量的过程
java
package com.springboot.demo.controller;

import java.io.File;

import javax.mail.internet.MimeMessage;

import org.springframework.beans.factory.annotation.Autowired;
import org.springframework.beans.factory.annotation.Value;
import org.springframework.core.io.FileSystemResource;
import org.springframework.mail.SimpleMailMessage;
import org.springframework.mail.javamail.JavaMailSender;
import org.springframework.mail.javamail.MimeMessageHelper;
import org.springframework.web.bind.annotation.RequestMapping;
import org.springframework.web.bind.annotation.RestController;
import org.thymeleaf.TemplateEngine;
import org.thymeleaf.context.Context;

@RestController
@RequestMapping("/email")
public class EmailController {

    @Autowired
    private JavaMailSender jms;

    @Value("${spring.mail.username}")
    private String from;

    @Autowired
    private TemplateEngine templateEngine;

    @RequestMapping("sendTemplateEmail")
    public String sendTemplateEmail(String code) {
        MimeMessage message = null;
        try {
            message = jms.createMimeMessage();
            MimeMessageHelper helper = new MimeMessageHelper(message, true);
            helper.setFrom(from);
            helper.setTo("888888@qq.com"); // 接收地址
            helper.setSubject("邮件摸板测试"); // 标题
            // 处理邮件模板
            Context context = new Context();
            context.setVariable("code", code);
            String template = templateEngine.process("emailTemplate", context);
            helper.setText(template, true);
            jms.send(message);
            return "发送成功";
        } catch (Exception e) {
            e.printStackTrace();
            return e.getMessage();
        }
    }
}
其中code对应模板里的
${code}变量。启动项目,访问http://localhost/email/sendTemplateEmail?code=EOS9,页面提示发送成功