Appearance
Sharding-JDBC 概述
官网:https://shardingsphere.apache.org/document/legacy/4.x/document/cn/manual/sharding-jdbc/
Sharding-JDBC是当当网研发的开源分布式数据库中间件。从 3.0 开始,Sharding-JDBC 更名为 Sharding-Sphere,之后该项目进入 Apache 孵化器,4.0 之后的版本为 Apache 版本。
ShardingSphere是一套开源的分布式数据库中间件解决方案组成的生态圈,它由 Sharding-JDBC、Sharding-Proxy 和 Sharding-Sidecar(计划中)这3款相互独立的产品组成。它们均提供标准化的数据分片、分布式事务和数据库治理功能,可适用于 Java 同构、异构语言、容器、云原生等各种多样化的应用场景。
目前只需关注 Sharding-JDBC,它定位为轻量级 Java 框架,在 Java 的 JDBC 层提供额外服务。它使用客户端直连数据库,以jar包形式提供服务,无需额外部署和依赖,可理解为增强版的 JDBC 驱动,完全兼容 JDBC 和各种 ORM 框架。
- 适用于任何基于 Java 的 ORM 框架,如:JPA, Hibernate, Mybatis, Spring JDBC Template 或直接使用 JDBC。
- 适用于任何第三方的数据库连接池,如:DBCP, C3P0, BoneCP, Druid, HikariCP 等。
- 适用于任意支持 JDBC 规范的数据库,如:MySQL,Oracle,SQLServer 和 PostgreSQL。
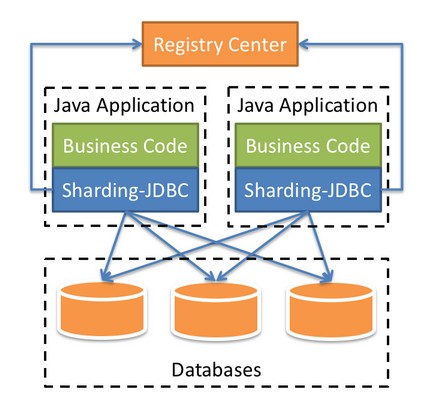
Sharding-JDBC 功能介绍
Sharding-JDBC 可以进行分库分表,同时又可以解决分库分表带来的问题,它的核心功能是:数据分片和读写分离。
数据分片
数据分片是 Sharding-JDBC 核心功能,它是指按照某个维度将存放在单一数据库中的数据分散存放至多个数据库或表中,以达到提升性能瓶颈以及可用性的效果。 数据分片的有效手段是对关系型数据库进行分库和分表。在使用 Sharding-JDBC 进行数据分片前,需要了解以下概念:
- 逻辑表
水平拆分的数据库(表)的相同逻辑和数据结构表的总称。例:订单数据根据主键尾数拆分为10张表,分别是t_order_0到t_order_9,他们的逻辑表名为t_order。
- 真实表
在分片的数据库中真实存在的物理表。即上个示例中的t_order_0到t_order_9。
- 数据节点
数据分片的最小单元。由数据源名称和数据表组成,例:ds_0.t_order_0。
- 分片键
用于分片的数据库字段,是将数据库(表)水平拆分的关键字段。例:将订单表中的订单主键的尾数取模分片,则订单主键为分片字段。 SQL 中如果无分片字段,将执行全路由,性能较差。 除了对单分片字段的支持,ShardingSphere 也支持根据多个字段进行分片。
- 自增主键生成策略
通过在客户端生成自增主键替换以数据库原生自增主键的方式,做到分布式全局主键无重复。
- 绑定表
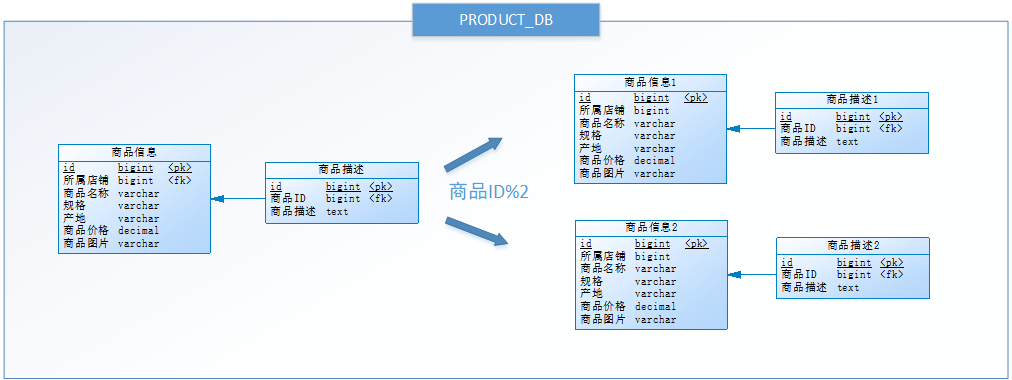
指分片规则一致的主表和子表。例如:商品信息表表和商品描述表,均按照商品id分片,则此两张表互为绑定表关系。绑定表之间的多表关联查询不会出现笛卡尔积,关联查询效率将大大提升。以上图为例,如果SQL为:
sql
select p1.*,p2.商品描述 from 商品信息 p1 inner join 商品描述 p2 on p1.id=p2.商品id;在不配置绑定表关系时,那么最终执行的 SQL 应该为 4 条,它们呈现为笛卡尔积:
sql
select p1.*,p2.商品描述 from 商品信息1 p1 inner join 商品描述1  p2 on  p1.id=p2.商品id;
select p1.*,p2.商品描述 from 商品信息2 p1 inner join 商品描述2  p2 on  p1.id=p2.商品id;
select p1.*,p2.商品描述 from 商品信息1 p1 inner join 商品描述2  p2 on  p1.id=p2.商品id;
select p1.*,p2.商品描述 from 商品信息2 p1 inner join 商品描述1  p2 on  p1.id=p2.商品id;
在配置绑定表关系后,最终执行的 SQL 应该为 2 条:
sql
select p1.*,p2.商品描述 from 商品信息1 p1 inner join 商品描述1  p2 on  p1.id=p2.商品id;
select p1.*,p2.商品描述 from 商品信息2 p1 inner join 商品描述2  p2 on  p1.id=p2.商品id;
注意:绑定表之间的分片键要完全相同。
读写分离
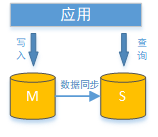
面对日益增加的系统访问量以及高并发的情况,数据库的性能面临着巨大瓶颈。 数据库的“写”操作是比较耗时的(例如:写10000条数据到oracle可能要3分钟),而数据库的“读”操作相对较快(例如:从oracle读10000条数据可能只要5秒钟)。在高并发的情况下,写操作会严重拖累读操作,这是单纯分库分表无法解决的。
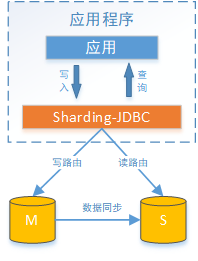
可以将数据库拆分为主库和从库,主库只负责处理增删改操作,从库只负责处理查询操作,这就是读写分离。它能够有效的避免由数据更新导致的行锁,使得整个系统的查询性能得到极大的改善。
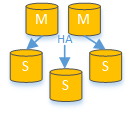
还可以搞一主多从,这样就可以将查询请求均匀的分散到多个从库,能够进一步的提升系统的处理能力。 使用多主多从的方式,不但能够提升系统的吞吐量,还能够提升系统的可用性,可以达到在任何一个数据库宕机,甚至磁盘物理损坏的情况下仍然不影响系统的正常运行。
读写分离的数据节点中的数据内容是一致的,所以在采用读写分离时,要注意解决主从数据同步的问题。Sharding-JDBC 读写分离则是根据SQL语义的分析,将读操作和写操作分别路由至主库与从库。它提供透明化读写分离,让使用方尽量像使用一个数据库一样进行读写分离操作。Sharding-JDBC 不提供主从数据库的数据同步功能,需要采用其他机制支持。
Sharding-JDBC 入门案例
案例需求描述
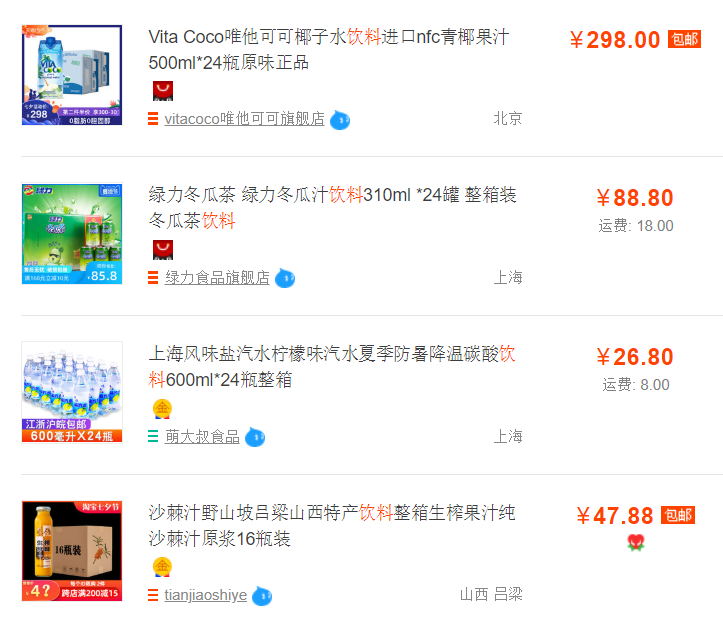
使用 Sharding-JDBC 实现电商平台的商品列表展示,每个列表项中除了包含商品基本信息、商品描述信息之外,还包括了商品所属的店铺信息,如下所示:
开发环境
- 数据库:MySQL-5.7.25
- JDK:1.8.0_201
- 应用框架:spring-boot-2.1.3.RELEASE,Mybatis 3.5.0
- Sharding-JDBC:sharding-jdbc-spring-boot-starter-4.0.0-RC1
案例数据库设计
此案例主体是商品表,按以下原则先做垂直拆分:
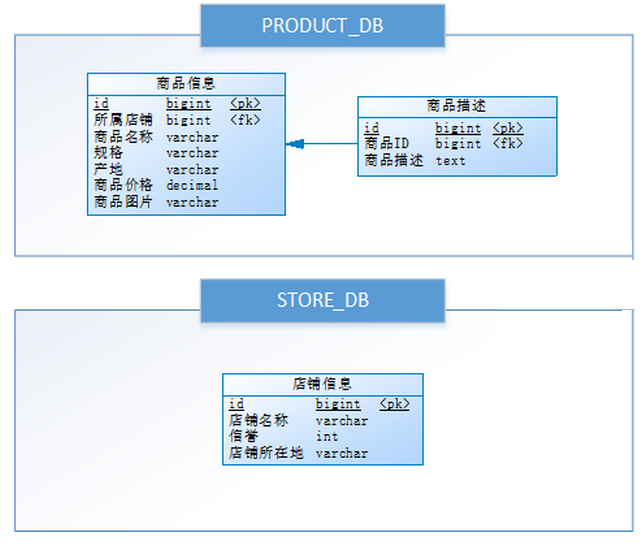
- 商品与店铺信息之间进行了垂直分库,拆分为了 PRODUCT_DB (商品库)和 STORE_DB (店铺库)
- 商品信息还进行了垂直分表,拆分为了商品基本信息 (store_info) 和商品描述信息 (product_info)
考虑到商品信息的数据增长性,针对商品模块再进行水平拆分,最终数据库设计如下图所示:
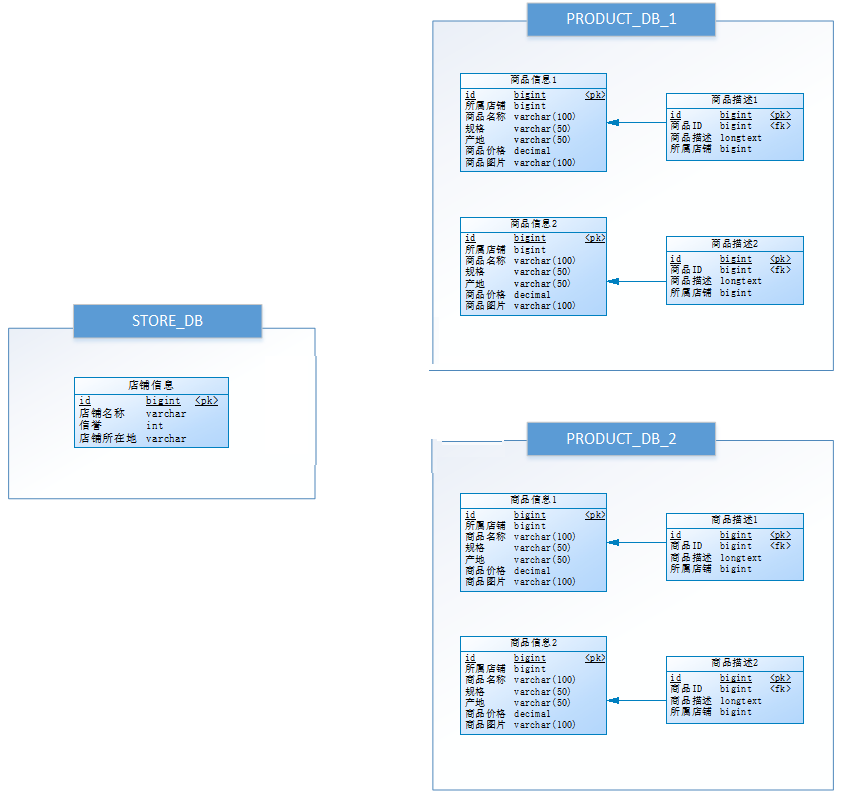
- 对 PRODUCT_DB (商品库)进行了水平分库,分片键使用店铺id,分片策略为
店铺ID%2 + 1 - 对每个 PRODUCT_DB (商品库) 的商品基本信息(product_info)和商品描述信息(product_descript)进行水平分表,分片键使用商品id,分片策略为
商品ID%2 + 1,并将这两个表设置为绑定表。
为避免主键冲突,ID生成策略采用雪花算法来生成全局唯一ID,雪花算法类似于UUID,但是它能生成有序的ID,有利于提高数据库性能。
MySQL 主从数据库搭建(windows)
本示例使用 MySQL 数据库,并在 windows 环境中搭建主从架构。
MySQL 配置主从同步配置
因为个人本地安装了 5.7.25 版本的 MySQL,如果搭建第二个 MySQL 数据库,可以复制原来本地的 mysql 到其它目录,也可以使用免安装版本的压缩包的方式,现在选择使用免安装的方式
- 主库:
D:\development\MySQL\MySQL Server 5.7\ - 从库:
D:\development\MySQL\mysql-5.7.25-winx64\
注意:
- 如果配置了MySQL的环境变量,可能会影响安装第二个MySQL,所以建议暂时移除MySQL的环境变量
- my.ini 配置文件不一定在安装目录中,可能会在系统用户目录中
分别修改主、从数据库的配置文件 my.ini。
主库 my.ini 配置:
properties
[mysqld]
# 开启日志
log-bin=mysql-bin
# 设置服务id,主从不能相同即可
server-id=1
# 设置需要同步的数据库
binlog-do-db=store_db
binlog-do-db=product_db_1
binlog-do-db=product_db_2
# 屏蔽系统库同步
binlog-ignore-db=mysql
binlog-ignore-db=information_schema
binlog-ignore-db=performance_schema
从库 my.ini 配置(免安装版本没有my.ini文件,复制安装版的即可):
properties
[mysqld]
# 设置3307端口
port=3307
basedir="D:/development/MySQL/mysql-5.7.25-winx64/"
# 设置mysql数据库的数据的存放目录(该目录不一定在mysql安装目录下)
datadir=D:/development/MySQL/mysql-5.7.25-winx64/Data
# 开启日志
log-bin=mysql-bin
# 设置服务id,主从不能相同即可
server-id=2
# 设置需要同步的数据库
replicate_wild_do_table=store_db.%
replicate_wild_do_table=product_db_1.%
replicate_wild_do_table=product_db_2.%
# 屏蔽系统库同步
replicate_wild_ignore_table=mysql.%
replicate_wild_ignore_table=information_schema.%
replicate_wild_ignore_table=performance_schema.%
安装 mysql 服务
进入从库所在位置的 bin 目录,以管理员身份运行命令行窗口,执行以下命令将从库安装为 windows 服务,注意配置文件位置:
bash
# 初始化
mysqld --initialize --user=mysql --console
# 安装服务
mysqld install mysqls --defaults-file="D:\development\MySQL\mysql-5.7.25-winx64\my.ini"
安装成功后在【服务】中可以看到
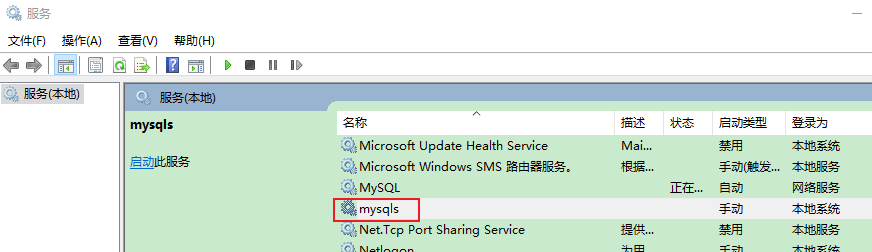
注意:当时搭建的时候遇到一个小坑,就是复制本地安装版本的配置文件 my.ini 到免安装版的根目录下,因为此配置中有配置
secure-file-priv,然后所配置的目录原本是不存在,导致一直服务都无法启动,需要手动创建目录才能正常启动。
在 bin 目录,输入命令登录mysql,修改root用户密码。这里需要使用之前生成的临时密码。如果窗口关了没有记录临时密码,可以将mysql目录下的data目录删除,然后再进行初始化
bash
# 登陆
mysql -uroot –p

# 修改root用户密码
ALTER USER 'root'@'localhost' IDENTIFIED WITH mysql_native_password BY '123456';
请注意,如果使用复制的方式来搭建从库数据,在 data 目录下有个文件 auto.cnf,也要与主库不一样,建议直接删除掉,重启服务后将会重新生成。由于从库是从主库复制过来的,因此里面的数据完全一致,可使用原来的账号、密码登录。最后重启主库和从库即可使用
授权主从复制专用账号
bash
# 切换至主库bin目录,登录主库
mysql -h localhost -uroot -p123456
# 授权主从复制专用账号
GRANT REPLICATION SLAVE ON *.* TO 'db_sync'@'%' IDENTIFIED BY 'db_sync';
# 刷新权限
FLUSH PRIVILEGES;
# 确认位点 记录下文件名以及位点
show master status;
注意:此文件名与位点每套环境安装部署都不一样,上图仅供参考。
从库同步主库数据
切换至从库 bin 目录,登录从库
bash
mysql -h localhost -P3307 -uroot -p123456注意:如果之前此从库已有主库指向,需要先执行以下命令清空
bash
STOP SLAVE IO_THREAD FOR CHANNEL '';
STOP SLAVE SQL_THREAD FOR CHANNEL '';
reset slave all;
设置从库向主库同步数据、并检查链路
bash
# 修改从库指向到主库,注意:master_log_file 与 master_log_pos 的值是分别使用上一步记录的文件名以及位点
CHANGE MASTER TO
 master_host = 'localhost',
 master_user = 'db_sync',
 master_password = 'db_sync',
 master_log_file = 'mysql-bin.000008',
master_log_pos = 592;重启主库和从库服务,然后执行以下命令。(一定要先重启主从数据库)
bash
show slave status\G执行该命令后,确认 Slave_IO_Runing 以及 Slave_SQL_Runing 两个状态位是否为 “Yes”,如果不为 Yes,请检查 error_log,然后排查相关异常。或者执行 START SLAVE; 命令
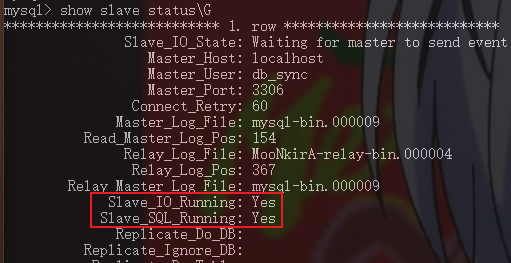
切换到主库,输入 show slave hosts; 命令,可以查询从库的连接情况:
bash
mysql> show slave hosts;
+-----------+------+------+-----------+--------------------------------------+
| Server_id | Host | Port | Master_id | Slave_UUID                           |
+-----------+------+------+-----------+--------------------------------------+
|         2 |      | 3307 |         1 | dff98aa4-9b5d-11ec-a778-3c7c3f5a58c8 |
+-----------+------+------+-----------+--------------------------------------+
1 row in set (0.03 sec)
注:通过以上配置后可能会发现从库比没有同步,主从同步的原理是从库开启一个线程去读取主库的bin-log 日志,此时因为要同步的数据库表没有发生变化,所以没有写入到 bin-log 日志中,所以从库没有进行同步。只需要让待同步的数据库发生变化即可,如:重新建库建表
初始化数据库
登录并连接主库,然后执行如下脚本:
- 执行 store_db.sql 创建 store 数据库和 store_info 表
sql
DROP DATABASE IF EXISTS `store_db`;
CREATE DATABASE `store_db` CHARACTER SET 'utf8' COLLATE 'utf8_general_ci';
USE `store_db`;

DROP TABLE IF EXISTS `store_info`;
CREATE TABLE `store_info` (
    `id` BIGINT(20) NOT NULL COMMENT 'id',
    `store_name` VARCHAR(100) CHARACTER SET utf8 COLLATE utf8_general_ci NULL DEFAULT NULL COMMENT '店铺名称',
    `reputation` INT(11) NULL DEFAULT NULL COMMENT '信誉等级',
    `region_code` VARCHAR(50) CHARACTER SET utf8 COLLATE utf8_general_ci NULL DEFAULT NULL COMMENT '店铺所在地',
    PRIMARY KEY (`id`) USING BTREE
) ENGINE = INNODB CHARACTER SET = utf8 COLLATE = utf8_general_ci ROW_FORMAT = DYNAMIC;

INSERT INTO `store_info` VALUES (1, '斩月铺子', 4, '110100');
INSERT INTO `store_info` VALUES (2, '斩月超市', 3, '410100');- 执行 product_db_1.sql 创建 product_db_1 数据库和其中的四张表
sql
DROP DATABASE IF EXISTS `product_db_1`;
CREATE DATABASE `product_db_1` CHARACTER SET 'utf8' COLLATE 'utf8_general_ci';
USE `product_db_1`;

DROP TABLE IF EXISTS `product_descript_1`;
CREATE TABLE `product_descript_1` (
	`id` BIGINT(20) NOT NULL COMMENT 'id',
	`product_info_id` BIGINT(20) NULL DEFAULT NULL COMMENT '所属商品id',
	`descript` LONGTEXT CHARACTER SET utf8 COLLATE utf8_general_ci NULL COMMENT '商品描述',
	`store_info_id` BIGINT(20) NULL DEFAULT NULL COMMENT '所属店铺id',
	PRIMARY KEY (`id`) USING BTREE,
	INDEX `FK_Reference_2`(`product_info_id`) USING BTREE
) ENGINE = INNODB CHARACTER SET = utf8 COLLATE = utf8_general_ci ROW_FORMAT = DYNAMIC;

DROP TABLE IF EXISTS `product_descript_2`;
CREATE TABLE `product_descript_2` (
	`id` BIGINT(20) NOT NULL COMMENT 'id',
	`product_info_id` BIGINT(20) NULL DEFAULT NULL COMMENT '所属商品id',
	`descript` LONGTEXT CHARACTER SET utf8 COLLATE utf8_general_ci NULL COMMENT '商品描述',
	`store_info_id` BIGINT(20) NULL DEFAULT NULL COMMENT '所属店铺id',
	INDEX `FK_Reference_2`(`product_info_id`) USING BTREE
) ENGINE = INNODB CHARACTER SET = utf8 COLLATE = utf8_general_ci ROW_FORMAT = DYNAMIC;

DROP TABLE IF EXISTS `product_info_1`;
CREATE TABLE `product_info_1` (
	`product_info_id` BIGINT(20) NOT NULL COMMENT 'id',
	`store_info_id` BIGINT(20) NULL DEFAULT NULL COMMENT '所属店铺id',
	`product_name` VARCHAR(100) CHARACTER SET utf8 COLLATE utf8_general_ci NULL DEFAULT NULL COMMENT '商品名称',
	`spec` VARCHAR(50) CHARACTER SET utf8 COLLATE utf8_general_ci NULL DEFAULT NULL COMMENT '规格',
	`region_code` VARCHAR(50) CHARACTER SET utf8 COLLATE utf8_general_ci NULL DEFAULT NULL COMMENT '产地',
	`price` DECIMAL(10, 0) NULL DEFAULT NULL COMMENT '商品价格',
	`image_url` VARCHAR(100) CHARACTER SET utf8 COLLATE utf8_general_ci NULL DEFAULT NULL COMMENT '商品图片',
	PRIMARY KEY (`product_info_id`) USING BTREE,
	INDEX `FK_Reference_1`(`store_info_id`) USING BTREE
) ENGINE = INNODB CHARACTER SET = utf8 COLLATE = utf8_general_ci ROW_FORMAT = DYNAMIC;

DROP TABLE IF EXISTS `product_info_2`;
CREATE TABLE `product_info_2` (
	`product_info_id` BIGINT(20) NOT NULL COMMENT 'id',
	`store_info_id` BIGINT(20) NULL DEFAULT NULL COMMENT '所属店铺id',
	`product_name` VARCHAR(100) CHARACTER SET utf8 COLLATE utf8_general_ci NULL DEFAULT NULL COMMENT '商品名称',
	`spec` VARCHAR(50) CHARACTER SET utf8 COLLATE utf8_general_ci NULL DEFAULT NULL COMMENT '规格',
	`region_code` VARCHAR(50) CHARACTER SET utf8 COLLATE utf8_general_ci NULL DEFAULT NULL COMMENT '产地',
	`price` DECIMAL(10, 0) NULL DEFAULT NULL COMMENT '商品价格',
	`image_url` VARCHAR(100) CHARACTER SET utf8 COLLATE utf8_general_ci NULL DEFAULT NULL COMMENT '商品图片',
	PRIMARY KEY (`product_info_id`) USING BTREE,
	INDEX `FK_Reference_1`(`store_info_id`) USING BTREE
) ENGINE = INNODB CHARACTER SET = utf8 COLLATE = utf8_general_ci ROW_FORMAT = DYNAMIC;- 执行 product_db_2.sql 创建 product_db_2 数据库和其中的四张表
sql
DROP DATABASE IF EXISTS `product_db_2`;
CREATE DATABASE `product_db_2` CHARACTER SET 'utf8' COLLATE 'utf8_general_ci';
USE `product_db_2`;

DROP TABLE IF EXISTS `product_descript_1`;
CREATE TABLE `product_descript_1` (
	`id` BIGINT(20) NOT NULL COMMENT 'id',
	`product_info_id` BIGINT(20) NULL DEFAULT NULL COMMENT '所属商品id',
	`descript` LONGTEXT CHARACTER SET utf8 COLLATE utf8_general_ci NULL COMMENT '商品描述',
	`store_info_id` BIGINT(20) NULL DEFAULT NULL COMMENT '所属店铺id',
	PRIMARY KEY (`id`) USING BTREE,
	INDEX `FK_Reference_2`(`product_info_id`) USING BTREE
) ENGINE = INNODB CHARACTER SET = utf8 COLLATE = utf8_general_ci ROW_FORMAT = DYNAMIC;

DROP TABLE IF EXISTS `product_descript_2`;
CREATE TABLE `product_descript_2` (
	`id` BIGINT(20) NOT NULL COMMENT 'id',
	`product_info_id` BIGINT(20) NULL DEFAULT NULL COMMENT '所属商品id',
	`descript` LONGTEXT CHARACTER SET utf8 COLLATE utf8_general_ci NULL COMMENT '商品描述',
	`store_info_id` BIGINT(20) NULL DEFAULT NULL COMMENT '所属店铺id',
	INDEX `FK_Reference_2`(`product_info_id`) USING BTREE
) ENGINE = INNODB CHARACTER SET = utf8 COLLATE = utf8_general_ci ROW_FORMAT = DYNAMIC;

DROP TABLE IF EXISTS `product_info_1`;
CREATE TABLE `product_info_1` (
	`product_info_id` BIGINT(20) NOT NULL COMMENT 'id',
	`store_info_id` BIGINT(20) NULL DEFAULT NULL COMMENT '所属店铺id',
	`product_name` VARCHAR(100) CHARACTER SET utf8 COLLATE utf8_general_ci NULL DEFAULT NULL COMMENT '商品名称',
	`spec` VARCHAR(50) CHARACTER SET utf8 COLLATE utf8_general_ci NULL DEFAULT NULL COMMENT '规格',
	`region_code` VARCHAR(50) CHARACTER SET utf8 COLLATE utf8_general_ci NULL DEFAULT NULL COMMENT '产地',
	`price` DECIMAL(10, 0) NULL DEFAULT NULL COMMENT '商品价格',
	`image_url` VARCHAR(100) CHARACTER SET utf8 COLLATE utf8_general_ci NULL DEFAULT NULL COMMENT '商品图片',
	PRIMARY KEY (`product_info_id`) USING BTREE,
	INDEX `FK_Reference_1`(`store_info_id`) USING BTREE
) ENGINE = INNODB CHARACTER SET = utf8 COLLATE = utf8_general_ci ROW_FORMAT = DYNAMIC;

DROP TABLE IF EXISTS `product_info_2`;
CREATE TABLE `product_info_2` (
	`product_info_id` BIGINT(20) NOT NULL COMMENT 'id',
	`store_info_id` BIGINT(20) NULL DEFAULT NULL COMMENT '所属店铺id',
	`product_name` VARCHAR(100) CHARACTER SET utf8 COLLATE utf8_general_ci NULL DEFAULT NULL COMMENT '商品名称',
	`spec` VARCHAR(50) CHARACTER SET utf8 COLLATE utf8_general_ci NULL DEFAULT NULL COMMENT '规格',
	`region_code` VARCHAR(50) CHARACTER SET utf8 COLLATE utf8_general_ci NULL DEFAULT NULL COMMENT '产地',
	`price` DECIMAL(10, 0) NULL DEFAULT NULL COMMENT '商品价格',
	`image_url` VARCHAR(100) CHARACTER SET utf8 COLLATE utf8_general_ci NULL DEFAULT NULL COMMENT '商品图片',
	PRIMARY KEY (`product_info_id`) USING BTREE,
	INDEX `FK_Reference_1`(`store_info_id`) USING BTREE
) ENGINE = INNODB CHARACTER SET = utf8 COLLATE = utf8_general_ci ROW_FORMAT = DYNAMIC;
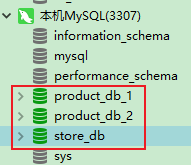
此时观察从库,会发现从库中已经存在上述数据库和表,说明主从数据同步已经发挥了作用。
分库分表功能实现
工程依赖
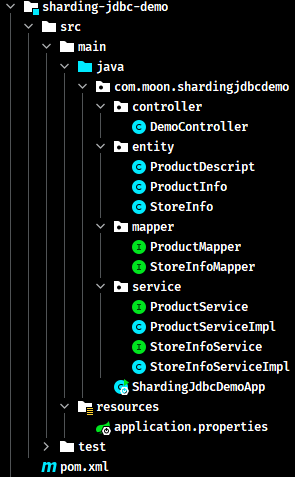
创建 maven 工程 sharding-jdbc-demo,在 pom 中引入相关依赖:
xml
<dependencyManagement>
    <dependencies>
        <dependency>
            <groupId>org.springframework.boot</groupId>
            <artifactId>spring-boot-dependencies</artifactId>
            <version>2.2.4.RELEASE</version>
            <type>pom</type>
            <scope>import</scope>
        </dependency>
    </dependencies>
</dependencyManagement>

<dependencies>
    <dependency>
        <groupId>org.springframework.boot</groupId>
        <artifactId>spring-boot-starter-web</artifactId>
    </dependency>

    <dependency>
        <groupId>org.springframework.boot</groupId>
        <artifactId>spring-boot-starter-actuator</artifactId>
    </dependency>

    <dependency>
        <groupId>org.springframework.boot</groupId>
        <artifactId>spring-boot-configuration-processor</artifactId>
        <optional>true</optional>
    </dependency>

    <dependency>
        <groupId>javax.interceptor</groupId>
        <artifactId>javax.interceptor-api</artifactId>
        <version>1.2</version>
    </dependency>

    <dependency>
        <groupId>mysql</groupId>
        <artifactId>mysql-connector-java</artifactId>
        <version>5.1.48</version>
    </dependency>

    <dependency>
        <groupId>org.mybatis.spring.boot</groupId>
        <artifactId>mybatis-spring-boot-starter</artifactId>
        <version>2.0.0</version>
    </dependency>

    <dependency>
        <groupId>com.alibaba</groupId>
        <artifactId>druid-spring-boot-starter</artifactId>
        <version>1.1.16</version>
    </dependency>

    <!-- sharding-jdbc 依赖 -->
    <dependency>
        <groupId>org.apache.shardingsphere</groupId>
        <artifactId>sharding-jdbc-spring-boot-starter</artifactId>
        <version>4.0.0-RC1</version>
    </dependency>

    <dependency>
        <groupId>org.projectlombok</groupId>
        <artifactId>lombok</artifactId>
        <version>1.18.0</version>
    </dependency>
</dependencies>

<build>
    <finalName>${project.name}</finalName>
    <resources>
        <resource>
            <directory>src/main/resources</directory>
            <filtering>true</filtering>
            <includes>
                <include>**/*</include>
            </includes>
        </resource>
        <resource>
            <directory>src/main/java</directory>
            <includes>
                <include>**/*.xml</include>
            </includes>
        </resource>
    </resources>
    <plugins>
        <plugin>
            <groupId>org.springframework.boot</groupId>
            <artifactId>spring-boot-maven-plugin</artifactId>
        </plugin>

        <plugin>
            <groupId>org.apache.maven.plugins</groupId>
            <artifactId>maven-compiler-plugin</artifactId>
            <configuration>
                <source>1.8</source>
                <target>1.8</target>
            </configuration>
        </plugin>

        <plugin>
            <artifactId>maven-resources-plugin</artifactId>
            <configuration>
                <encoding>utf-8</encoding>
                <useDefaultDelimiters>true</useDefaultDelimiters>
            </configuration>
        </plugin>
    </plugins>
</build>
项目配置
在 resources 目录创建 application.properties 配置文件,配置内容如下:
- 基础配置部分
properties
server.port=56081
spring.application.name=sharding-jdbc-demo
server.servlet.context-path=/sharding-jdbc-demo
spring.http.encoding.enabled=true
spring.http.encoding.charset=UTF-8
spring.http.encoding.force=true

# 同名bean允许覆盖
spring.main.allow-bean-definition-overriding=true

# 将带有下划线的表字段映射为驼峰格式的实体类属性
mybatis.configuration.map-underscore-to-camel-case=true- sharding-jdbc 配置部分。sharding-jdbc 的使用主要是配置,代码的逻辑跟以往的数据库操作一样
properties
# 真实数据源定义(本示例共6个库),指定涉及的数据库名称(名称自定)
spring.shardingsphere.datasource.names=m0,m1,m2,s0,s1,s2
# 指定名称相关的数据库信息
spring.shardingsphere.datasource.m0.type=com.alibaba.druid.pool.DruidDataSource
spring.shardingsphere.datasource.m0.driver-class-name=com.mysql.jdbc.Driver
spring.shardingsphere.datasource.m0.url=jdbc:mysql://localhost:3306/store_db?useUnicode=true&useSSL=false&characterEncoding=utf8
spring.shardingsphere.datasource.m0.username=root
spring.shardingsphere.datasource.m0.password=123456
spring.shardingsphere.datasource.m1.type=com.alibaba.druid.pool.DruidDataSource
spring.shardingsphere.datasource.m1.driver-class-name=com.mysql.jdbc.Driver
spring.shardingsphere.datasource.m1.url=jdbc:mysql://localhost:3306/product_db_1?useUnicode=true&useSSL=false&characterEncoding=utf8
spring.shardingsphere.datasource.m1.username=root
spring.shardingsphere.datasource.m1.password=123456
spring.shardingsphere.datasource.m2.type=com.alibaba.druid.pool.DruidDataSource
spring.shardingsphere.datasource.m2.driver-class-name=com.mysql.jdbc.Driver
spring.shardingsphere.datasource.m2.url=jdbc:mysql://localhost:3306/product_db_2?useUnicode=true&useSSL=false&characterEncoding=utf8
spring.shardingsphere.datasource.m2.username=root
spring.shardingsphere.datasource.m2.password=123456
spring.shardingsphere.datasource.s0.type=com.alibaba.druid.pool.DruidDataSource
spring.shardingsphere.datasource.s0.driver-class-name=com.mysql.jdbc.Driver
spring.shardingsphere.datasource.s0.url=jdbc:mysql://localhost:3307/store_db?useUnicode=true&useSSL=false&characterEncoding=utf8
spring.shardingsphere.datasource.s0.username=root
spring.shardingsphere.datasource.s0.password=123456
spring.shardingsphere.datasource.s1.type=com.alibaba.druid.pool.DruidDataSource
spring.shardingsphere.datasource.s1.driver-class-name=com.mysql.jdbc.Driver
spring.shardingsphere.datasource.s1.url=jdbc:mysql://localhost:3307/product_db_1?useUnicode=true&useSSL=false&characterEncoding=utf8
spring.shardingsphere.datasource.s1.username=root
spring.shardingsphere.datasource.s1.password=123456
spring.shardingsphere.datasource.s2.type=com.alibaba.druid.pool.DruidDataSource
spring.shardingsphere.datasource.s2.driver-class-name=com.mysql.jdbc.Driver
spring.shardingsphere.datasource.s2.url=jdbc:mysql://localhost:3307/product_db_2?useUnicode=true&useSSL=false&characterEncoding=utf8
spring.shardingsphere.datasource.s2.username=root
spring.shardingsphere.datasource.s2.password=123456

# =============================================
# 定义逻辑数据源(主从对应关系)
# =============================================
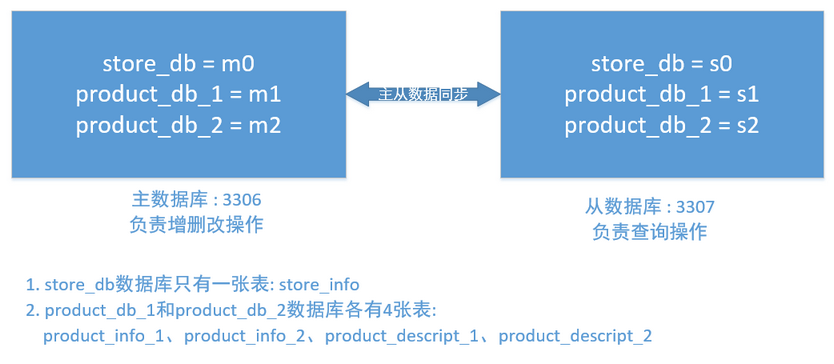
# 以下的配置含义是:ds0 数据源的主库是 m0,从库是 s0;ds1 数据源的主库是 m1,从库是 s1;...
spring.shardingsphere.sharding.master-slave-rules.ds0.master-data-source-name=m0
spring.shardingsphere.sharding.master-slave-rules.ds0.slave-data-source-names=s0
spring.shardingsphere.sharding.master-slave-rules.ds1.master-data-source-name=m1
spring.shardingsphere.sharding.master-slave-rules.ds1.slave-data-source-names=s1
spring.shardingsphere.sharding.master-slave-rules.ds2.master-data-source-name=m2
spring.shardingsphere.sharding.master-slave-rules.ds2.slave-data-source-names=s2

# =============================================
# 定义分库策略
# 即插入数据时按什么逻辑策略去决定具体保存到哪个数据库。此示例的分库策略是按“店铺id”字段奇偶数来决定,奇数时保存到 product_db_1;偶数时保存到 product_db_2。配置如下:
# =============================================
# 分片键
spring.shardingsphere.sharding.default-database-strategy.inline.sharding-column=store_info_id
# 分片策略(算法行表达式,需符合groovy语法)
spring.shardingsphere.sharding.default-database-strategy.inline.algorithm-expression=ds$->{store_info_id % 2+1}

# =============================================
# 定义分表策略。示例共有3张表需要拆分
# =============================================
# store_info 分表配置
# 指定真实的数据节点。由数据源名 + 表名组成,以小数点分隔。多个表以逗号分隔,支持inline表达式。
spring.shardingsphere.sharding.tables.store_info.actual-data-nodes=ds$->{0}.store_info
# 分片键
spring.shardingsphere.sharding.tables.store_info.table-strategy.inline.sharding-column=id
# 分片策略为固定分配至 ds0 的 store_info 真实表
spring.shardingsphere.sharding.tables.store_info.table-strategy.inline.algorithm-expression=store_info

# product_info 分表配置
# 指定真实的数据节点(由数据源名 + 表名组成,以小数点分隔。多个表以逗号分隔,支持inline表达式)。分布在 ds1,ds2 的 product_info_1 和 product_info_2 表
spring.shardingsphere.sharding.tables.product_info.actual-data-nodes=ds$->{1..2}.product_info_$->{1..2}
# 分片键
spring.shardingsphere.sharding.tables.product_info.table-strategy.inline.sharding-column=product_info_id
# 分片策略为 product_info_id % 2+1
spring.shardingsphere.sharding.tables.product_info.table-strategy.inline.algorithm-expression=product_info_$->{product_info_id % 2+1}
# 自增列名称,缺省表示不使用自增主键生成器
spring.shardingsphere.sharding.tables.product_info.key-generator.column=product_info_id
# 自增列 product_info_id 采用雪花算法
spring.shardingsphere.sharding.tables.product_info.key-generator.type=SNOWFLAKE

# product_descript 分表配置
# 指定真实的数据节点。分布在 ds1,ds2 的 product_descript_1 和 product_descript_2 表
spring.shardingsphere.sharding.tables.product_descript.actual-data-nodes=ds$->{1..2}.product_descript_$->{1..2}
# 分片键
spring.shardingsphere.sharding.tables.product_descript.table-strategy.inline.sharding-column=product_info_id
# 分片策略为 product_info_id % 2+1
spring.shardingsphere.sharding.tables.product_descript.table-strategy.inline.algorithm-expression=product_descript_$->{product_info_id %2+1}
# 自增列名称,缺省表示不使用自增主键生成器
spring.shardingsphere.sharding.tables.product_descript.key-generator.column=id
# 自增列 id 采用雪花算法
spring.shardingsphere.sharding.tables.product_descript.key-generator.type=SNOWFLAKE

# 设置绑定表规则,商品表与商品描述表,配置值是逻辑表(简单理解是表名没有尾数的)
spring.shardingsphere.sharding.binding-tables=product_info,product_descript

# 是否开启SQL输出日志显示,默认值: false
spring.shardingsphere.props.sql.show=true
以上配置相应梳理,如下图所示:
持久层接口与业务功能
此部分代码与平常的单数据库单表操作一样。具体代码详见:wanxinp2p-project\wanxinp2p\technology-stack-demo\sharding-jdbc-demo\。
以下是 mapper 接口部分代码
java
@Mapper
public interface ProductMapper {

    @Insert("insert into product_info(store_info_id,product_name,spec,region_code,price,image_url) value (#{storeInfoId},#{productName},#{spec},#{regionCode},#{price},#{imageUrl})")
    @Options(useGeneratedKeys = true, keyProperty = "id", keyColumn = "product_info_id")
    int insertProductInfo(ProductInfo productInfo);

    @Insert("insert into product_descript(product_info_id,descript,store_info_id) value (#{productInfoId},#{descript},#{storeInfoId})")
    @Options(useGeneratedKeys = true, keyProperty = "id", keyColumn = "id")
    int insertProductDescript(ProductDescript productDescript);

    @Select("select i.*, d.descript from product_info i inner join product_descript d on i.product_info_id = d.product_info_id")
    List<ProductInfo> selectProductList();
}值得注意的是:在编号SQL语句时,表名均为逻辑表的名称,非数据库真实存在的表,此处就是通过sql操作逻辑表,由 Sharding-JDBC 根据配置来决定具体操作哪些库、哪些真实表
功能测试
启动两个 MySQL 服务,启动 sharding-jdbc-demo 工程,通过 postman 请求进行测试
- 通过创建商品接口新增商品进行分库验证,
store_info_id为奇数的数据在 product_db_1,为偶数的数据在 product_db_2 - 通过创建商品接口新增商品进行分表验证,
product_id为奇数的数据在 product_info_1、product_descript_1,为偶数的数据在 product_info_2、product_descript_2
POST http://localhost:56081/sharding-jdbc-demo/products请求参数,注:通过 storeInfoId 改变来测试数据是否保存到正确的数据库中,其取值要根据 store_db 库的 store_info 表
json
{
    "descript": "商品描述",
    "imageUrl": "商品图片",
    "price": 3,
    "productName": "可乐饮料",
    "regionCode": 410100,
    "spec": "500ml",
    "storeInfoId": 2
}- 主从数据同步验证,观察数据是否同步到从库即可
- 通过商品查询接口进行商品数据查询,验证读写分离
GET http://localhost:56081/sharding-jdbc-demo/products