Appearance
Eureka案例代码地址:
spring-cloud-note\spring-cloud-greenwich-sample\02-springcloud-eureka\
Eureka 注册中心
Eureka 是 Netflix 开发的服务发现框架,SpringCloud 将它集成在自己的子项目 spring-cloud-netflix 中,实现 Spring Cloud 的服务发现功能。Spring Cloud 提供了多种注册中心的支持,如:Eureka、ZooKeeper 等。推荐使用 Eureka。
Eureka 的基本架构
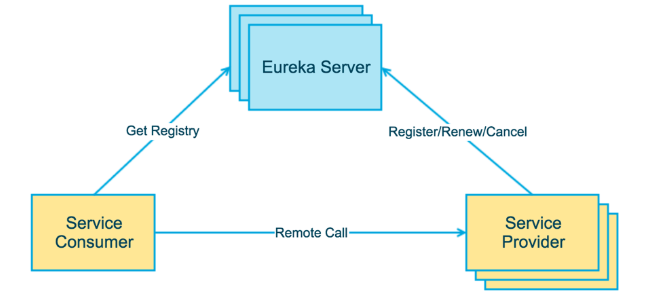
上图简要描述了 Eureka 的基本架构,由3个角色组成:
Eureka Server:注册中心服务端,提供服务注册和发现功能Eureka client:客户端,指注册到注册中心的具体的服务实例。又可抽象分为服务提供者和服务消费者。Service Provider:服务提供者,将自身服务注册到 Eureka,使服务消费方能够找到Service Consumer:服务消费者,从 Eureka 获取注册服务列表,调用相应的服务
Eureka 的交互流程与原理
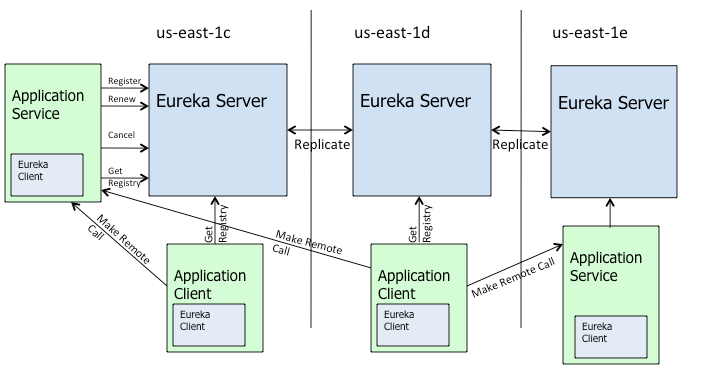
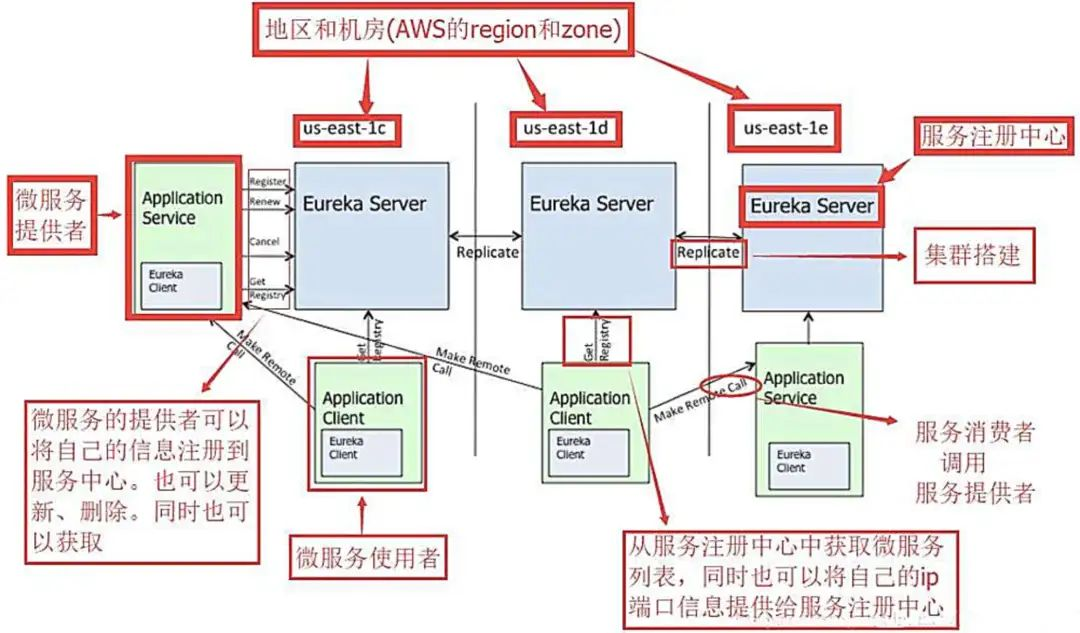
上图是 Eureka 官方的架构图,大致描述了 Eureka 集群的工作过程。
- Application Service 相当于服务提供者,Application Client 相当于服务消费者。
- Make Remote Call 可以简单理解为调用 RESTful API。
- us-east-1c、us-east-1d 等都是 zone,它们都属于 us-east-1 这个 region。
简化版架构图:
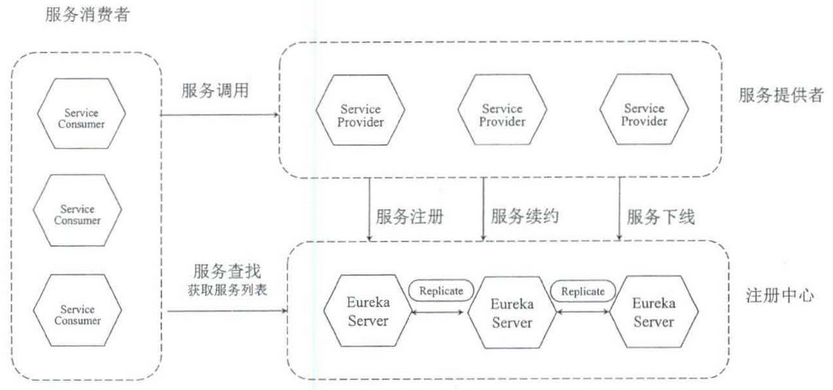
Eureka包含两个组件:Eureka Server 和 Eureka Client,作用如下:
- Eureka Client 是一个 Java 客户端,用于简化与 Eureka Server 的交互。客户端同时也就别一个内置的、使用轮询(round-robin)负载算法的负载均衡器。
- Eureka Server 提供服务发现的能力,各个微服务节点启动时,会通过 Eureka Client 向 Eureka Server 进行注册自己的信息(例如网络信息),Eureka Server 服务注册表中将会存储所有可用服务节点的信息到内存中,服务节点的信息可以在管理平台界面中直观的看到。
- 各个微服务节点启动后,会周期性地向 Eureka Server 发送心跳(默认周期为30秒)以续约自己的信息。如果 Eureka Server 在多个心跳周期内没有接收到某个微服务节点的心跳,Eureka Server 将会注销该微服务节点(即把这个服务节点从服务注册表中移除,默认90秒)。
- 每个 Eureka Server 同时也是 Eureka Client,多个 Eureka Server之 间通过复制的方式完成服务注册表数据的同步。
- Eureka Client 还提供了客户端缓存机制,会缓存 Eureka Server 中的信息。即使所有的 Eureka Server 节点都宕掉,服务消费者依然可以使用缓存中的信息找到服务提供者。
Eureka 通过心跳检查、客户端缓存等机制,确保了系统的高可用性、灵活性和可伸缩性。
Eureka 注册中心使用示例
案例代码:spring-cloud-note\spring-cloud-greenwich-sample\02-springcloud-eureka\
沿用上面
01-microservice-no-springcloud项目的代码
引入 Spring Cloud 依赖
修改聚合工程pom.xml文件,增加spring cloud Greenwich 版本的依赖
xml
<dependencyManagement>
    <dependencies>
        <!-- Spring Cloud Greenwich 版本的依赖 -->
        <dependency>
            <groupId>org.springframework.cloud</groupId>
            <artifactId>spring-cloud-dependencies</artifactId>
            <version>Greenwich.RELEASE</version>
            <type>pom</type>
            <scope>import</scope>
        </dependency>
    </dependencies>
</dependencyManagement>
搭建Eureka注册中心(单节点版)
搭建Eureka服务中心
- 创建
shop-server-eureka子模块,引入eureka服务端的依赖
xml
<dependencies>
    <dependency>
        <groupId>org.springframework.cloud</groupId>
        <artifactId>spring-cloud-starter-netflix-eureka-server</artifactId>
    </dependency>
</dependencies>- 配置
application.yml文件
yml
server:
  port: 8001 # 项目端口
spring:
  application:
    name: shop-server-eureka # 服务名称
# eureka配置部分
eureka:
  instance:
    hostname: localhost
  client:
    # 是否将自己注册到Eureka服务中,如果不是高可用部署,则不需要注册(注:也可以写成驼峰命名registerWithEureka)
    register-with-eureka: false
    # 服务发现,是否从Eureka中获取注册信息
    fetch-registry: false
    service-url:
      # Eureka客户端与Eureka服务端的交互地址,高可用状态配置对方的地址,单机状态配置自己(如果不配置则默认本机8761端口)
      defaultZone: http://${eureka.instance.hostname}:${server.port}/eureka/
配置说明:
registerWithEureka:是否将自己注册到Eureka服务中,非高可用部署的情况,本身就是无需注册fetchRegistry:服务发现,是否从Eureka中获取注册信息service-url.defaultZone:Eureka客户端与Eureka服务端进行交互的地址
注:驼峰命名
registerWithEureka与分隔符命名register-with-eureka的效果一样
- 创建启动类
EurekaServerApplication,使用@EnableEurekaServer注解标识开启Eureka服务端
java
@SpringBootApplication
// 标识开启Eureka Server端
@EnableEurekaServer
public class EurekaServerApplication {
    public static void main(String[] args) {
        SpringApplication.run(EurekaServerApplication.class, args);
    }
}
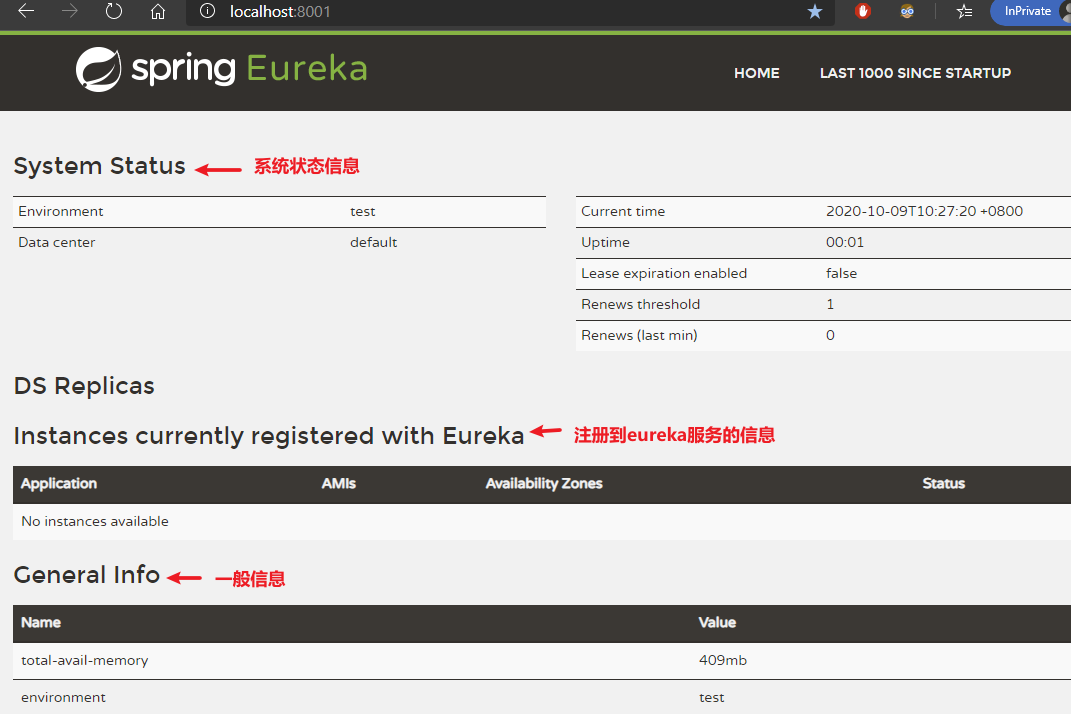
服务注册中心管理后台
访问http://localhost:8761即可进入EurekaServer内置的管理控制台
服务注册到Eureka注册中心
商品服务注册
- 在
shop-service-product工程的pom.xml文件增加eureka client的相关坐标
xml
<!-- 引入 Eureka Client 端依赖-->
<dependency>
    <groupId>org.springframework.cloud</groupId>
    <artifactId>spring-cloud-starter-netflix-eureka-client</artifactId>
</dependency>- 配置application.yml文件,添加Eureka Server的主机地址
yml
# Eureka 客户端配置
eureka:
  instance:
    prefer-ip-address: true # 将当前服务的ip地址注册到Eureka服务中
    instance-id: ${spring.application.name}:${server.port}  # 指定实例id
  client:
    register-with-eureka: true  # 服务注册开关
    fetch-registry: true  # 服务发现开关
    # Eureka server 地址,多个eureka server之间用,隔开
    service-url:
defaultZone: http://localhost:8001/eureka/- 修改工程的启动类添加服务注册的注解
@EnableDiscoveryClient或者@EnableEurekaClient
java
@SpringBootApplication(scanBasePackages = "com.moon.product")
@EntityScan("com.moon.entity") // 指定扫描实体类的包路径
/* 从Spring Cloud Edgware版本开始,以下两个注解均可以省略不写。只需加上相关依赖与相应配置,即可注册服务 */
// @EnableEurekaClient // 基于spring-cloud-netflix依赖,只能为eureka作用
// @EnableDiscoveryClient // 基于spring cloud自身的依赖,可以作用于除了eureka之外的注册中心
public class ProductApplication {
    public static void main(String[] args) {
        SpringApplication.run(ProductApplication.class, args);
    }
}
注:从Spring Cloud Edgware版本开始,
@EnableDiscoveryClient或@EnableEurekaClient可省略。只需加上相关依赖,并进行相应配置,即可将微服务注册到服务发现组件上。
订单服务注册
和商品微服务一样,只需要引入坐标依赖,在工程的 application.yml 中添加Eureka Server的主机地址即可
@EnableDiscoveryClient 与 @EnableEurekaClient 的区别
两个注解的用法上基本一致。
@EnableDiscoveryClient注解是基于spring-cloud-commons依赖,并且在classpath中实现;@EnableEurekaClient注解是基于spring-cloud-netflix依赖,只能为eureka作用;- 更简单来说,就是如果选用的注册中心是eureka,那么就推荐
@EnableEurekaClient,如果是其他的注册中心,那么推荐使用@EnableDiscoveryClient。
如果你的classpath中添加了eureka,则它们的作用是一样的。
注解@EnableEurekaClient上有@EnableDiscoveryClient注解,可以说基本就是@EnableEurekaClient有@EnableDiscoveryClient的功能,另外上面的注释中提到,其实@EnableEurekaClient注解就是一种方便使用eureka的注解而已,可以说使用其他的注册中心后,都可以使用@EnableDiscoveryClient注解,但是使用@EnableEurekaClient的情景,就是在服务采用eureka作为注册中心的时候,使用场景较为单一
Eureka 自我保护模式
概述
微服务第一次注册成功之后,每30秒会发送一次心跳将服务的实例信息注册到注册中心。通知 Eureka Server 该实例仍然存在。默认情况下,如果 Eureka Server 在一定时间内没有接收到某个微服务实例的心跳,Eureka Server 将会注销该实例(默认90秒)。但是当网络分区故障发生时,微服务与 Eureka Server 之间无法正常通信,这就可能变得非常危险了。因为微服务本身是健康的,此时本不应该注销这个微服务。
Eureka Server 通过“自我保护模式”来解决这个问题。Eureka Server 在运行期间,会统计心跳失败的比例在15分钟之内是否低于85%,如果出现低于的情况(在单机调试的时候很容易满足,实际在生产环境上通常是由于网络不稳定导致),Eureka Server 节点在短时间内丢失过多客户端时(可能发生了网络分区故障),那么这个节点就会进入自我保护模式。一旦进入该模式,Eureka Server 就会保护服务注册表中的信息,不再删除服务注册表中的数据(也就是不会注销任何微服务),同时提示以下警告。
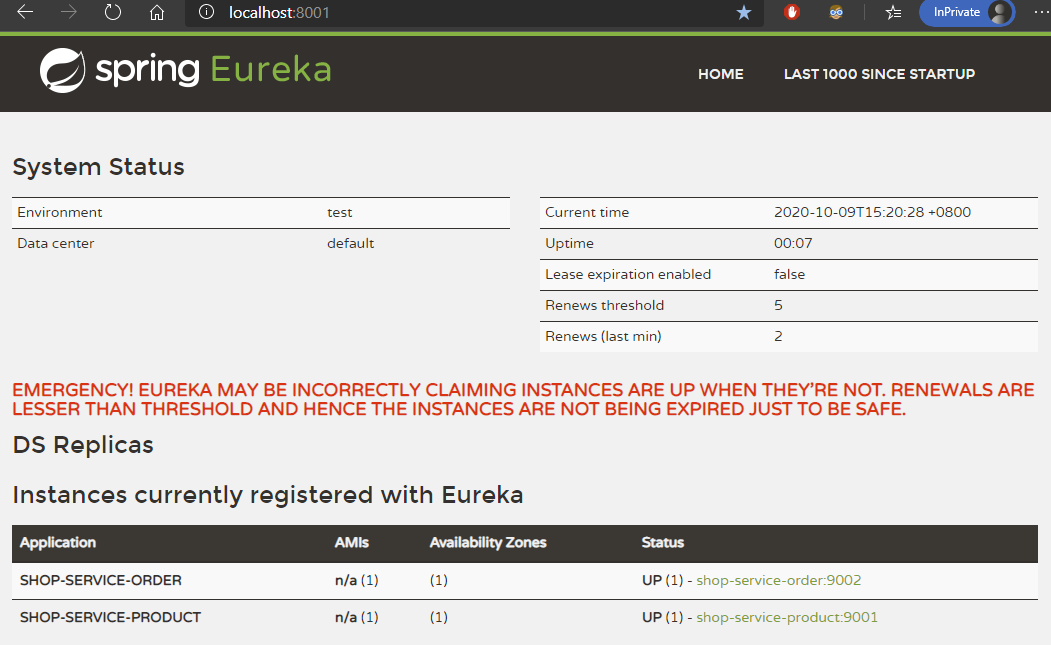
一般进入自我保护模式,无需处理。当网络故障恢复后,该 Eureka Server 节点会自动退出自我保护模式。自我保护模式是一种对网络异常的安全保护措施。使用自我保护模式,而已让 Eureka 集群更加的健壮、稳定。
Notes: 验证完自我保护机制开启后,并不会马上呈现到 web 上,而是默认需等待5分钟(可以通过
eureka.server.wait-time-in-ms-when-sync-empty配置),即 5 分钟后才会看到上面的提示信息。
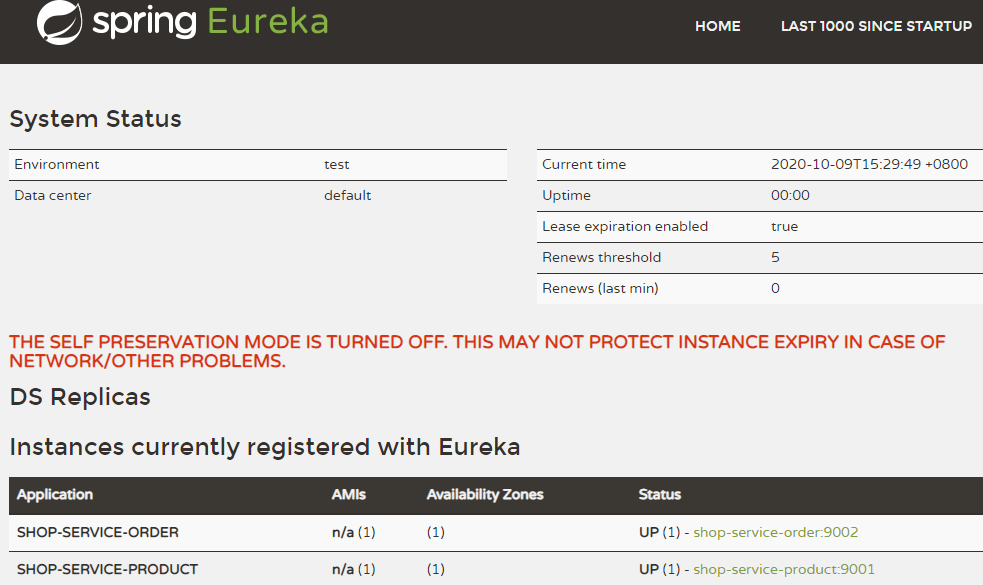
禁用自我保护模式
如果需要禁用自我保护模式,只需要在 eureka server 配置文件中添加配置:
yml
eureka:
  instance:
    hostname: localhost
  client:
    register-with-eureka: false
    fetch-registry: false
    service-url:
      defaultZone: http://${eureka.instance.hostname}:${server.port}/eureka/
  server:
    enable-self-preservation: false # 禁用自我保护模式
Tips: 如果禁用自我保护模式,在网络通信故障下会出现问题。
Eureka 中的元数据
概念
Eureka的元数据有两种:标准元数据和自定义元数据
- 标准元数据:主机名、IP地址、端口号、状态页和健康检查等信息,这些信息都会被发布在服务注册表中,用于服务之间的调用
- 自定义元数据:可以使用
eureka.instance.metadata-map配置,符合KEY/VALUE的存储格式。这些元数据可以在远程客户端中访问
在程序中可以使用 org.springframework.cloud.client.discovery.DiscoveryClient 获取指定微服务的所有元数据信息
java
@RunWith(SpringRunner.class)
@SpringBootTest
public class EurekaTest {
    @Autowired
    private DiscoveryClient discoveryClient;

    /* Eureka元数据 */
    @Test
    public void eurekaMetadataTest() {
        // 调用discoveryClient的getInstances方法,根据微服务名称从注册中心获取相关的元数据信息
        List<ServiceInstance> instances = discoveryClient.getInstances("shop-service-product");
        // 循环所有元数据
        for (ServiceInstance instance : instances) {
            System.out.println("hostname: " + instance.getHost());
            System.out.println("instanceId: " + instance.getInstanceId());
            System.out.println("port: " + instance.getPort());
            System.out.println("scheme: " + instance.getScheme());
            System.out.println("serviceId: " + instance.getServiceId());
            System.out.println("uri: " + instance.getUri());
            System.out.println("================== 分隔线 =====================");
            // 循环
            for (Map.Entry<String, String> entry : instance.getMetadata().entrySet()) {
                System.out.println("key: " + entry.getKey() + " === value: " + entry.getValue());
            }
            System.out.println("================== 分隔线 =====================");
        }
    }
}
通过 Eureka 的元数据实现服务调用
修改shop-service-order工程的OrderController,注入DiscoveryClient对象,获取商品服务的url,进行远程调用
java
@RestController
@RequestMapping("order")
public class OrderController {
    /* 日志对象 */
    private static final Logger LOGGER = LoggerFactory.getLogger(OrderController.class);

    // 注入HTTP请求工具类RestTemplate
    @Autowired
    private RestTemplate restTemplate;

    // 注入注册中心服务对象
    @Autowired
    private DiscoveryClient discoveryClient;

    /**
     * 根据商品id创建订单
     */
    @PostMapping("/{id}")
    public String createOrder(@PathVariable Long id) {
        // 调用discoveryClient方法,根据服务名称获取所有的元数据
        List<ServiceInstance> instances = discoveryClient.getInstances("shop-service-product");
        // 因为当前商品服务只有一个,所以直接获取唯一的服务实例即可
        ServiceInstance productService = instances.get(0);
        // 拼接请求url
        String uri = String.format("http://%s:%s/product/%d", productService.getHost(), productService.getPort(), id);
        // 通过http请求,获取商品数据
        Product product = restTemplate.getForObject(uri, Product.class);
        LOGGER.info("当前下单的商品是: ${}", product);
        return "创建订单成功";
    }
}
Eureka Server 高可用集群
在单节点的Eureka Server的服务中,Eureka Client会定时连接Eureka Server,获取注册表中的信息并缓存到本地。微服务在消费远程API时总是使用本地缓存中的数据。因此一般来说,即使Eureka Server发生宕机,也不会影响到服务之间的调用。
但如果EurekaServer宕机时,某些微服务也出现了不可用的情况,Eureka Server中的缓存若不被刷新,就可能会影响到微服务的调用,甚至影响到整个应用系统的高可用。因此,在生成环境中,通常会部署一个高可用的Eureka Server集群。
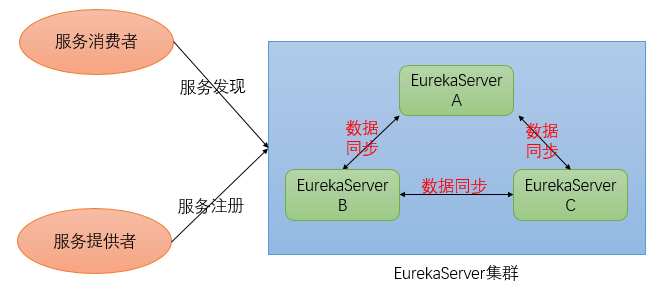
Eureka Server可以通过运行多个实例并相互注册的方式实现高可用部署,Eureka Server实例会彼此增量地同步信息,从而确保所有节点数据一致。事实上,节点之间相互注册是Eureka Server的默认行为
搭建 Eureka Server 高可用集群
复用
spring-cloud-sample-eureka工程的代码,在原有基础上增加集群部分配置。详细示例详见spring-cloud-note\spring-cloud-sample-eureka-cluster\
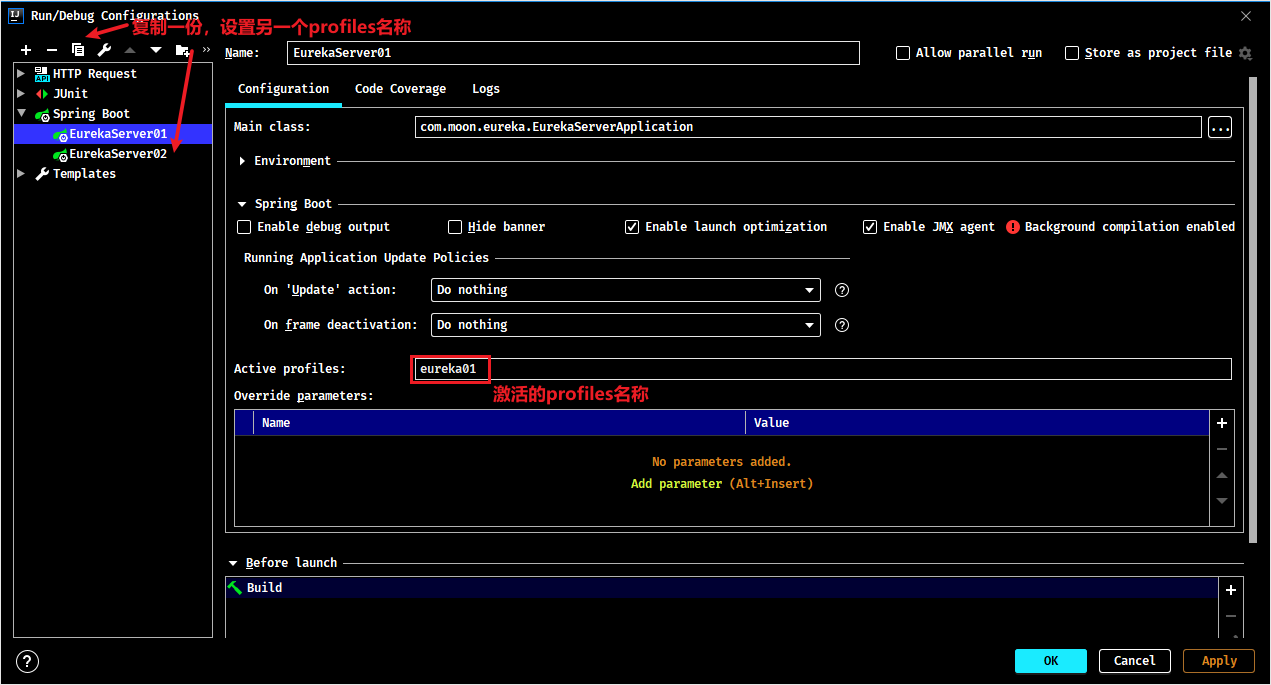
注:使用idea开启多个服务的方法有多种,下面是通过定义不同的profiles的方式,还有通过启动多个实例,直接修改配置文件;还有通过启动时定义配置文件的参数方式,详细参考学成项目的配置方式
修改相关配置
- 修改本机host属性
Eureka配置server集群时需要执行host地址,为了方便配置,增加本地ip与域名的映射
127.0.0.1  eureka01
127.0.0.1 eureka02- 修改
shop-server-eureka工程中的yml配置文件,添加如下配置属性
yml
spring:
  application:
    name: shop-server-eureka # 服务名称
# 定义两个不同环境的profiles配置,模拟两个EurekaServer,端口号分别是8001、8002。两个EurekaServer相应注册
---
# EurekaServer01 配置
spring:
  profiles: eureka01
server:
  port: 8001 # 项目端口
eureka:
  instance:
    hostname: eureka01 # 配置域名
  client:
    # 是否将自己注册到Eureka服务中,eureka集群需要注册,默认为true,因此可以省略不写(注:也可以写成驼峰命名registerWithEureka)
    register-with-eureka: true
    # 服务发现,是否从Eureka中获取注册信息。eureka集群需要相互间获取注册信息,所在设置为true,默认值为true,因此可以省略不写
    fetch-registry: true
    service-url:
      # Eureka客户端与Eureka服务端的交互地址,高可用状态配置对方的地址,可以多个eureka server,多个eureka server之间用,隔开
      defaultZone: http://eureka02:8002/eureka/
---
# EurekaServer02 配置
spring:
  profiles: eureka02
server:
  port: 8002 # 项目端口
eureka:
  instance:
    hostname: eureka02 # 配置域名
  client:
    # 是否将自己注册到Eureka服务中,eureka集群需要注册,默认为true,因此可以省略不写
    # register-with-eureka: true
    # 服务发现,是否从Eureka中获取注册信息。eureka集群需要相互间获取注册信息,所在设置为true,默认值为true,因此可以省略不写
    # fetch-registry: true
    service-url:
      # Eureka客户端与Eureka服务端的交互地址,高可用状态配置对方的地址,可以多个eureka server,多个eureka server之间用,隔开
defaultZone: http://eureka01:8001/eureka/说明:在配置文件中通过连字符(---)将文件分为三个部分,第一部分为应用名称,第二部分和第三部分是根据不同的profiles选项动态添加,可以在IDEA启动时进行激活配置
启动服务
使用IDEA启动两次EurekaServerApplicaion分别激活eureka01和eureka02配置
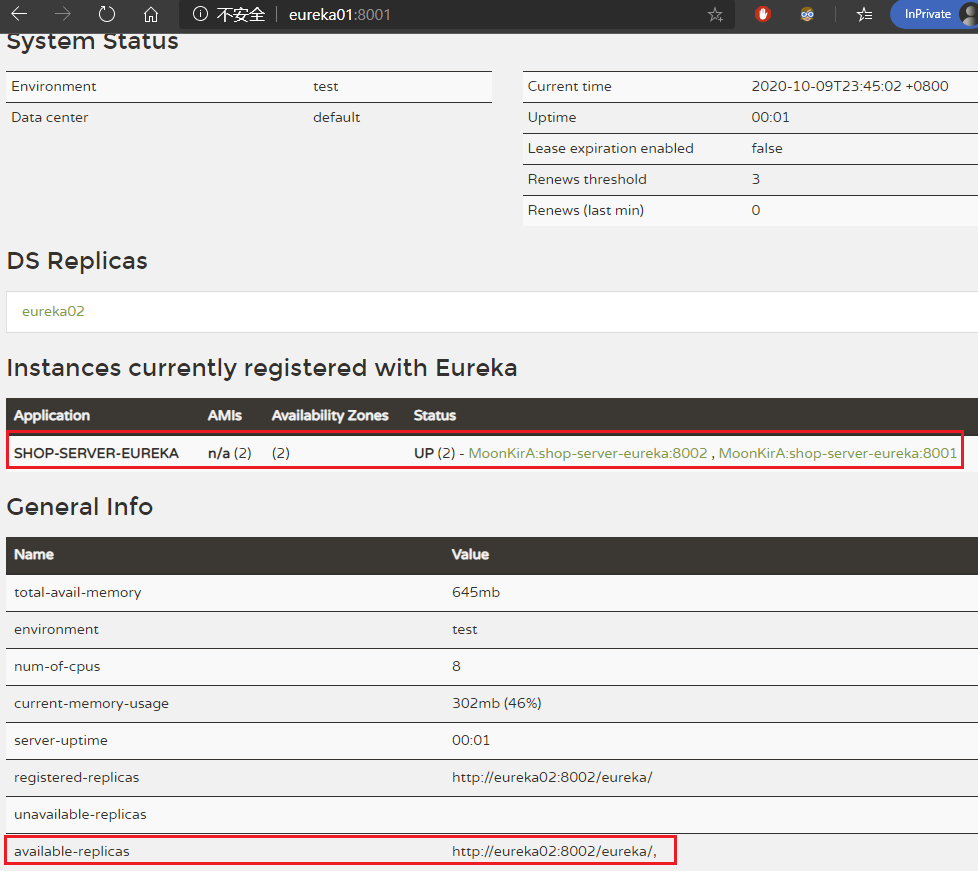
访问http://eureka01:8001和http://eureka02:8002/。此时注册中心 SHOP-SERVER-EUREKA 应用已经有两个节点,并且 registered-replicas (相邻集群复制节点)中已经包含其他节点
服务注册到Eureka Server集群
如果需要将微服务注册到Eureka Server集群,只需要修改yml配置文件中的eureka.client.service-url.defaultZone属性,指定集群各个Eureka Server的地址,多个地址中间用“,”分隔
yml
# Eureka 客户端配置
eureka:
  instance:
    prefer-ip-address: true # 将当前服务的ip地址注册到Eureka服务中
    instance-id: ${spring.application.name}:${server.port}  # 指定实例id
  client:
    # Eureka server 地址,多个eureka server之间用,隔开
    service-url:
      defaultZone: http://eureka01:8001/eureka/,http://eureka02:8002/eureka/
Eureka中的常见细节问题
服务注册慢
默认情况下,服务注册到Eureka Server的过程较慢。SpringCloud官方文档中给出了详细的原因:
大致含义:服务的注册涉及到心跳,默认心跳间隔为30s。在实例、服务器、客户端都在本地缓存中具有相同的元数据之前,服务不可用于客户端发现(所以可能需要3次心跳)。可以通过配置eureka.instance.leaseRenewalIntervalInSeconds (心跳频率)加快客户端连接到其他服务的过程。在生产中,最好使用默认值,因为在服务器内部有一些计算,官方开发团队对续约做出假设。
监控页面显示服务的ip
在Eureka Server的管控台中,显示的服务实例名称默认情况下是微服务定义的名称和端口。为了更好的对所有服务进行定位,微服务注册到Eureka Server的时候可以手动配置示例ID。
通过修改eureka.instance.instance-id属性指定显示的名称,使用el表达式spring.cloud.client.ip-address可以获取当前客户端的ip地址,配置方式如下:
yml
eureka:
  instance:
    prefer-ip-address: true # 将当前服务的ip地址注册到Eureka服务中
    # instance-id: ${spring.application.name}:${server.port}  # 指定实例id,这里只是显示服务名称+端口
    instance-id: ${spring.cloud.client.ip-address}:${server.port}  # 通过 spring.cloud.client.ip-address 可以获取ip地址
服务节点剔除问题
默认情况下,由于 Eureka Server 剔除失效服务间隔时间为 90s 且存在自我保护的机制。所以不能有效而迅速的剔除失效节点,开发或测试时希望可以马上剔除不用的服务。解决方案如下:
- Eureka Server:配置关闭自我保护,设置剔除无效节点的时间间隔
yml
eureka:
  instance:
    hostname: eureka01 # 配置域名
  client:
    service-url:
      defaultZone: http://eureka02:8002/eureka/
  server:
    enable-self-preservation: false # 关闭自我保护(注:一般只用于开发与测试阶段,生产部署还是开启比较好)
eviction-interval-timer-in-ms: 4000 # 剔除时间间隔,单位:毫秒- Eureka Client:配置开启健康检查,并设置续约时间
yml
eureka:
  instance:
    prefer-ip-address: true # 将当前服务的ip地址注册到Eureka服务中
    instance-id: ${spring.cloud.client.ip-address}:${server.port}  # 通过 spring.cloud.client.ip-address 可以获取ip地址
    lease-renewal-interval-in-seconds: 5 # 发送心跳续约间隔时间
    lease-expiration-duration-in-seconds: 10 # eureka client发送心跳给server端后,续约到期时间(默认90秒)
  client:
    # healthcheck: true # 开启健康检查(需要依赖spring-boot-actuator)
    service-url:
      defaultZone: http://eureka01:8001/eureka/,http://eureka02:8002/eureka/
解决响应为xml格式的问题
有些版本会出现请求响应返回数据会变成xml格式。
- 原因:引入了eureka server的依赖,导致破坏了之前SpringMVC默认的配置,从而导致了响应成了xml
- 解决方法:在order工程中pom.xml,排除eureka server中的xml依赖
xml
<dependency>
    <groupId>org.springframework.cloud</groupId>
    <artifactId>spring-cloud-starter-eureka</artifactId>
    <exclusions>
        <exclusion>
            <groupId>com.fasterxml.jackson.dataformat</groupId>
            <artifactId>jackson-dataformat-xml</artifactId>
        </exclusion>
    </exclusions>
</dependency>
为 Eureka 添加用户认证(暂时有问题)
Eureka服务端配置用户认证
添加用户认证,即需要密码才能访问查询注册中心的信息
- 为shop-server-eureka添加安全认证依赖
xml
<!-- eureka安全认证依赖 -->
<dependency>
    <groupId>org.springframework.boot</groupId>
    <artifactId>spring-boot-starter-security</artifactId>
</dependency>- 修改application.yml配置文件,增加开启基于HTTP basic的认证部分配置
yml
spring:
  application:
    name: shop-server-eureka # 服务名称
  # 开启基于HTTP basic的认证
  security:
    basic:
      enabled: true
    # 配置用户的账号信息
    user:
      name: moon
      password: moon
server:
  port: 8001 # 项目端口
eureka:
  instance:
    hostname: eureka01 # 配置域名
  client:
    # 是否将自己注册到Eureka服务中,eureka集群需要注册,默认为true,因此可以省略不写(注:也可以写成驼峰命名registerWithEureka)
    register-with-eureka: true
    # 服务发现,是否从Eureka中获取注册信息。eureka集群需要相互间获取注册信息,所在设置为true,默认值为true,因此可以省略不写
    fetch-registry: true
    service-url:
      # Eureka客户端与Eureka服务端的交互地址,高可用状态配置对方的地址,可以多个eureka server,多个eureka server之间用,隔开
      defaultZone: http://eureka02:8002/eureka/
  server:
    enable-self-preservation: false # 关闭自我保护(注:一般只用于开发与测试阶段,生产部署还是开启比较好)
eviction-interval-timer-in-ms: 4000 # 剔除时间间隔,单位:毫秒- 重新启动Eureka服务进行测试,输入正确的用户名密码即可登录
注:服务提供者注册到Eureka时会报错,需要在服务注册时也设置用户名和密码
bash
2018-10-01 07:24:51.730  INFO 3652 --- [nfoReplicator-0] com.netflix.discovery.DiscoveryClient    : DiscoveryClient_SPRINGCLOUD-MICROSERVICE-ITEM/localhost:springcloud-microservice-item:8081: registering service...
2018-10-01 07:24:51.745  WARN 3652 --- [nfoReplicator-0] c.n.d.s.t.d.RetryableEurekaHttpClient    : Request execution failure with status code 401; retrying on another server if available
2018-10-01 07:24:51.745  WARN 3652 --- [nfoReplicator-0] com.netflix.discovery.DiscoveryClient    : DiscoveryClient_SPRINGCLOUD-MICROSERVICE-ITEM/localhost:springcloud-microservice-item:8081 - registration failed Cannot execute request on any known server
服务提供者注册时设置账户信息
服务注册到有认证需求的注册中心时,需要设置如下信息。例子:http://USER:PASSWORD@127.0.0.1:8001/eureka/
将原来eureka.client.serviceUrl.defaultZone的配置增加用户与密码,与服务配置的密码一致
yml
# 配置注册eureka服务
eureka:
  client:
    registerWithEureka: true  # 是否将自己注册到Eureka服务中,默认为true
    fetchRegistry: true # 是否从Eureka中获取注册信息,默认为true
    serviceUrl: # Eureka客户端与Eureka服务端进行交互的地址
      defaultZone: http://moon:moon@127.0.0.1:8001/eureka/
  instance:
    prefer-ip-address: true # 将自己的ip地址注册到Eureka服务中
TODO: 目前存在问题,在测试的eureka url 中加上账号密码还是一样提示无法注册,但排查
Eureka 工作流程总结
- Eureka Server 启动成功,等待服务端注册。在启动过程中如果配置了集群,集群之间定时通过 Replicate 同步注册表,每个 Eureka Server 都存在独立完整的服务注册表信息。
- Eureka Client 启动时根据配置的 Eureka Server 地址去注册中心注册服务。
- Eureka Client 会每 30s 向 Eureka Server 发送一次心跳请求,证明客户端服务正常。
- 当 Eureka Server 90s 内没有收到 Eureka Client 的心跳,注册中心则认为该节点失效,会注销该实例。
- 单位时间内 Eureka Server 统计到有大量的 Eureka Client 没有上送心跳,则认为可能为网络异常,进入自我保护机制,不再剔除没有上送心跳的客户端。
- 当 Eureka Client 心跳请求恢复正常之后,Eureka Server 自动退出自我保护模式。
- Eureka Client 定时全量或者增量从注册中心获取服务注册表,并且将获取到的信息缓存到本地。
- 服务调用时,Eureka Client 会先从本地缓存找寻调取的服务。如果获取不到,先从注册中心刷新注册表,再同步到本地缓存。
- Eureka Client 获取到目标服务器信息,发起服务调用。
- Eureka Client 程序关闭时向 Eureka Server 发送取消请求,Eureka Server 将实例从注册表中删除。
Eureka 的架构设计,完美地解决了注册中心的稳定性和高可用性。Eureka 为了保障注册中心的高可用性,容忍了数据的非强一致性,服务节点间的数据可能不一致, Client-Server 间的数据可能不一致。比较适合跨越多机房、对注册中心服务可用性要求较高的使用场景。
Eureka源码解析
SpringBoot 中的自动装载原理(回顾)
ImportSelector 接口
ImportSelector接口是Spring导入外部配置的核心接口,在SpringBoot的自动化配置和@EnableXxx(功能性注解)中起到了决定性的作用。当在@Configuration标注的Class上使用@Import引入了一个ImportSelector实现类后,会把实现类中定义所有标识@Bean注解的方法所返回的类实例都注册到Spring容器中。
java
public interface ImportSelector {
	/**
	 * Select and return the names of which class(es) should be imported based on
	 * the {@link AnnotationMetadata} of the importing @{@link Configuration} class.
	 */
	String[] selectImports(AnnotationMetadata importingClassMetadata);
}DeferredImportSelector接口继承ImportSelector,它和ImportSelector的区别在于装载bean的时机上,DeferredImportSelector需要等所有的@Configuration都执行完毕后才会进行装载
java
public interface DeferredImportSelector extends ImportSelector而SpringBoot的@EnableAutoConfiguration注解中@Import引入的AutoConfigurationImportSelector就是实现了DeferredImportSelector接口
ImportSelector 基础使用示例
- 定义Bean对象
java
@Data
public class User {
    private String name;
    private Integer age;
}- 定义配置类,不标识任何spring注解
java
/**
 * 配置类,注意:此类不标识@Component、@Service、@Repository、@Controller等注解,
 * spring扫描的时候并不会装载该类,待使用@Import注解引入一个ImportSelector接口实现类,在实现类中处理注册到容器中
 * 注意事项:实现了ImportSelector接口的类不会被解析成一个Bean注册到容器中,只会将里面标识的@Bean注解的方法创建实例注册到容器
 */
public class UserConfiguration {
    /* 创建User实例 */
    @Bean
    public User getUser() {
        User user = new User();
        user.setAge(12);
        user.setName("石原里美");
        return user;
    }
}- 定义
ImportSelector接口的实现类
java
public class UserImportSelector implements ImportSelector {
    public String[] selectImports(AnnotationMetadata importingClassMetadata) {
        // 返回需要加载的配置类名称数组,此示例直接返回UserConfiguration类全限定名
        return new String[]{UserConfiguration.class.getName()};
    }
}- 定义
EnableXxx注解,并使用@Import注解引入自定义的ImportSelector接口的实现类
java
/**
 * 自定义注解,使用@Import注解引入ImportSelector接口实现类
 */
@Retention(RetentionPolicy.RUNTIME)
@Documented
@Target(ElementType.TYPE)
@Import(UserImportSelector.class)
public @interface EnableUserBean {}- 测试
java
@EnableUserBean
public class ImportSelectorTest {
    public static void main(String[] args) {
        /*
         * 创建注解扫描容器,执行流程如下:
         *  创建注解扫描容器 --> 扫描到@EnableUserBean注解 --> 通过注解上@Import注解找到ImportSelector实现类UserImportSelector
         *  --> 调用ImportSelector接口实现的selectImports方法,返回需要注册到容器的类全限定名称数组 --> 注册UserConfiguration类实例到容器
         *  --> 通过@Bean注解将User类实例注册到容器
         */
        AnnotationConfigApplicationContext context = new AnnotationConfigApplicationContext(ImportSelectorTest.class);
        // 从容器获取User实例
        User user = context.getBean(User.class);
        System.out.println(user);
        // UserConfiguration实例有注册到spring容器中
        UserConfiguration config = context.getBean(UserConfiguration.class);
        System.out.println(config);
        // 此处会报错:No qualifying bean of type 'com.moon.importselector.UserImportSelector' available
        // 说明实现了ImportSelector接口或者ImportBeanDefinitionRegistrar接口的类不会被解析成一个Bean注册到容器中
        UserImportSelector importSelector = context.getBean(UserImportSelector.class);
        System.out.println(importSelector);
    }
}
示例结论:
UserConfiguration类并没有使用Spring的相关的对象创建注解声明(@Controller,@Service,@Repostiroty等),而是使用编程的方式动态的载入bean
ImportSelector 接口的调用时机
ConfigurationClassParser类的processImports方法中进行ImportSelector接口的处理
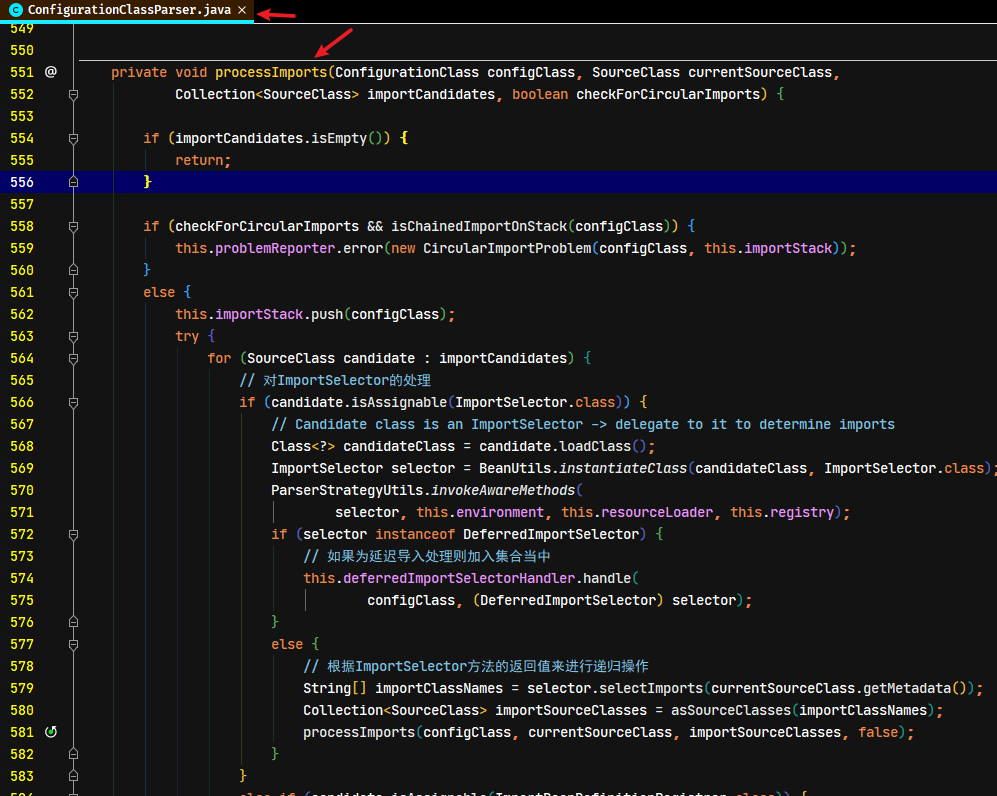
分析源码可以看到,ImportSelector接口的返回值会递归进行解析,把解析到的类全名按照@Configuration进行处理
Spring Boot 自动装载的实现
SpringBoot开箱即用的特点(自动装载机制),是基于ImportSelector实现。
- 在SpringBoot启动类中配置的主要注解
@SpringBootApplication,在此注解中声明了一个@EnableAutoConfiguration
java
@Target(ElementType.TYPE)
@Retention(RetentionPolicy.RUNTIME)
@Documented
@Inherited
@SpringBootConfiguration
@EnableAutoConfiguration
@ComponentScan(excludeFilters = { @Filter(type = FilterType.CUSTOM, classes = TypeExcludeFilter.class),
		@Filter(type = FilterType.CUSTOM, classes = AutoConfigurationExcludeFilter.class) })
public @interface SpringBootApplication {
}- 在
@EnableAutoConfiguration中通过@Import引入了SpringBoot定义的AutoConfigurationImportSelector
java
@Target(ElementType.TYPE)
@Retention(RetentionPolicy.RUNTIME)
@Documented
@Inherited
@AutoConfigurationPackage
@Import(AutoConfigurationImportSelector.class)
public @interface EnableAutoConfiguration {
}AutoConfigurationImportSelector会执行里面的selectImports方法
java
public class AutoConfigurationImportSelector implements DeferredImportSelector, BeanClassLoaderAware,
		ResourceLoaderAware, BeanFactoryAware, EnvironmentAware, Ordered {
    // ....省略代码
    @Override
	public String[] selectImports(AnnotationMetadata annotationMetadata) {
		if (!isEnabled(annotationMetadata)) {
			return NO_IMPORTS;
		}
		AutoConfigurationMetadata autoConfigurationMetadata = AutoConfigurationMetadataLoader
				.loadMetadata(this.beanClassLoader);
		// 此方法是主要处理逻辑,获取需要加载的bean全限定名集合
		AutoConfigurationEntry autoConfigurationEntry = getAutoConfigurationEntry(autoConfigurationMetadata,
				annotationMetadata);
		return StringUtils.toStringArray(autoConfigurationEntry.getConfigurations());
	}

	protected AutoConfigurationEntry getAutoConfigurationEntry(AutoConfigurationMetadata autoConfigurationMetadata,
			AnnotationMetadata annotationMetadata) {
		if (!isEnabled(annotationMetadata)) {
			return EMPTY_ENTRY;
		}
		AnnotationAttributes attributes = getAttributes(annotationMetadata);
		// 通过getCandidateConfigurations方法获取所有需要加载的bean全限定名集合
		List<String> configurations = getCandidateConfigurations(annotationMetadata, attributes);
		// 去重处理
		configurations = removeDuplicates(configurations);
		// 获取不需要加载的bean,这里我们可以通过spring.autoconfigure.exclude人为配置
		Set<String> exclusions = getExclusions(annotationMetadata, attributes);
		checkExcludedClasses(configurations, exclusions);
		configurations.removeAll(exclusions);
		configurations = filter(configurations, autoConfigurationMetadata);
		// 发送事件,通知所有的AutoConfigurationImportListener进行监听
		fireAutoConfigurationImportEvents(configurations, exclusions);
		return new AutoConfigurationEntry(configurations, exclusions);
	}

    // 这里是获取bean渠道的地方,重点是SpringFactoriesLoader#loadFactoryNames方法
	protected List<String> getCandidateConfigurations(AnnotationMetadata metadata, AnnotationAttributes attributes) {
		// 此处的getSpringFactoriesLoaderFactoryClass()最终返回EnableAutoConfiguration.class
		List<String> configurations = SpringFactoriesLoader.loadFactoryNames(getSpringFactoriesLoaderFactoryClass(),
				getBeanClassLoader());
		Assert.notEmpty(configurations, "No auto configuration classes found in META-INF/spring.factories. If you "
				+ "are using a custom packaging, make sure that file is correct.");
		return configurations;
	}
	// ....省略代码
}SpringFactoriesLoader.loadFactoryNames方法,会读取相应jar定义的META-INF/spring.factories,jar被加载的同时spring.factories里面定义的bean就可以自动被加载
java
public final class SpringFactoriesLoader {
    public static final String FACTORIES_RESOURCE_LOCATION = "META-INF/spring.factories";
    // ....省略代码
    public static List<String> loadFactoryNames(Class<?> factoryClass, @Nullable ClassLoader classLoader) {
        // 通过factoryClassName获取相应的bean全称
		String factoryClassName = factoryClass.getName();
		return loadSpringFactories(classLoader).getOrDefault(factoryClassName, Collections.emptyList());
	}

    private static Map<String, List<String>> loadSpringFactories(@Nullable ClassLoader classLoader) {
		MultiValueMap<String, String> result = cache.get(classLoader);
		if (result != null) {
			return result;
		}

		try {
			// 获取工程中所有META-INF/spring.factories文件,将其中的键值组合成Map
			Enumeration<URL> urls = (classLoader != null ?
					classLoader.getResources(FACTORIES_RESOURCE_LOCATION) :
					ClassLoader.getSystemResources(FACTORIES_RESOURCE_LOCATION));
			result = new LinkedMultiValueMap<>();
			while (urls.hasMoreElements()) {
				URL url = urls.nextElement();
				UrlResource resource = new UrlResource(url);
				Properties properties = PropertiesLoaderUtils.loadProperties(resource);
				for (Map.Entry<?, ?> entry : properties.entrySet()) {
					String factoryClassName = ((String) entry.getKey()).trim();
					for (String factoryName : StringUtils.commaDelimitedListToStringArray((String) entry.getValue())) {
						result.add(factoryClassName, factoryName.trim());
					}
				}
			}
			cache.put(classLoader, result);
			return result;
		}
		catch (IOException ex) {
			throw new IllegalArgumentException("Unable to load factories from location [" +
					FACTORIES_RESOURCE_LOCATION + "]", ex);
		}
	}
	// ....省略代码
}
Eureka 服务注册核心源码解析
@EnableEurekaServer 注解的作用
通过 @EnableEurekaServer 注解激活Eureka Server。
java
@Target(ElementType.TYPE)
@Retention(RetentionPolicy.RUNTIME)
@Documented
@Import(EurekaServerMarkerConfiguration.class)
public @interface EnableEurekaServer {
}此注解有一个重要作用:使用@Import注解导入EurekaServerMarkerConfiguration配置类,实例化了一个Marker的bean对象,此对象是实例化核心配置类的前提条件。跟踪源码会知道,因为后面Eureka server的自动配置类EurekaServerAutoConfiguration标识了@ConditionalOnBean(EurekaServerMarkerConfiguration.Marker.class)注解,设置了当容器中存在Marker实例后,才初始化该类
java
@Configuration
public class EurekaServerMarkerConfiguration {
	@Bean
	public Marker eurekaServerMarkerBean() {
		return new Marker();
	}

	class Marker {
	}
}
自动装载核心配置类
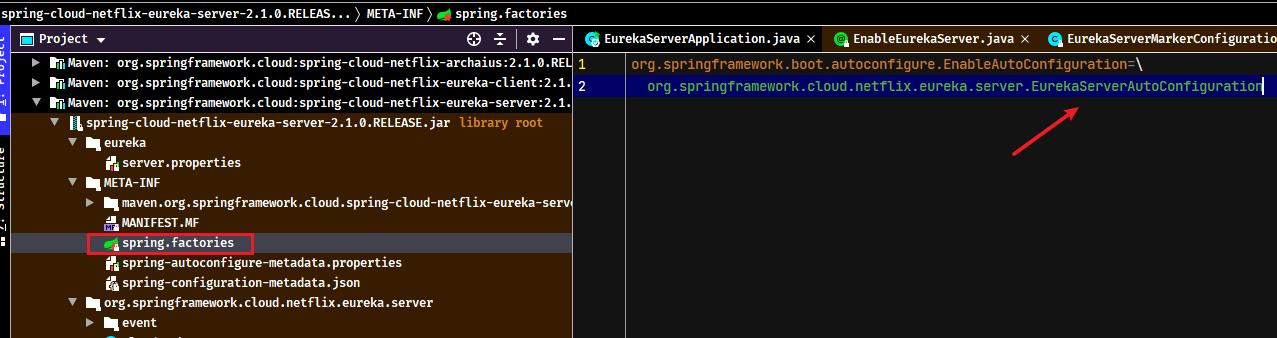
Spring Cloud 对 Eureka Server 做了封装。根据自动装载原则,Eureka Server项目的启动时,会在到spring-cloud-netflix-eureka-server-x.x.x.RELEASE.jar中找META-INF/spring.factories配置文件,加载此配置文件中定义的类
java
@Configuration
@Import(EurekaServerInitializerConfiguration.class)
@ConditionalOnBean(EurekaServerMarkerConfiguration.Marker.class)
@EnableConfigurationProperties({ EurekaDashboardProperties.class,
		InstanceRegistryProperties.class })
@PropertySource("classpath:/eureka/server.properties")
public class EurekaServerAutoConfiguration extends WebMvcConfigurerAdapter {
    // ....省略代码
}
EurekaServerAutoConfiguration 是Eureka服务端的自动配置类,从源码可以分析到以下的要点:
- 此配置类实例化的前提条件是上下文中存在
EurekaServerMarkerConfiguration.Marker的实例 - 通过
@EnableConfigurationProperties({ EurekaDashboardProperties.class, InstanceRegistryProperties.class })又导入了两个配置类EurekaDashboardProperties配置 Eureka Server 的管控台InstanceRegistryProperties配置期望续约数量和默认的通信数量
- 通过
@Import(EurekaServerInitializerConfiguration.class)引入启动配置类
EurekaServerInitializerConfiguration 启动配置类
EurekaServerInitializerConfiguration实现了SmartLifecycle,也就意味着Spring容器启动时会去执行start()方法。加载所有的Eureka Server的配置
java
@Configuration
public class EurekaServerInitializerConfiguration
		implements ServletContextAware, SmartLifecycle, Ordered {
    // ....省略部分代码
    @Override
	public void start() {
		new Thread(new Runnable() {
			@Override
			public void run() {
				try {
					//TODO: is this class even needed now?
					eurekaServerBootstrap.contextInitialized(EurekaServerInitializerConfiguration.this.servletContext);
					log.info("Started Eureka Server");

					publish(new EurekaRegistryAvailableEvent(getEurekaServerConfig()));
					EurekaServerInitializerConfiguration.this.running = true;
					publish(new EurekaServerStartedEvent(getEurekaServerConfig()));
				}
				catch (Exception ex) {
					// Help!
					log.error("Could not initialize Eureka servlet context", ex);
				}
			}
		}).start();
	}
    // ....省略部分代码
}
EurekaServerAutoConfiguration 自动配置类
在此配置类中,主要实例化一些bean,其中有以下比较重要的bean实例化
- 实例化了Eureka Server的管控台的Controller类
EurekaController - 实例化
EurekaServerBootstrap类 - 实例化
jersey相关配置类。jersey是RESTful的Web服务框架
java
public class EurekaServerAutoConfiguration extends WebMvcConfigurerAdapter {
    // ....省略部分代码
    @Bean
    @ConditionalOnProperty(prefix = "eureka.dashboard", name = "enabled", matchIfMissing = true)
    public EurekaController eurekaController() {
    	return new EurekaController(this.applicationInfoManager);
    }
    // ....省略部分代码

    @Bean
	public EurekaServerBootstrap eurekaServerBootstrap(PeerAwareInstanceRegistry registry,
			EurekaServerContext serverContext) {
		return new EurekaServerBootstrap(this.applicationInfoManager,
				this.eurekaClientConfig, this.eurekaServerConfig, registry,
				serverContext);
	}

    @Bean
	public FilterRegistrationBean jerseyFilterRegistration(
			javax.ws.rs.core.Application eurekaJerseyApp) {
		FilterRegistrationBean bean = new FilterRegistrationBean();
		bean.setFilter(new ServletContainer(eurekaJerseyApp));
		bean.setOrder(Ordered.LOWEST_PRECEDENCE);
		bean.setUrlPatterns(
				Collections.singletonList(EurekaConstants.DEFAULT_PREFIX + "/*"));

		return bean;
	}

    @Bean
	public javax.ws.rs.core.Application jerseyApplication(Environment environment,
			ResourceLoader resourceLoader) {

		ClassPathScanningCandidateComponentProvider provider = new ClassPathScanningCandidateComponentProvider(
				false, environment);

		// Filter to include only classes that have a particular annotation.
		//
		provider.addIncludeFilter(new AnnotationTypeFilter(Path.class));
		provider.addIncludeFilter(new AnnotationTypeFilter(Provider.class));

		// Find classes in Eureka packages (or subpackages)
		//
		Set<Class<?>> classes = new HashSet<>();
		for (String basePackage : EUREKA_PACKAGES) {
			Set<BeanDefinition> beans = provider.findCandidateComponents(basePackage);
			for (BeanDefinition bd : beans) {
				Class<?> cls = ClassUtils.resolveClassName(bd.getBeanClassName(),
						resourceLoader.getClassLoader());
				classes.add(cls);
			}
		}

		// Construct the Jersey ResourceConfig
		//
		Map<String, Object> propsAndFeatures = new HashMap<>();
		propsAndFeatures.put(
				// Skip static content used by the webapp
				ServletContainer.PROPERTY_WEB_PAGE_CONTENT_REGEX,
				EurekaConstants.DEFAULT_PREFIX + "/(fonts|images|css|js)/.*");

		DefaultResourceConfig rc = new DefaultResourceConfig(classes);
		rc.setPropertiesAndFeatures(propsAndFeatures);

		return rc;
	}
	// ....省略部分代码
}
在 jerseyApplication 方法中,会往容器中存放了一个jerseyApplication对象,jerseyApplication()方法里的东西和Spring源码里扫描@Component逻辑类似,扫描@Path和@Provider标签,然后封装成BeanDefinition,封装到Application的set容器里。通过filter过滤器来过滤url进行映射到对象的Controller
暴露的服务端接口
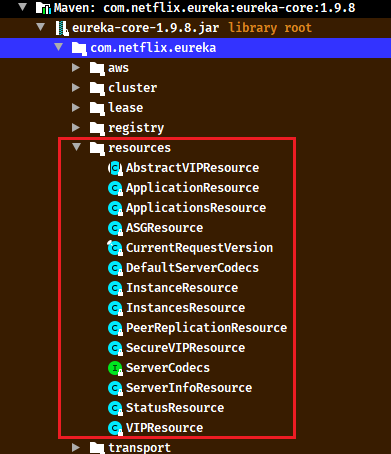
集成了Jersey,可以找到在EurekaServer的依赖包中的 eureka-core-x.x.x.jar,可以看到一系列XXXResource的类。这些类都是通过Jersey发布了供客户端调用的服务接口
服务端接受客户端的注册
ApplicationResource类是处理客户端的注册,通过addInstance()方法中this.registry.register(info, "true".equals(isReplication));这一逻辑完成客户端的注册。具体的逻辑由PeerAwareInstanceRegistryImpl类实现
java
@Singleton
public class PeerAwareInstanceRegistryImpl extends AbstractInstanceRegistry implements PeerAwareInstanceRegistry {
    // ....省略部分代码
    @Override
    public void register(final InstanceInfo info, final boolean isReplication) {
        // 默认有效时长90ms
        int leaseDuration = Lease.DEFAULT_DURATION_IN_SECS;
        if (info.getLeaseInfo() != null && info.getLeaseInfo().getDurationInSecs() > 0) {
            leaseDuration = info.getLeaseInfo().getDurationInSecs();
        }
        // 注册实例
        super.register(info, leaseDuration, isReplication);
        // 同步到其他Eureka Server服务
        replicateToPeers(Action.Register, info.getAppName(), info.getId(), info, null, isReplication);
    }
    // ....省略部分代码
}跟踪super.register(info, leaseDuration, isReplication);方法,调用了父类AbstractInstanceRegistry的方法,里面的就是整个注册的过程
java
public abstract class AbstractInstanceRegistry implements InstanceRegistry {
    // ....省略部分代码
    // 使用了线程安全的map,存放所有注册的示例对象
    private final ConcurrentHashMap<String, Map<String, Lease<InstanceInfo>>> registry
            = new ConcurrentHashMap<String, Map<String, Lease<InstanceInfo>>>();

    public void register(InstanceInfo registrant, int leaseDuration, boolean isReplication) {
        try {
            read.lock();
            Map<String, Lease<InstanceInfo>> gMap = registry.get(registrant.getAppName());
            REGISTER.increment(isReplication);
            // 如果第一个实例注册会给registry put 进去一个空的
            if (gMap == null) {
                final ConcurrentHashMap<String, Lease<InstanceInfo>> gNewMap = new ConcurrentHashMap<String, Lease<InstanceInfo>>();
                gMap = registry.putIfAbsent(registrant.getAppName(), gNewMap);
                if (gMap == null) {
                    gMap = gNewMap;
                }
            }
            // 根据注册的示例对象id,获取已存在的Lease
            Lease<InstanceInfo> existingLease = gMap.get(registrant.getId());
            // Retain the last dirty timestamp without overwriting it, if there is already a lease
            if (existingLease != null && (existingLease.getHolder() != null)) {
                Long existingLastDirtyTimestamp = existingLease.getHolder().getLastDirtyTimestamp();
                Long registrationLastDirtyTimestamp = registrant.getLastDirtyTimestamp();
                logger.debug("Existing lease found (existing={}, provided={}", existingLastDirtyTimestamp, registrationLastDirtyTimestamp);

                // this is a > instead of a >= because if the timestamps are equal, we still take the remote transmitted
                // InstanceInfo instead of the server local copy.
                if (existingLastDirtyTimestamp > registrationLastDirtyTimestamp) {
                    logger.warn("There is an existing lease and the existing lease's dirty timestamp {} is greater" +
                            " than the one that is being registered {}", existingLastDirtyTimestamp, registrationLastDirtyTimestamp);
                    logger.warn("Using the existing instanceInfo instead of the new instanceInfo as the registrant");
                    registrant = existingLease.getHolder();
                }
            } else {
                // The lease does not exist and hence it is a new registration
                synchronized (lock) {
                    if (this.expectedNumberOfClientsSendingRenews > 0) {
                        // Since the client wants to register it, increase the number of clients sending renews
                        this.expectedNumberOfClientsSendingRenews = this.expectedNumberOfClientsSendingRenews + 1;
                        updateRenewsPerMinThreshold();
                    }
                }
                logger.debug("No previous lease information found; it is new registration");
            }
            Lease<InstanceInfo> lease = new Lease<InstanceInfo>(registrant, leaseDuration);
            if (existingLease != null) {
                lease.setServiceUpTimestamp(existingLease.getServiceUpTimestamp());
            }
            // 将lease存入gMap
            gMap.put(registrant.getId(), lease);
            synchronized (recentRegisteredQueue) {
                recentRegisteredQueue.add(new Pair<Long, String>(
                        System.currentTimeMillis(),
                        registrant.getAppName() + "(" + registrant.getId() + ")"));
            }
            // This is where the initial state transfer of overridden status happens
            if (!InstanceStatus.UNKNOWN.equals(registrant.getOverriddenStatus())) {
                logger.debug("Found overridden status {} for instance {}. Checking to see if needs to be add to the "
                                + "overrides", registrant.getOverriddenStatus(), registrant.getId());
                if (!overriddenInstanceStatusMap.containsKey(registrant.getId())) {
                    logger.info("Not found overridden id {} and hence adding it", registrant.getId());
                    overriddenInstanceStatusMap.put(registrant.getId(), registrant.getOverriddenStatus());
                }
            }
            InstanceStatus overriddenStatusFromMap = overriddenInstanceStatusMap.get(registrant.getId());
            if (overriddenStatusFromMap != null) {
                logger.info("Storing overridden status {} from map", overriddenStatusFromMap);
                registrant.setOverriddenStatus(overriddenStatusFromMap);
            }

            // Set the status based on the overridden status rules
            InstanceStatus overriddenInstanceStatus = getOverriddenInstanceStatus(registrant, existingLease, isReplication);
            registrant.setStatusWithoutDirty(overriddenInstanceStatus);

            // If the lease is registered with UP status, set lease service up timestamp
            if (InstanceStatus.UP.equals(registrant.getStatus())) {
                lease.serviceUp();
            }
            registrant.setActionType(ActionType.ADDED);
            recentlyChangedQueue.add(new RecentlyChangedItem(lease));
            registrant.setLastUpdatedTimestamp();
            invalidateCache(registrant.getAppName(), registrant.getVIPAddress(), registrant.getSecureVipAddress());
            logger.info("Registered instance {}/{} with status {} (replication={})",
                    registrant.getAppName(), registrant.getId(), registrant.getStatus(), isReplication);
        } finally {
            read.unlock();
        }
    }
    // ....省略部分代码
}
服务端接受客户端的续约
在InstanceResource类中,处理客户端的续约逻辑。通过renewLease方法中完成客户端的心跳(续约)处理
java
@Produces({"application/xml", "application/json"})
public class InstanceResource {
    // ....省略部分代码
    @PUT
    public Response renewLease(
            @HeaderParam(PeerEurekaNode.HEADER_REPLICATION) String isReplication,
            @QueryParam("overriddenstatus") String overriddenStatus,
            @QueryParam("status") String status,
            @QueryParam("lastDirtyTimestamp") String lastDirtyTimestamp) {
        boolean isFromReplicaNode = "true".equals(isReplication);
        boolean isSuccess = registry.renew(app.getName(), id, isFromReplicaNode);

        // Not found in the registry, immediately ask for a register
        if (!isSuccess) {
            logger.warn("Not Found (Renew): {} - {}", app.getName(), id);
            return Response.status(Status.NOT_FOUND).build();
        }
        // Check if we need to sync based on dirty time stamp, the client
        // instance might have changed some value
        Response response;
        if (lastDirtyTimestamp != null && serverConfig.shouldSyncWhenTimestampDiffers()) {
            response = this.validateDirtyTimestamp(Long.valueOf(lastDirtyTimestamp), isFromReplicaNode);
            // Store the overridden status since the validation found out the node that replicates wins
            if (response.getStatus() == Response.Status.NOT_FOUND.getStatusCode()
                    && (overriddenStatus != null)
                    && !(InstanceStatus.UNKNOWN.name().equals(overriddenStatus))
                    && isFromReplicaNode) {
                registry.storeOverriddenStatusIfRequired(app.getAppName(), id, InstanceStatus.valueOf(overriddenStatus));
            }
        } else {
            response = Response.ok().build();
        }
        logger.debug("Found (Renew): {} - {}; reply status={}", app.getName(), id, response.getStatus());
        return response;
    }
    // ....省略部分代码
}其中最关键的逻辑就是this.registry.renew(this.app.getName(), this.id, isFromReplicaNode),具体的逻辑由PeerAwareInstanceRegistryImpl类实现
java
public boolean renew(final String appName, final String id, final boolean isReplication) {
    // 客户端续约
    if (super.renew(appName, id, isReplication)) {
        // 同步到其他的Eureka Server服务
        replicateToPeers(Action.Heartbeat, appName, id, null, null, isReplication);
        return true;
    }
    return false;
}跟踪父类AbstractInstanceRegistry的renew方法,实现了整个续约的过程
java
public abstract class AbstractInstanceRegistry implements InstanceRegistry {
    // ....省略部分代码
    public boolean renew(String appName, String id, boolean isReplication) {
        RENEW.increment(isReplication);
        Map<String, Lease<InstanceInfo>> gMap = registry.get(appName);
        // 从内存map中根据id获取示例对象的Lease对象
        Lease<InstanceInfo> leaseToRenew = null;
        if (gMap != null) {
            leaseToRenew = gMap.get(id);
        }
        if (leaseToRenew == null) {
            RENEW_NOT_FOUND.increment(isReplication);
            logger.warn("DS: Registry: lease doesn't exist, registering resource: {} - {}", appName, id);
            return false;
        } else {
            // 获取示例对象
            InstanceInfo instanceInfo = leaseToRenew.getHolder();
            if (instanceInfo != null) {
                // touchASGCache(instanceInfo.getASGName());
                InstanceStatus overriddenInstanceStatus = this.getOverriddenInstanceStatus(
                        instanceInfo, leaseToRenew, isReplication);
                if (overriddenInstanceStatus == InstanceStatus.UNKNOWN) {
                    logger.info("Instance status UNKNOWN possibly due to deleted override for instance {}"
                            + "; re-register required", instanceInfo.getId());
                    RENEW_NOT_FOUND.increment(isReplication);
                    return false;
                }
                if (!instanceInfo.getStatus().equals(overriddenInstanceStatus)) {
                    logger.info(
                            "The instance status {} is different from overridden instance status {} for instance {}. "
                                    + "Hence setting the status to overridden status", instanceInfo.getStatus().name(),
                                    instanceInfo.getOverriddenStatus().name(),
                                    instanceInfo.getId());
                    // 设置示例状态
                    instanceInfo.setStatusWithoutDirty(overriddenInstanceStatus);

                }
            }
            // 设置续约次数
            renewsLastMin.increment();
            leaseToRenew.renew();
            return true;
        }
    }
    // ....省略部分代码
}
服务剔除
在AbstractInstanceRegistry.postInit()方法,在此方法里开启了一个每60秒调用一次EvictionTask.evict()的定时器
java
protected void postInit() {
    renewsLastMin.start();
    if (evictionTaskRef.get() != null) {
        evictionTaskRef.get().cancel();
    }
    evictionTaskRef.set(new EvictionTask());
    evictionTimer.schedule(evictionTaskRef.get(),
            serverConfig.getEvictionIntervalTimerInMs(),
            serverConfig.getEvictionIntervalTimerInMs());
}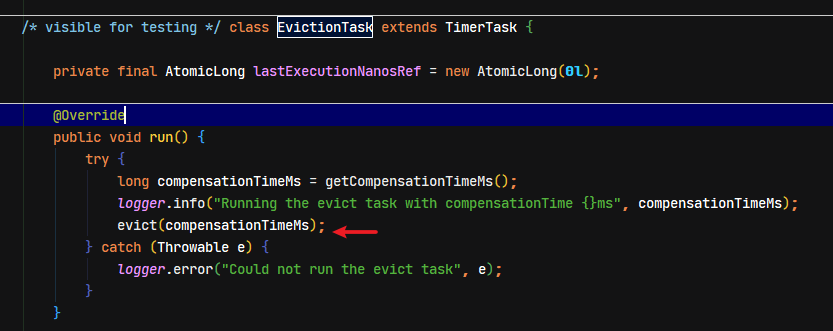
java
public void evict(long additionalLeaseMs) {
    logger.debug("Running the evict task");

    if (!isLeaseExpirationEnabled()) {
        logger.debug("DS: lease expiration is currently disabled.");
        return;
    }

    // We collect first all expired items, to evict them in random order. For large eviction sets,
    // if we do not that, we might wipe out whole apps before self preservation kicks in. By randomizing it,
    // the impact should be evenly distributed across all applications.
    List<Lease<InstanceInfo>> expiredLeases = new ArrayList<>();
    for (Entry<String, Map<String, Lease<InstanceInfo>>> groupEntry : registry.entrySet()) {
        Map<String, Lease<InstanceInfo>> leaseMap = groupEntry.getValue();
        if (leaseMap != null) {
            for (Entry<String, Lease<InstanceInfo>> leaseEntry : leaseMap.entrySet()) {
                Lease<InstanceInfo> lease = leaseEntry.getValue();
                if (lease.isExpired(additionalLeaseMs) && lease.getHolder() != null) {
                    expiredLeases.add(lease);
                }
            }
        }
    }

    // To compensate for GC pauses or drifting local time, we need to use current registry size as a base for
    // triggering self-preservation. Without that we would wipe out full registry.
    int registrySize = (int) getLocalRegistrySize();
    int registrySizeThreshold = (int) (registrySize * serverConfig.getRenewalPercentThreshold());
    int evictionLimit = registrySize - registrySizeThreshold;

    int toEvict = Math.min(expiredLeases.size(), evictionLimit);
    if (toEvict > 0) {
        logger.info("Evicting {} items (expired={}, evictionLimit={})", toEvict, expiredLeases.size(), evictionLimit);

        Random random = new Random(System.currentTimeMillis());
        for (int i = 0; i < toEvict; i++) {
            // Pick a random item (Knuth shuffle algorithm)
            int next = i + random.nextInt(expiredLeases.size() - i);
            Collections.swap(expiredLeases, i, next);
            Lease<InstanceInfo> lease = expiredLeases.get(i);

            String appName = lease.getHolder().getAppName();
            String id = lease.getHolder().getId();
            EXPIRED.increment();
            logger.warn("DS: Registry: expired lease for {}/{}", appName, id);
            internalCancel(appName, id, false);
        }
    }
}
Eureka服务发现核心源码解析
自动装载
在服务消费者导入的坐标中,找到 spring-cloud-netflix-eureka-client-x.x.x.RELEASE.jar 包下的 spring.factories,里面配置了所有自动装载的配置类

客户端的创建
查看自动装载的配置类EurekaClientAutoConfiguration,里面的有一个创建EurekaDiscoveryClient类的方法,此类是就是Eureka Client客户端
java
@Bean
public DiscoveryClient discoveryClient(EurekaClient client, EurekaClientConfig clientConfig) {
	return new EurekaDiscoveryClient(client, clientConfig);
}
服务注册
在eureka-client-x.x.x.jar包中的DiscoveryClient类,其中register()就是实现了服务的注册
java
@Singleton
public class DiscoveryClient implements EurekaClient {
    // ....省略部分代码
    boolean register() throws Throwable {
        logger.info(PREFIX + "{}: registering service...", appPathIdentifier);
        EurekaHttpResponse<Void> httpResponse;
        try {
            httpResponse = eurekaTransport.registrationClient.register(instanceInfo);
        } catch (Exception e) {
            logger.warn(PREFIX + "{} - registration failed {}", appPathIdentifier, e.getMessage(), e);
            throw e;
        }
        if (logger.isInfoEnabled()) {
            logger.info(PREFIX + "{} - registration status: {}", appPathIdentifier, httpResponse.getStatusCode());
        }
        return httpResponse.getStatusCode() == Status.NO_CONTENT.getStatusCode();
    }
    // ....省略部分代码
}
服务下架
在eureka-client-x.x.x.jar包中的DiscoveryClient类,其中register()就是实现了服务的注册
java
@Singleton
public class DiscoveryClient implements EurekaClient {
    // ....省略部分代码
    @PreDestroy
    @Override
    public synchronized void shutdown() {
        if (isShutdown.compareAndSet(false, true)) {
            logger.info("Shutting down DiscoveryClient ...");

            if (statusChangeListener != null && applicationInfoManager != null) {
                applicationInfoManager.unregisterStatusChangeListener(statusChangeListener.getId());
            }

            cancelScheduledTasks();

            // If APPINFO was registered
            if (applicationInfoManager != null
                    && clientConfig.shouldRegisterWithEureka()
                    && clientConfig.shouldUnregisterOnShutdown()) {
                applicationInfoManager.setInstanceStatus(InstanceStatus.DOWN);
                unregister();
            }

            if (eurekaTransport != null) {
                eurekaTransport.shutdown();
            }

            heartbeatStalenessMonitor.shutdown();
            registryStalenessMonitor.shutdown();

            logger.info("Completed shut down of DiscoveryClient");
        }
    }
    // ....省略部分代码
}
心跳续约
在com.netflix.discovery.DiscoveryClient.HeartbeatThread中renew()方法,实现了续约的操作。具体的流程:首先向注册中心执行了心跳续约的请求,StatusCode为200成功,若为404则执行register()重新注册操作;
java
@Singleton
public class DiscoveryClient implements EurekaClient {
    // ....省略部分代码
    private class HeartbeatThread implements Runnable {

        public void run() {
            if (renew()) {
                lastSuccessfulHeartbeatTimestamp = System.currentTimeMillis();
            }
        }
    }

    boolean renew() {
        EurekaHttpResponse<InstanceInfo> httpResponse;
        try {
            httpResponse = eurekaTransport.registrationClient.sendHeartBeat(instanceInfo.getAppName(), instanceInfo.getId(), instanceInfo, null);
            logger.debug(PREFIX + "{} - Heartbeat status: {}", appPathIdentifier, httpResponse.getStatusCode());
            if (httpResponse.getStatusCode() == Status.NOT_FOUND.getStatusCode()) {
                REREGISTER_COUNTER.increment();
                logger.info(PREFIX + "{} - Re-registering apps/{}", appPathIdentifier, instanceInfo.getAppName());
                long timestamp = instanceInfo.setIsDirtyWithTime();
                boolean success = register();
                if (success) {
                    instanceInfo.unsetIsDirty(timestamp);
                }
                return success;
            }
            return httpResponse.getStatusCode() == Status.OK.getStatusCode();
        } catch (Throwable e) {
            logger.error(PREFIX + "{} - was unable to send heartbeat!", appPathIdentifier, e);
            return false;
        }
    }
    // ....省略部分代码
}
Eureka 客户端流程总结
- 根据配置文件初始化bean,创建客户端实例信息类
InstanceInfo - 第一次全量拉取注册中心服务列表(
url=/apps),初始化周期任务:CacheRefreshThread定时刷新本地缓存服务列表,若是客户端第一次拉取,则会全量拉取,后面则增量拉取。若增量拉取失败则全量拉取,配置属性为eureka.client.registryFetchIntervalSeconds=30,即默认30s拉取一次HeartbeatThread通过renew()方法实现续约任务,维持于注册中心的心跳(url=/apps/{id}),若返回状态码为404则说明该服务实例没有在注册中心注册,执行register()向注册中心注册实例信息ApplicationInfoManager.StatusChangeListener注册实例状态监听类,监听服务实例状态变化,向注册中心同步实例状态InstanceInfoReplicator定时刷新实例状态,并向注册中心同步,默认eureka.client.instanceInfoReplicationIntervalSeconds=30,即30s执行一次。若实例状态有变更,则重新执行注册