Appearance
Elasticsearch 简介
Elasticsearch 介绍、安装及其使用的相关内容,详见《ElasticSearch 分布式全文搜索引擎》笔记
概述
ES(Elasticsearch)是一个分布式全文搜索引擎。全文搜索的条件不再是仅用于对某一个字段进行比对,而是在一条数据中使用搜索条件去比对更多的字段,只要能匹配上就列入查询结果,这就是全文搜索的目的。
要实现全文搜索的效果,不可能使用数据库中 like 操作去进行比对,这种方式效率太低了。ES 设计了一种全新的思想,来实现全文搜索。具体操作过程如下:
- 将被查询的字段的数据全部文本信息进行查分,分成若干个词
- 例如“今天很开心”就会被拆分成三个词,分别是“今天”、“很”、“开心”,此过程有专业术语叫做分词。分词的策略不同,分出的效果不一样,不同的分词策略称为分词器。
- 将分词得到的结果存储起来,对应每条数据的id
- 例如id为1的数据中名称这一项的值是“今天很开心”,那么分词结束后,就会出现“今天”对应id为1,“很”对应id为1,“开心”对应id为1
- 例如id为2的数据中名称这一项的值是“今天学习编程”,那么分词结束后,就会出现“今天”对应id为2,“学习”对应id为2,“编程”对应id为2
- 此时就会出现如下对应结果,按照上述形式可以对所有文档进行分词。需要注意分词的过程不是仅对一个字段进行,而是对每一个参与查询的字段都执行,最终结果汇总到一个表格中
- 当进行查询时,如果输入“今天”作为查询条件,可以通过上述表格数据进行比对,得到id值1,2,然后根据id值就可以得到查询的结果数据了。
上述过程中分词结果关键字内容每一个都不相同,作用有点类似于数据库中的索引,是用来加速数据查询的。但是数据库中的索引是对某一个字段进行添加索引,而这里的分词结果关键字不是一个完整的字段值,只是一个字段中的其中的一部分内容。并且索引使用时是根据索引内容查找整条数据,全文搜索中的分词结果关键字查询后得到的并不是整条的数据,而是数据的id,要想获得具体数据还要再次查询,因此这里为这种分词结果关键字起了一个全新的名称,叫做倒排索引。
安装
windows 版安装包下载地址:https://www.elastic.co/cn/downloads/elasticsearch
下载的安装包是解压缩就能使用的 zip 文件,解压缩到没有中文与空格目录即可
启动服务器
进入 ElasticSearch 安装位置的 bin 目录中,双击 elasticsearch.bat 文件即可启动 ES 服务器,默认服务端口 9200。
通过浏览器访问 http://localhost:9200 看到相应的 json 数据,即 ES 服务器正常启动
基本操作
ES 中保存有需要查询的数据,只不过格式和数据库存储数据格式不同而已。在 ES 中要先创建倒排索引,这个索引的功能又点类似于数据库的表,然后将数据添加到倒排索引中,添加的数据称为文档。所以要进行 ES 的操作要先创建索引,再添加文档,这样才能进行后续的查询操作。
要操作 ES 可以通过 Restful 风格的请求来进行,也就是说发送一个请求就可以执行一个操作。比如新建索引,删除索引这些操作都可以使用发送请求的形式来进行。
创建索引
注:下面所有其他示例,books 是索引名称,使用 Postman 等请求工具发送
创建索引发送 PUT 类型请求
bash
PUT http://localhost:9200/books发送请求后,看到如下信息即索引创建成功
json
{
    "acknowledged": true,
    "shards_acknowledged": true,
    "index": "books"
}重复创建已经存在的索引会出现错误信息,reason 属性中描述错误原因
json
{
    "error": {
        "root_cause": [
            {
                "type": "resource_already_exists_exception",
                "reason": "index [books/VgC_XMVAQmedaiBNSgO2-w] already exists",
                "index_uuid": "VgC_XMVAQmedaiBNSgO2-w",
                "index": "books"
            }
        ],
        "type": "resource_already_exists_exception",
        "reason": "index [books/VgC_XMVAQmedaiBNSgO2-w] already exists",	# books索引已经存在
        "index_uuid": "VgC_XMVAQmedaiBNSgO2-w",
        "index": "book"
    },
    "status": 400
}
查询索引
创建索引发送 GET 类型请求
bash
GET http://localhost:9200/books查询索引得到索引相关信息,如下
json
{
    "book": {
        "aliases": {},
        "mappings": {},
        "settings": {
            "index": {
                "routing": {
                    "allocation": {
                        "include": {
                            "_tier_preference": "data_content"
                        }
                    }
                },
                "number_of_shards": "1",
                "provided_name": "books",
                "creation_date": "1645768584849",
                "number_of_replicas": "1",
                "uuid": "VgC_XMVAQmedaiBNSgO2-w",
                "version": {
                    "created": "7160299"
                }
            }
        }
    }
}
如果查询了不存在的索引,会返回错误信息,例如查询名称为 book 的索引后信息如下
json
{
    "error": {
        "root_cause": [
            {
                "type": "index_not_found_exception",
                "reason": "no such index [book]",
                "resource.type": "index_or_alias",
                "resource.id": "book",
                "index_uuid": "_na_",
                "index": "book"
            }
        ],
        "type": "index_not_found_exception",
        "reason": "no such index [book]",		# 没有book索引
        "resource.type": "index_or_alias",
        "resource.id": "book",
        "index_uuid": "_na_",
        "index": "book"
    },
    "status": 404
}
删除索引
删除索引发送 DELETE 类型请求
bash
DELETE http://localhost:9200/books删除所有后,给出删除结果
json
{
    "acknowledged": true
}
如果重复删除,会给出错误信息,同样在 reason 属性中描述具体的错误原因
json
{
    "error": {
        "root_cause": [
            {
                "type": "index_not_found_exception",
                "reason": "no such index [books]",
                "resource.type": "index_or_alias",
                "resource.id": "book",
                "index_uuid": "_na_",
                "index": "book"
            }
        ],
        "type": "index_not_found_exception",
        "reason": "no such index [books]",		# 没有books索引
        "resource.type": "index_or_alias",
        "resource.id": "book",
        "index_uuid": "_na_",
        "index": "book"
    },
    "status": 404
}
创建索引并指定分词器
前面创建的索引是未指定分词器的,可以在创建索引时添加请求参数,设置分词器。目前国内较为流行的分词器是 IK 分词器,使用前先在下对应的分词器,然后使用。
IK 分词器下载地址:https://github.com/medcl/elasticsearch-analysis-ik/releases
分词器下载后解压到 ES 安装目录的 plugins 目录中即可,安装分词器后需要重新启动 ES 服务器。使用 IK 分词器创建索引格式:
bash
PUT http://localhost:9200/books请求参数如下(注意是json格式的参数)
json
{
    "mappings": {                           # 定义mappings属性,替换创建索引时对应的mappings属性
        "properties": {                     # 定义索引中包含的属性设置
            "id": {                         # 设置索引中包含id属性
                "type": "keyword"           # 当前属性可以被直接搜索
            },
            "name": {                       # 设置索引中包含name属性
                "type": "text",             # 当前属性是文本信息,参与分词
                "analyzer": "ik_max_word",  # 使用IK分词器进行分词
                "copy_to": "all"            # 分词结果拷贝到all属性中
            },
            "type": {
                "type": "keyword"
            },
            "description": {
                "type": "text",
                "analyzer": "ik_max_word",
                "copy_to": "all"
            },
            "all": {                        # 定义属性,用来描述多个字段的分词结果集合,当前属性可以参与查询
                "type": "text",
                "analyzer": "ik_max_word"
            }
        }
    }
}
创建完毕后返回结果和不使用分词器创建索引的结果是一样的,此时可以通过查看索引信息观察到添加的请求参数 mappings 已经进入到了索引属性中
json
{
    "books": {
        "aliases": {},
        "mappings": {
            "properties": {
                "all": {
                    "type": "text",
                    "analyzer": "ik_max_word"
                },
                "description": {
                    "type": "text",
                    "copy_to": [
                        "all"
                    ],
                    "analyzer": "ik_max_word"
                },
                "id": {
                    "type": "keyword"
                },
                "name": {
                    "type": "text",
                    "copy_to": [
                        "all"
                    ],
                    "analyzer": "ik_max_word"
                },
                "type": {
                    "type": "keyword"
                }
            }
        },
        "settings": {
            "index": {
                "routing": {
                    "allocation": {
                        "include": {
                            "_tier_preference": "data_content"
                        }
                    }
                },
                "number_of_shards": "1",
                "provided_name": "books",
                "creation_date": "1645769809521",
                "number_of_replicas": "1",
                "uuid": "DohYKvr_SZO4KRGmbZYmTQ",
                "version": {
                    "created": "7160299"
                }
            }
        }
    }
}
添加文档
目前我们已经有了索引了,但是索引中还没有数据,所以要先添加数据,ES中称数据为文档,下面进行文档操作。
- 添加文档发送 POST 类型请求,有以下三种方式
bash
POST http://localhost:9200/books/_doc		# 使用系统生成id
POST http://localhost:9200/books/_create/1	# 使用指定id
POST http://localhost:9200/books/_doc/1		# 使用指定id,不存在创建,存在更新(版本递增)
文档通过请求参数传递,数据格式json
json
{
    "name": "springboot",
    "type": "springboot",
    "description": "springboot"
}
查询文档
查询文档发送 GET 请求
bash
GET http://localhost:9200/books/_doc/1		 # 查询单个文档
GET http://localhost:9200/books/_search # 查询全部文档- 条件查询
bash
GET http://localhost:9200/books/_search?q=name:springboot # q=查询属性名:查询属性值删除文档
删除文档发送 DELETE 请求
bash
DELETE http://localhost:9200/books/_doc/1修改文档
修改文档发送 PUT 请求
- 修改文档(全量更新)
bash
PUT http://localhost:9200/books/_doc/1文档通过请求参数传递,数据格式json
json
{
    "name": "springboot",
    "type": "springboot",
    "description": "springboot"
}- 修改文档(部分更新)
bash
POST http://localhost:9200/books/_update/1文档通过请求参数传递,数据格式json
json
{
    "doc": {                    # 部分更新并不是对原始文档进行更新,而是对原始文档对象中的doc属性中的指定属性更新
        "name": "springboot"    # 仅更新提供的属性值,未提供的属性值不参与更新操作
    }
}
Spring Boot 整合 Elasticsearch 低级别客户端
以下是整合 ES 早期操作使用的客户端,被称为 Low Level Client,这种客户端操作方式性能方面略显不足
引入依赖
导入 Spring Boot 整合 Elasticsearch 低级别客户端的坐标
xml
<dependency>
    <groupId>org.springframework.boot</groupId>
    <artifactId>spring-boot-starter-data-elasticsearch</artifactId>
</dependency>
项目配置
在 Spring Boot 项目配置文件 application.yml 中,设置 Elasticsearch 相关配置,主要配置 ES 服务器地址,端口 9200
yml
spring:
  elasticsearch:
    rest:
      uris: http://localhost:9200
操作客户端
使用 Spring Boot 整合 ES 的专用客户端接口 ElasticsearchRestTemplate 来进行操作
java
@SpringBootTest
public class ElasticsearchTest {
    /* ES 早期低版本的客户操作对象 ElasticsearchRestTemplate,不推荐使用 */
    @Autowired
    private ElasticsearchRestTemplate template;
}
Spring Boot 整合 Elasticsearch 高级别客户端
上述示例操作形式是 ES 早期的 Low Level Client,后面 ES 开发了全新的客户端操作方式,称为 High Level Client。高级别客户端与 ES 版本同步更新,但是 Spring Boot 最初整合 ES 的时候使用的是低级别客户端,所以企业开发需要更换成高级别的客户端模式。
引入依赖
导入 Spring Boot 整合 Elasticsearch 高级别客户端的坐标
xml
 <!-- ES 全新的客户端操作方式,称为 High Level Client。推荐使用 -->
<dependency>
    <groupId>org.elasticsearch.client</groupId>
    <artifactId>elasticsearch-rest-high-level-client</artifactId>
</dependency>
<!-- ES 高级别客户没有整合 starter -->
<dependency>
    <groupId>org.springframework.boot</groupId>
    <artifactId>spring-boot-starter</artifactId>
</dependency>
注:因为 Spring Boot 整合 ES 高级别客户端的坐标,此种形式目前没有对应的 starter,所以如果不是 Spring Boot web 应用的话,需要导入 spring-boot-starter 依赖
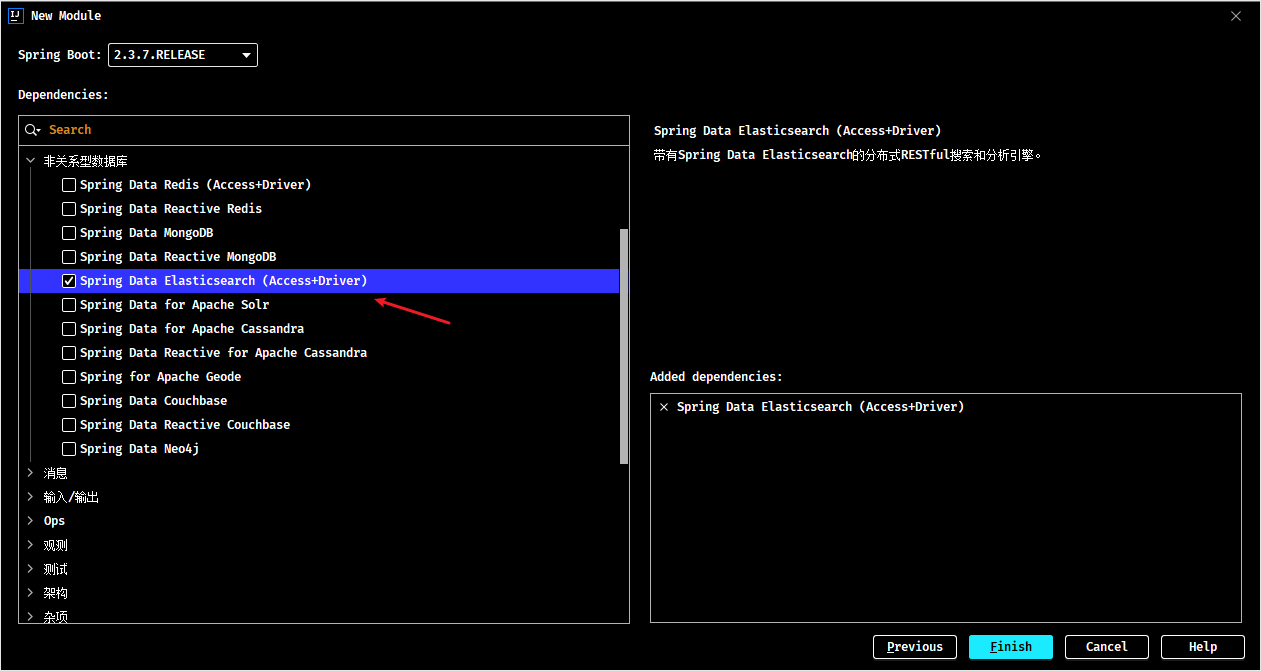
也可以直接使用 idea 的 Spring Initializr 创建 Spring Boot 项目,在创建模块的时候勾选相应的依赖,归属 NoSQL 分类中
项目配置
ES 高级别客户可以不需要与低级别客户一样,在 Spring Boot 项目配置文件 application.yml 中,设置 Elasticsearch 相关基础配置,因为在创建客户端时会指定服务器ip地址与端口
操作客户端示例
创建客户端对象
使用编程的形式设置连接的 ES 服务器,并获取客户端对象。配置 ES 服务器地址与端口9200(可以将地址与端口等写到配置文件中,再读取配置文件),记得客户端使用完毕需要手工关闭。由于当前客户端是手工维护的,因此不能通过自动装配的形式加载对象。
java
@SpringBootTest
public class ElasticsearchTest {

    /* ES 早期低级别的客户操作对象 ElasticsearchRestTemplate,不推荐使用 */
    // @Autowired
    // private ElasticsearchRestTemplate template;

    /* ES 高级别客户操作对象 */
    private RestHighLevelClient client;

    @BeforeEach
    public void init() {
        // 指定 es 服务器地址,创建 HttpHost 连接对象。(可以修改成读取配置文件)
        HttpHost host = HttpHost.create("http://localhost:9200");
        // 创建高级别客户端操作对象
        RestClientBuilder builder = RestClient.builder(host);
        client = new RestHighLevelClient(builder);
    }

    @AfterEach
    public void shutdown() throws IOException {
        client.close();
    }
}
创建索引
高级别客户端操作是通过发送请求的方式完成所有操作的,ES 针对各种不同的操作,设定了各式各样的请求对象,在创建索引的对象是 CreateIndexRequest,其他操作也会有自己专用的 Request 对象。
- 创建普通索引
java
@Test
public void testCreateIndex() throws IOException {
    // 创建索引专用的请求对象 CreateIndexRequest
    CreateIndexRequest request = new CreateIndexRequest("books");
    client.indices().create(request, RequestOptions.DEFAULT);
}- 创建索引(IK分词器)。IK 分词器是通过请求参数的形式进行设置的,设置请求参数使用
CreateIndexRequest对象中的source方法进行设置,根据操作种类来决定相应的参数。当请求中需要参数时,均可使用当前形式进行参数设置。
java
@Test
public void testCreateIndexByIK() throws IOException {
    CreateIndexRequest request = new CreateIndexRequest("books");
    String json = "{\n" +
            "    \"mappings\":{\n" +
            "        \"properties\":{\n" +
            "            \"id\":{\n" +
            "                \"type\":\"keyword\"\n" +
            "            },\n" +
            "            \"name\":{\n" +
            "                \"type\":\"text\",\n" +
            "                \"analyzer\":\"ik_max_word\",\n" +
            "                \"copy_to\":\"all\"\n" +
            "            },\n" +
            "            \"type\":{\n" +
            "                \"type\":\"keyword\"\n" +
            "            },\n" +
            "            \"description\":{\n" +
            "                \"type\":\"text\",\n" +
            "                \"analyzer\":\"ik_max_word\",\n" +
            "                \"copy_to\":\"all\"\n" +
            "            },\n" +
            "            \"all\":{\n" +
            "                \"type\":\"text\",\n" +
            "                \"analyzer\":\"ik_max_word\"\n" +
            "            }\n" +
            "        }\n" +
            "    }\n" +
            "}";
    // 设置请求中的参数
    request.source(json, XContentType.JSON);
    client.indices().create(request, RequestOptions.DEFAULT);
}
添加文档
添加文档使用的请求对象是 IndexRequest
java
@Test
public void testCreateDoc() throws IOException {
    Book book = new Book();
    book.setId(1);
    book.setName("金田一少年之事件薄");
    book.setType("漫画");
    book.setDescription("推理迷不能错过");
    // 创建新增的专用请求对象 IndexRequest
    IndexRequest request = new IndexRequest("books").id(book.getId().toString());
    String json = JSON.toJSONString(book);
    request.source(json, XContentType.JSON);
    client.index(request, RequestOptions.DEFAULT);
}
批量添加文档
批量添加文档时,先创建一个 BulkRequest 的对象,可以将该对象理解为是一个保存 IndexRequest 对象的容器,将所有的请求都初始化好后,添加到 BulkRequest 对象中,再使用 BulkRequest 对象的 bulk 方法,一次性执行完毕。
java
@Test
public void testCreateDocBatch() throws IOException {
    // 创建批量请求对象容器 BulkRequest
    BulkRequest bulk = new BulkRequest();

    for (int i = 2; i < 6; i++) {
        Book book = new Book();
        book.setId(i);
        book.setName("金田一少年之事件薄第" + i + "集");
        book.setType("漫画");
        book.setDescription("推理迷不能错过" + i);

        // 创建新增的专用请求对象 IndexRequest
        IndexRequest request = new IndexRequest("books").id(book.getId().toString());
        String json = JSON.toJSONString(book);
        request.source(json, XContentType.JSON);
        // 将 IndexRequest 请求对象加入到 BulkRequest 容器中
        bulk.add(request);
    }
    // 批量新增
    client.bulk(bulk, RequestOptions.DEFAULT);
}
按id查询文档
根据 id 查询文档的请求对象是 GetRequest
java
@Test
public void testGet() throws IOException {
    // 创建根据 id 查询文档专用请求对象 GetRequest
    GetRequest request = new GetRequest("books", "2");
    GetResponse response = client.get(request, RequestOptions.DEFAULT);
    String json = response.getSourceAsString();
    System.out.println(json);
}
按条件查询文档
按条件查询文档的请求对象是 SearchRequest,查询时调用 SearchRequest 对象的 termQuery 方法,指定查询的属性名,此处支持使用合并字段,也就是前面定义索引属性时添加的 all 属性。
java
@Test
public void testSearch() throws IOException {
    // 创建条件查询文档专用请求对象 SearchRequest
    SearchRequest request = new SearchRequest("books");
    // 指定查询条件(根据哪些属性查询)
    SearchSourceBuilder builder = new SearchSourceBuilder();
    builder.query(QueryBuilders.termQuery("all", "金田一"));
    request.source(builder);
    // 查询
    SearchResponse response = client.search(request, RequestOptions.DEFAULT);
    // 获取查询命中的数据
    SearchHits hits = response.getHits();
    for (SearchHit hit : hits) {
        String source = hit.getSourceAsString();
        System.out.println("source: " + source);
        Book book = JSON.parseObject(source, Book.class);
        System.out.println(book);
    }
}