Appearance
ElasticSearch 分布式全文搜索引擎
概述
ElasticSearch 是一个基于 Lucene 的搜索服务器。它提供了一个分布式多用户能力的全文搜索引擎,基于 RESTful web 接口。Elasticsearch 是用 Java 语言开发的,并作为 Apache 许可条款下的开放源码发布,是一种流行的企业级搜索引擎。ElasticSearch 用于云计算中,能够达到实时搜索,稳定,可靠,快速,安装使用方便。官方客户端在 Java、.NET(C#)、PHP、Python、Apache Groovy、Ruby 和许多其他语言中都是可用的。根据 DB-Engines 的排名显示,Elasticsearch 是最受欢迎的企业搜索引擎,其次是 Apache Solr,也是基于 Lucene
总结:
- elasticsearch 是一个基于 Lucene 的高扩展的分布式搜索服务器,支持开箱即用。
- elasticsearch 隐藏了 Lucene 的复杂性,对外提供 Restful 接口来操作索引、搜索。
优势:
- 扩展性好,可部署上百台服务器集群,处理 PB 级数据
- 近实时的去索引数据、搜索数据
Tips: es 和 solr 选择哪个?
- 如果公司现在用的 solr 可以满足需求就不要换了。
- 如果你司准备进行全文检索项目的开发,建议优先考虑 elasticsearch,因为像 Github 这样大规模的搜索都在用它。
原理与应用
索引结构
下图是 ElasticSearch 的索引结构,下边黑色部分是物理结构,上边黄色部分是逻辑结构,逻辑结构也是为了更好的去描述 ElasticSearch 的工作原理及去使用物理结构中的索引文件

逻辑结构部分是一个倒排索引表:
- 将要搜索的文档内容分词,所有不重复的词组成分词列表。
- 将搜索的文档最终以Document方式存储起来。
- 每个词和docment都有关联。
示例
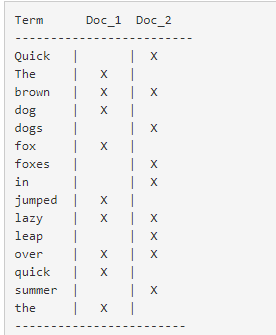
现在,如果想搜索 quick brown,只需要查找包含每个词条的文档

两个文档都匹配,但是第一个文档比第二个匹配度更高。如果使用仅计算匹配词条数量的简单相似性算法,那么可以说,对于查询的相关性来讲,第一个文档比第二个文档更佳
RESTful 应用方法
Elasticsearch 提供 RESTful Api 接口进行索引、搜索,并且支持多种客户端
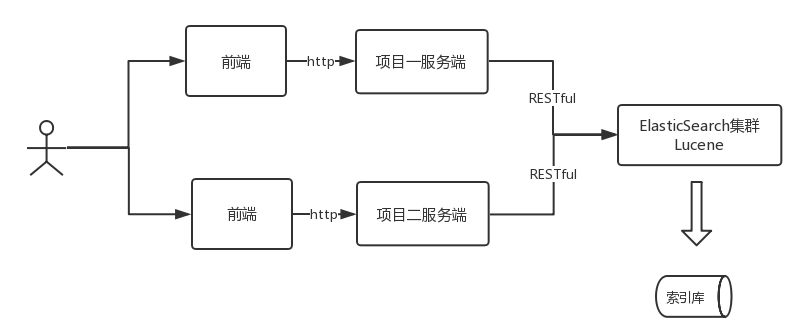
- 用户在前端搜索关键字
- 项目前端通过 http 方式请求项目服务端
- 项目服务端通过 Http RESTful 方式请求 ES 集群进行搜索
- ES集群从索引库检索数据
ElasticaSearch 安装
下载地址
- ES 更多版本:https://www.elastic.co/cn/downloads/past-releases
- ES 最新版本:https://www.elastic.co/cn/downloads/elasticsearch
目前下载的是 Elasticsearch 6.2.1
Notes: JDK8 只支持到 7.15.x 版本,更高的版本需要 JDK11
安装说明
安装配置
- 新版本要求至少 jdk1.8 以上。
- 支持 tar、zip、rpm 等多种安装方式。在 windows 下开发建议使用 ZIP 安装方式。
- 支持 docker 方式安装。更多详情参见:https://www.elastic.co/guide/en/elasticsearch/reference/current/install-elasticsearch.html
目录结构
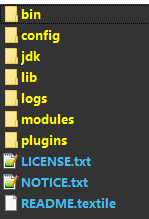
解压 elasticsearch-6.2.1.zip,目录结构如下:
- bin:脚本目录,包括:启动、停止等可执行脚本
- config:配置文件目录,包括 ES 服务器所有使用的配置文件
- jdk:此目录中包含了一个完整的 JDK 工具包,版本17,当 ES 升级时,使用最新版本的 JDK
- lib:包含 ES 运行的依赖 jar 文件
- data:索引目录,存放索引文件的地方
- logs:日志目录,包含 ES 运行后产生的所有日志文件
- modules:模块目录,包括了 ES 的所有功能模块。里面的内容也是 jar 包。和 jar 目录不同,jar 目录是 ES 运行期间依赖的 jar 包,modules 是 ES 软件自己的功能 jar 包
- plugins:插件目录,ES 支持插件机制,默认为空
Elasticsearch 版本和支持 JVM 版本关系详见:https://www.elastic.co/cn/support/matrix#matrix_jvm
配置文件
三个配置文件
ES的配置文件的地址根据安装形式的不同而不同:
- 使用 zip、tar 安装,配置文件的地址在安装目录的 config 下
- 使用 RPM 安装,配置文件在
/etc/elasticsearch下 - 使用 MSI 安装,配置文件的地址在安装目录的 config 下,并且会自动将 config 目录地址写入环境变量
ES_PATH_CONF
本 ES 研究使用的 zip 包安装,配置文件在 ES 安装目录的 config 下
相关配置文件如下:
- elasticsearch.yml:用于配置 Elasticsearch 运行参数
- jvm.options:用于配置 Elasticsearch JVM 设置
- log4j2.properties:用于配置 Elasticsearch 日志
elasticsearch.yml
配置格式说明
配置格式是YAML,可以采用如下两种方式
- 方式1:层次方式。如:
path: data: /var/lib/elasticsearch logs: /var/log/elasticsearch - 方式2:属性方式。如:
path.data: /var/lib/elasticsearch path.logs: /var/log/elasticsearch
本次实践项目使用方式2,配置如下
yml
cluster.name: xuecheng
node.name: xc_node_1
network.host: 0.0.0.0
http.port: 9200
transport.tcp.port: 9300
node.master: true
node.data: true
discovery.zen.ping.unicast.hosts: ["0.0.0.0:9300", "0.0.0.0:9301"]
discovery.zen.minimum_master_nodes: 1
node.ingest: true
bootstrap.memory_lock: false
node.max_local_storage_nodes: 2

path.data: E:\deployment-environment\elasticsearch-6.2.1\data
path.logs: E:\deployment-environment\elasticsearch-6.2.1\logs

http.cors.enabled: true
http.cors.allow-origin: /.*/
注意
path.data和path.logs路径配置正确
常用的配置项说明
cluster.name:配置elasticsearch的集群名称,默认是elasticsearch。建议修改成一个有意义的名称node.name:节点名,通常一台物理服务器就是一个节点,es会默认随机指定一个名字,建议指定一个有意义的名称,方便管理。一个或多个节点组成一个cluster集群,集群是一个逻辑的概念,节点是物理概念path.conf:设置配置文件的存储路径,tar或zip包安装默认在es根目录下的config文件夹,rpm安装默认在/etc/elasticsearchpath.data:设置索引数据的存储路径,默认是es根目录下的data文件夹,可以设置多个存储路径,用逗号隔开path.logs:设置日志文件的存储路径,默认是es根目录下的logs文件夹path.plugin:设置插件的存放路径,默认是es根目录下的plugins文件夹bootstrap.memory_lock:设置为true可以锁住ES使用的内存,避免内存与swap分区交换数据network.host:设置绑定主机的ip地址,设置为0.0.0.0表示绑定任何ip,允许外网访问,生产环境建议设置为具体的iphttp.port: 9200:设置对外服务的http端口,默认为9200transport.tcp.port: 9300:集群结点之间通信端口node.master:指定该节点是否有资格被选举成为master结点,默认是true,如果原来的master宕机会重新选举新的masternode.data:指定该节点是否存储索引数据,默认为truediscovery.zen.ping.unicast.hosts: ["host1:port", "host2:port", "..."]:设置集群中master节点的初始列表discovery.zen.ping.timeout: 3s:设置ES自动发现节点连接超时的时间,默认为3秒,如果网络延迟高可设置大些discovery.zen.minimum_master_nodes:主结点数量的最少值,此值的公式为:(master_eligible_nodes / 2) + 1,比如:有3个符合要求的主结点,那么这里要设置为2node.max_local_storage_nodes:单机允许的最大存储结点数,通常单机启动一个结点建议设置为1,开发环境如果单机启动多个节点可设置大于1http.cors.enabled:开启 cors 跨域访问支持,默认为falsehttp.cors.allow-origin:跨域访问允许的域名地址,可以使用正则,如,允许所有域名/.*/
jvm.options
- 设置最小及最大的JVM堆内存大小,修改jvm.options,设置
-Xms和-Xmx:
- 两个值设置为相等
- 将
Xmx设置为不超过物理内存的一半
log4j2.properties
日志文件设置,ES使用log4j,注意日志级别的配置
系统配置(Linux系统)
在linux上根据系统资源情况,可将每个进程最多允许打开的文件数设置大些
bash
su limit -n- 查询当前文件数
使用命令设置 limit:
方式1:先切换到root,设置完成再切回elasticsearch用户
bash
sudo su
ulimit ‐n 65536
su elasticsearch方法2:也可通过下边的方式修改文件进行持久设置。打开/etc/security/limits.conf文件,将下边的设置加入到此文件中
bash
elasticsearch ‐ nofile 65536启动 ES
进入 ElasticSearch 根目录,进入 bin 目录,在 cmd 命令行中运行
bash
elasticsearch.bat浏览器输入:http://localhost:9200
显示结果如下(配置不同内容则不同)说明 ES启动成功
json
{
  "name" : "xc_node_1",
  "cluster_name" : "xuecheng",
  "cluster_uuid" : "_na_",
  "version" : {
    "number" : "7.4.0",
    "build_flavor" : "default",
    "build_type" : "zip",
    "build_hash" : "22e1767283e61a198cb4db791ea66e3f11ab9910",
    "build_date" : "2019-09-27T08:36:48.569419Z",
    "build_snapshot" : false,
    "lucene_version" : "8.2.0",
    "minimum_wire_compatibility_version" : "6.8.0",
    "minimum_index_compatibility_version" : "6.0.0-beta1"
  },
  "tagline" : "You Know, for Search"
}
head 插件安装
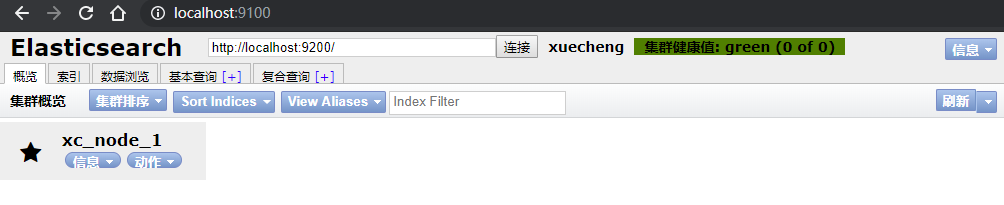
head 插件是 ES 的一个可视化管理插件,用来监视 ES 的状态,并通过 head 客户端和 ES 服务进行交互,比如创建映射、创建索引等,head 的项目地址在https://github.com/mobz/elasticsearch-head
从 ES6.0 开始,head 插件支持使得 node.js 运行
- 安装 node.js
- 下载 head 并运行
方式一:可以使用命令行直接进行下载并运行(推荐)
bash
# 下载
git clone git://github.com/mobz/elasticsearch-head.git

cd elasticsearch-head
# 安装依赖
npm install
# 启动
npm run start open HTTP://localhost:9100/
方式二:到 github 中下载elasticsearch-head源码。不过好像只打包到 5.0.0 版本
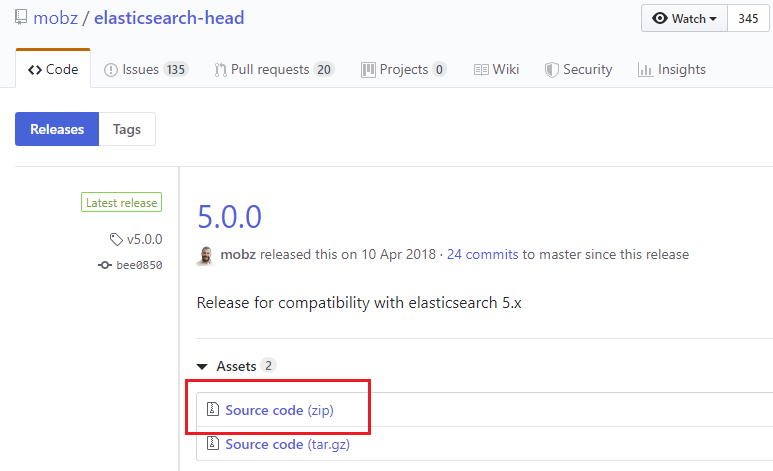
解压压缩包后,进入项目的根目录,使用npm命令安装依赖并运行项目
bash
cd E:\deployment-environment\elasticsearch-head-5.0.0\
npm install
npm run start打开浏览器调试工具发现报错:Origin null is not allowed by Access-Control-Allow-Origin.。
原因是:head插件作为客户端要连接ES服务(localhost:9200),此时存在跨域问题,elasticsearch默认不允许跨域访问
解决方案:设置elasticsearch允许跨域访问
在 config/elasticsearch.yml 后面增加以下参数:
yml
# 开启cors跨域访问支持,默认为false
http.cors.enabled: true
# 跨域访问允许的域名地址,(允许所有域名)使用正则
http.cors.allow-origin: /.*/
注意:将config/elasticsearch.yml另存为utf-8编码格式
ES 快速入门
ES作为一个索引及搜索服务,对外提供丰富的REST接口,此部分的示例使用head插件来测试,目的是对ES的使用方法及流程有个初步的认识
创建索引库
索引库概念
ES 的索引库是一个逻辑概念,它包括了分词列表及文档列表,同一个索引库中存储了相同类型的文档。它就相当于 MySQL 中的表,或相当于 Mongodb 中的集合
关于索引这个词语解释:
- 索引(名词):ES 是基于 Lucene 构建的一个搜索服务,它要从索引库搜索符合条件索引数据。
- 索引(动词):索引库刚创建起来是空的,将数据添加到索引库的过程称为索引。
上边讲的创建索引库相当于关系数据库中的数据库还是表?
- 如果相当于数据库就表示一个索引库可以创建很多不同类型的文档,这在 ES 中也是允许的。
- 如果相当于表就表示一个索引库只能存储相同类型的文档,ES 官方建议在一个索引库中只存储相同类型的文档。
创建方式
- 方式一:使用 postman 或 curl 这样的工具创建
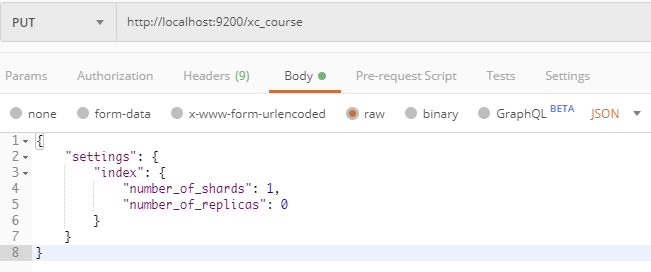
使用 postman 发送 put 请求,http://localhost:9200/索引库名称。请求参数如下
json
{
    "settings": {
        "index": {
            "number_of_shards": 1,
            "number_of_replicas": 0
        }
    }
}- number_of_shards:设置分片的数量,在集群中通常设置多个分片,表示一个索引库将拆分成多片分别存储不同的结点,提高了ES的处理能力和高可用性,入门程序使用单机环境,这里设置为1。
- number_of_replicas:设置副本的数量,设置副本是为了提高ES的高可靠性,单机环境设置为0
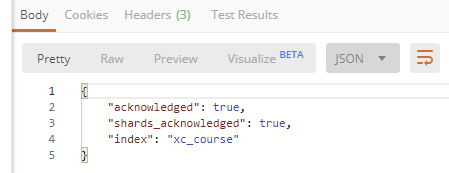
以下创建示例,创建xc_course索引库,共1个分片,0个副本
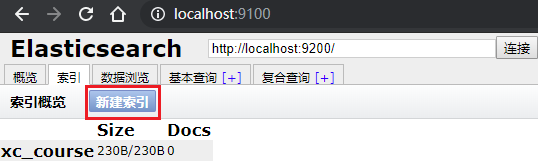
- 方式二:使用head插件创建
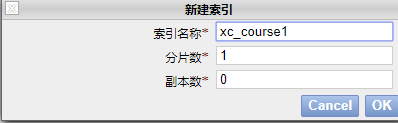
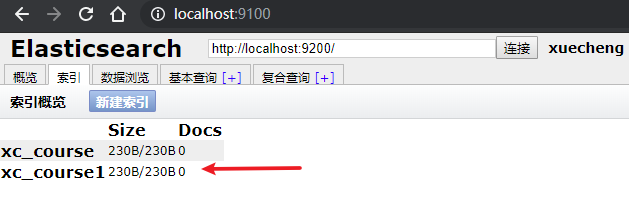
创建映射
概念说明
在索引中每个文档都包括了一个或多个 field,创建映射就是向索引库中创建 field 的过程,下边是 document 和 field 与关系数据库的概念的类比
| ES 索引库 | 关系数据库 |
|---|---|
| 文档(Document) | Row 记录 |
| 字段(Field) | Columns 列 |
注意:6.0 之前的版本有 type(类型)概念,type 相当于关系数据库的表,ES 官方将在 ES9.0 版本中彻底删除 type
创建映射
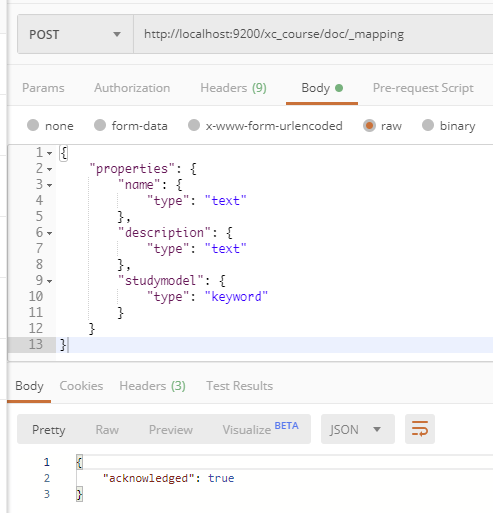
创建映射方法:发送POST请求,http://localhost:9200/索引库名称/类型名称/_mapping
示例:把课程信息存储到ES中,这里创建课程信息的映射。创建类型为xc_course的映射,共包括三个字段:name、description、studymondel
由于ES6.0版本还没有将type彻底删除,所以暂时把type起一个没有特殊意义的名字
- post 请求:http://localhost:9200/xc_course/doc/_mapping
- 以请求表示在xc_course索引库下的doc类型下创建映射。doc是类型名,可以自定义,在ES6.0中要弱化类型的概念,给它起一个没有具体业务意义的名称。
- 请求参数
json
{
    "properties": {
        "name": {
            "type": "text"
        },
        "description": {
            "type": "text"
        },
        "studymodel": {
            "type": "keyword"
        }
    }
}
映射创建成功,查看head界面:
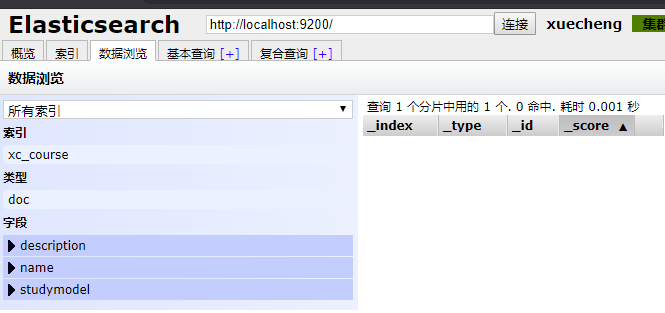
解决索引库只读不能创建映射的问题
如果创建索引映射报以下错误:
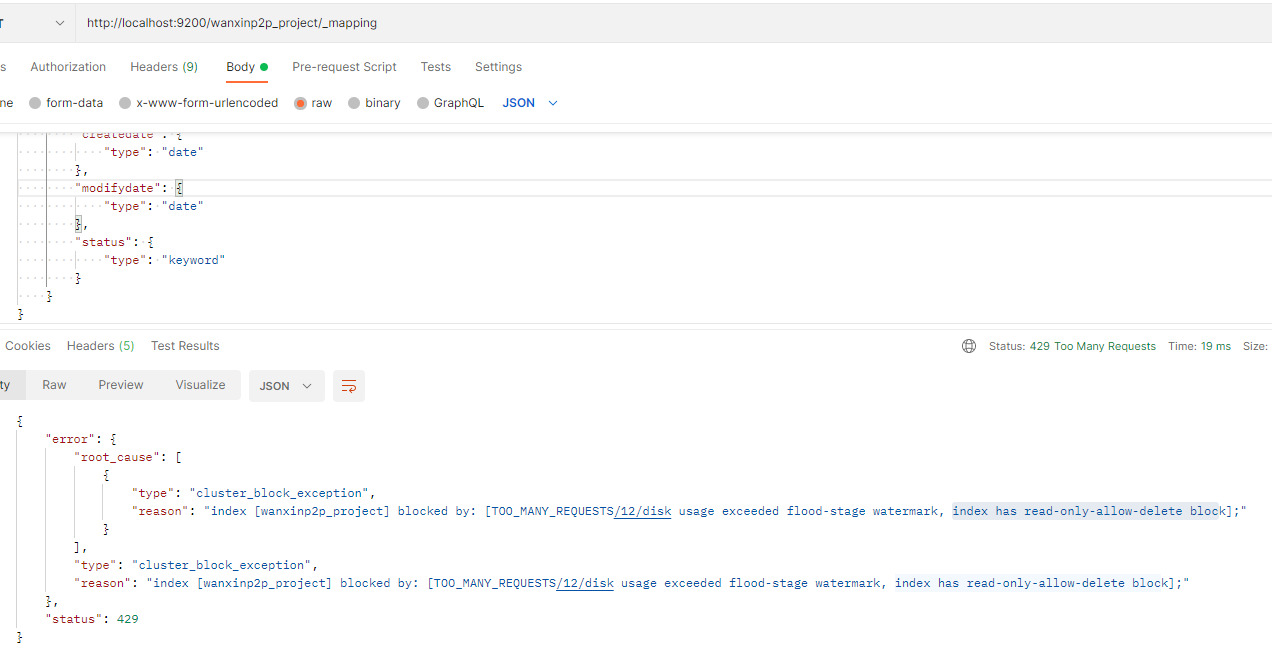
这是因为索引库为只读状态。
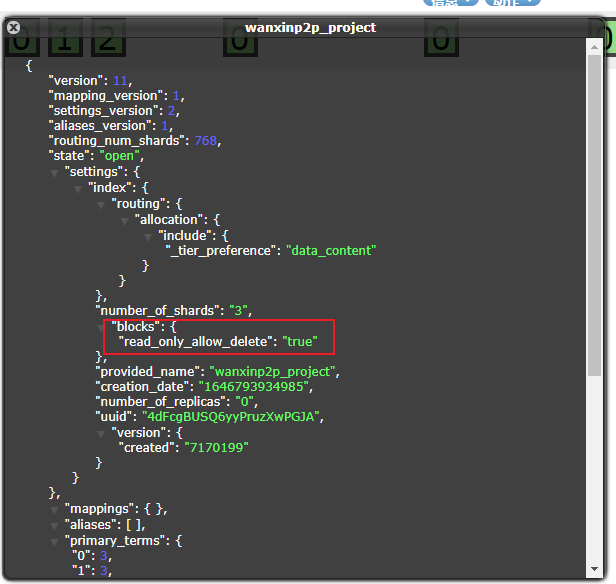
解决方法:
修改 elasticsearch.yml 配置文件,在最后加上以下配置
yml
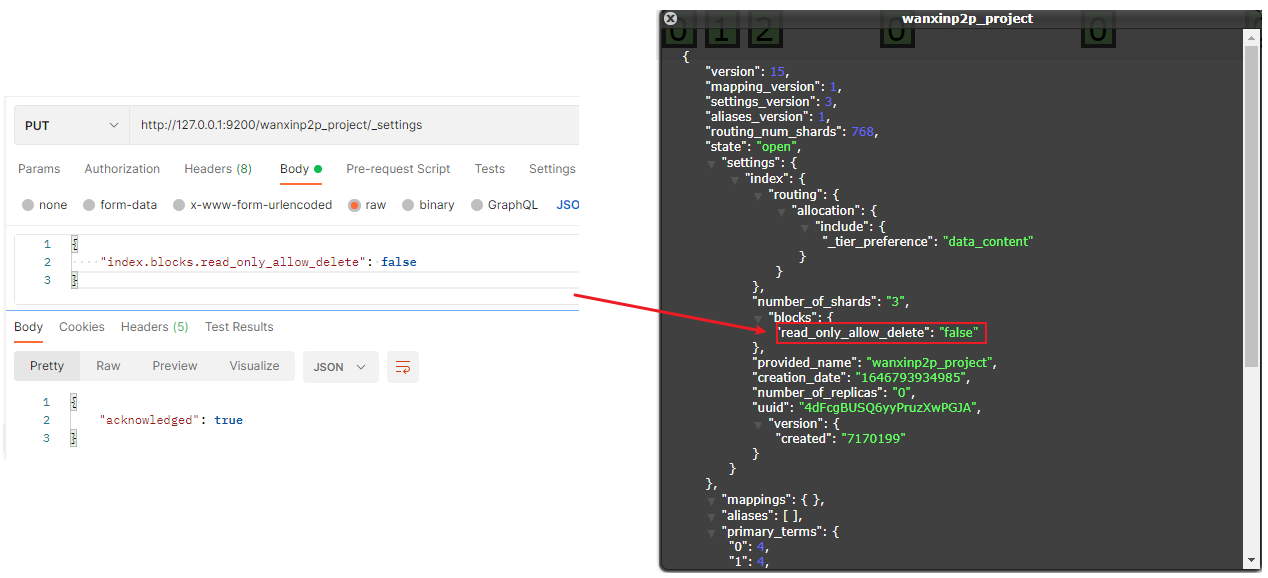
cluster.routing.allocation.disk.threshold_enabled: false重启 es 服务后,通过使用 post 修改当前索引库配置即可
json
PUT http://127.0.0.1:9200/wanxinp2p_project/_settings

{
    "index.blocks.read_only_allow_delete": false
}
创建文档
ES中的文档相当于MySQL数据库表中的记录
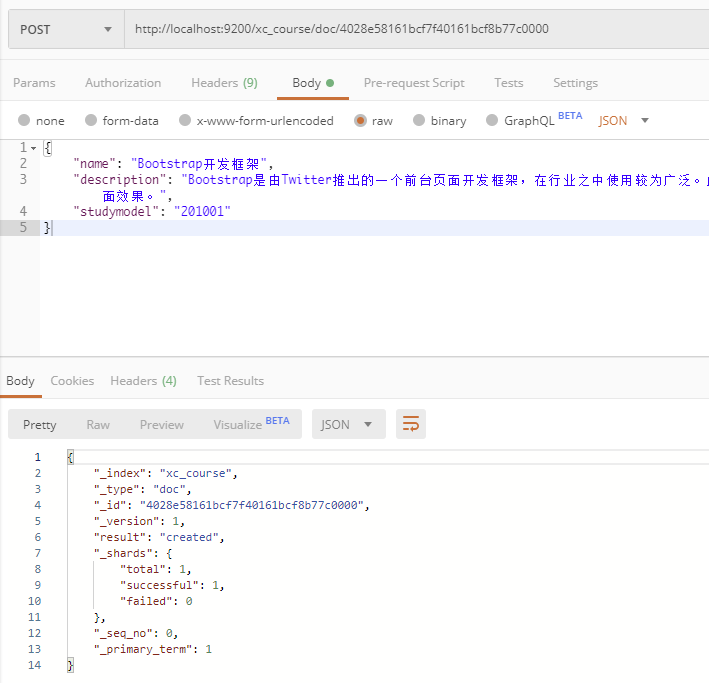
发送put或Post请求:http://localhost:9200/xc_course/doc/id值。如果不指定id值ES会自动生成ID
示例:使用postman测试,发送请求 http://localhost:9200/xc_course/doc/4028e58161bcf7f40161bcf8b77c0000,上送参数
json
{
    "name": "Bootstrap开发框架",
    "description": "Bootstrap是由Twitter推出的一个前台页面开发框架,在行业之中使用较为广泛。此开发框架包含了大量的CSS、JS程序代码,可以帮助开发者(尤其是不擅长页面开发的程序人员)轻松的实现一个不受浏览器限制的精美界面效果。",
    "studymodel": "201001"
}
通过head查询数据

搜索文档
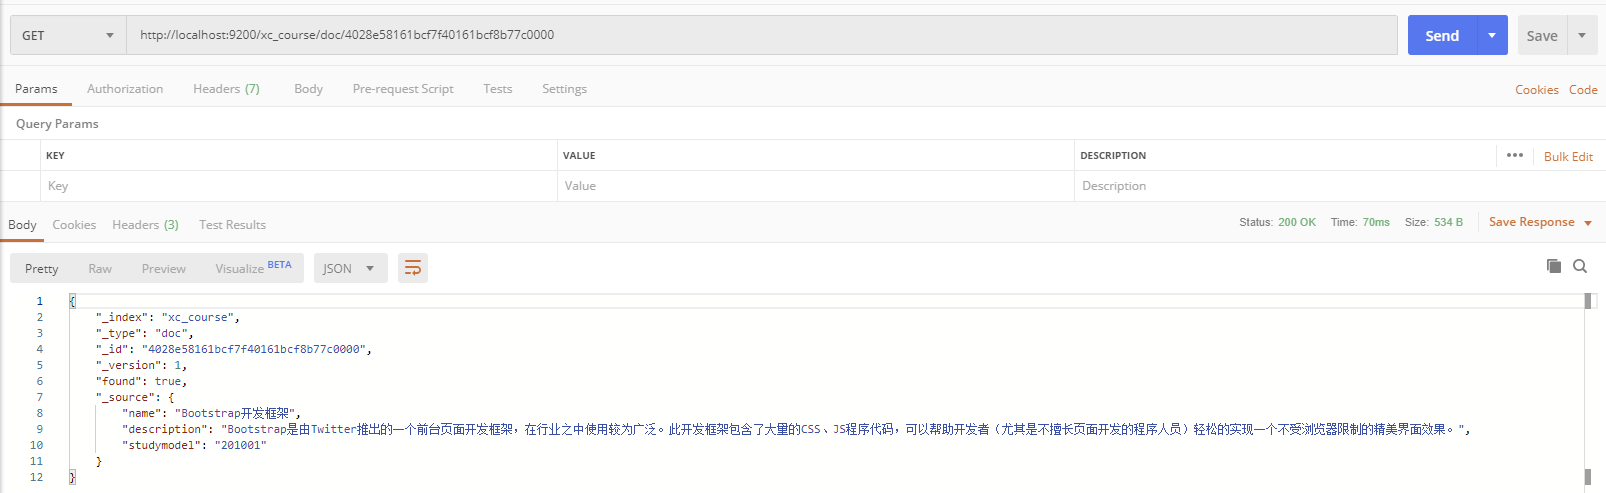
根据课程id查询文档
发送get请求:http://localhost:9200/xc_course/doc/4028e58161bcf7f40161bcf8b77c0000
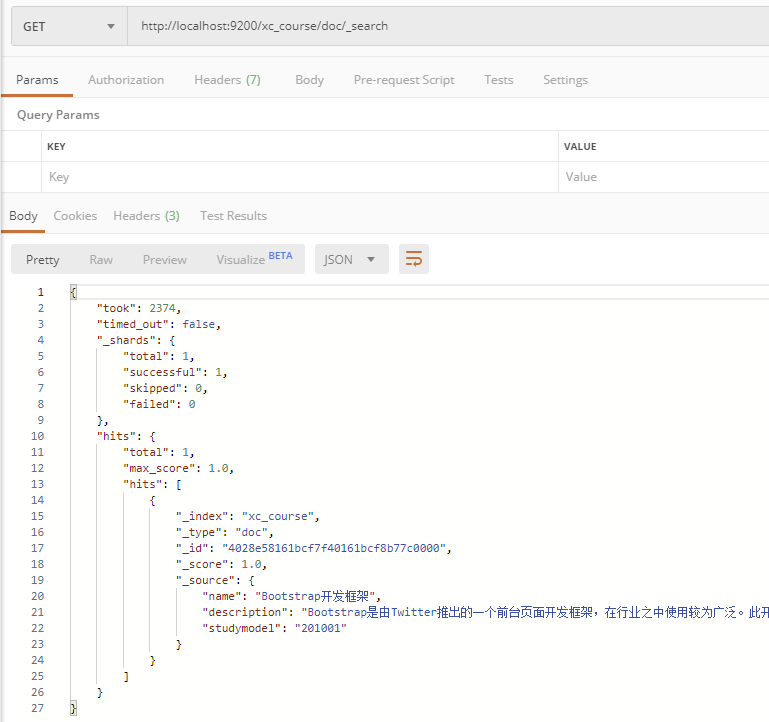
查询所有记录
发送get请求:http://localhost:9200/xc_course/doc/_search
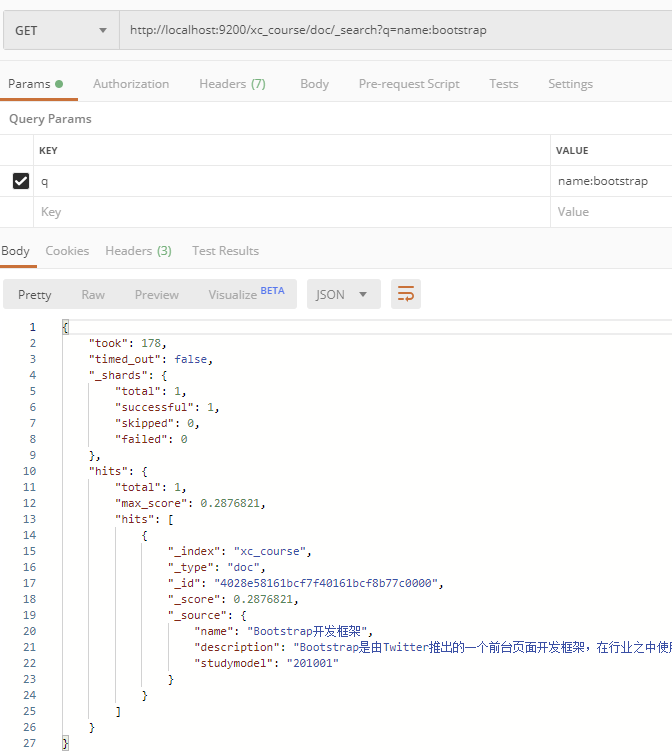
指定关键字查询相应的记录
- 查询名称中包括spring关键字的记录
发送GET请求:http://localhost:9200/xc_course/doc/_search?q=name:bootstrap
- 查询学习模式为201001的记录
发送GET请求:http://localhost:9200/xc_course/doc/_search?q=studymodel:201001
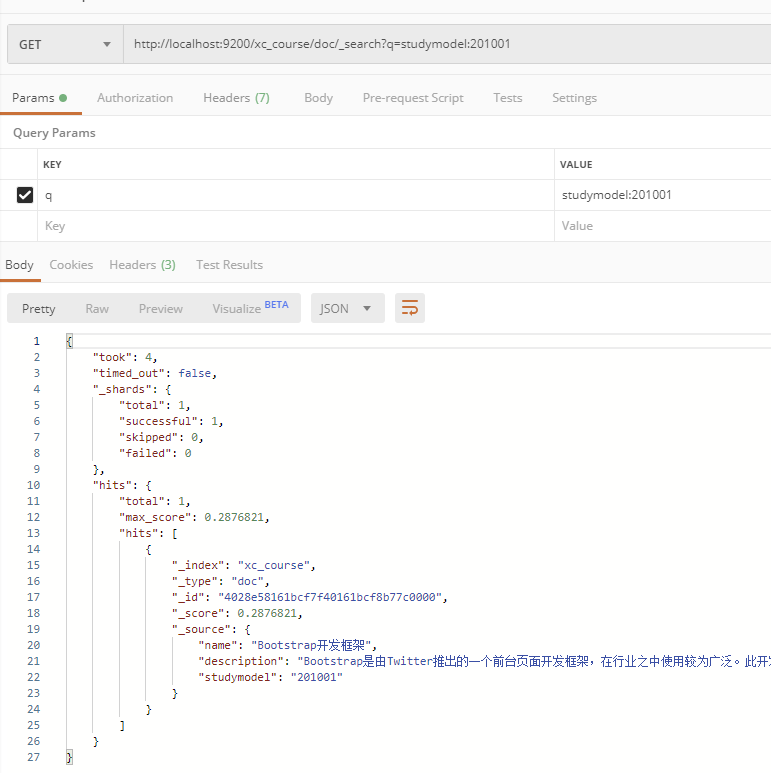
查询结果分析
分析上面查询的结果
json
{
    "took": 4,
    "timed_out": false,
    "_shards": {
        "total": 1,
        "successful": 1,
        "skipped": 0,
        "failed": 0
    },
    "hits": {
        "total": 1,
        "max_score": 0.2876821,
        "hits": [
            {
                "_index": "xc_course",
                "_type": "doc",
                "_id": "4028e58161bcf7f40161bcf8b77c0000",
                "_score": 0.2876821,
                "_source": {
                    "name": "Bootstrap开发框架",
                    "description": "Bootstrap是由Twitter推出的一个前台页面开发框架,在行业之中使用较为广泛。此开发框架包含了大量的CSS、JS程序代码,可以帮助开发者(尤其是不擅长页面开发的程序人员)轻松的实现一个不受浏览器限制的精美界面效果。",
                    "studymodel": "201001"
                }
            }
        ]
    }
}- took:本次操作花费的时间,单位为毫秒。
- timed_out:请求是否超时
- _shards:说明本次操作共搜索了哪些分片
- hits:搜索命中的记录
- hits.total:符合条件的文档总数 hits.hits :匹配度较高的前N个文档
- hits.max_score:文档匹配得分,这里为最高分
- _score:每个文档都有一个匹配度得分,按照降序排列。
- _source:显示了文档的原始内容
IK 分词器
测试分词器
在添加文档时会进行分词,索引中存放的就是一个一个的词(term),当你去搜索时就是拿关键字去匹配词,最终找到词关联的文档
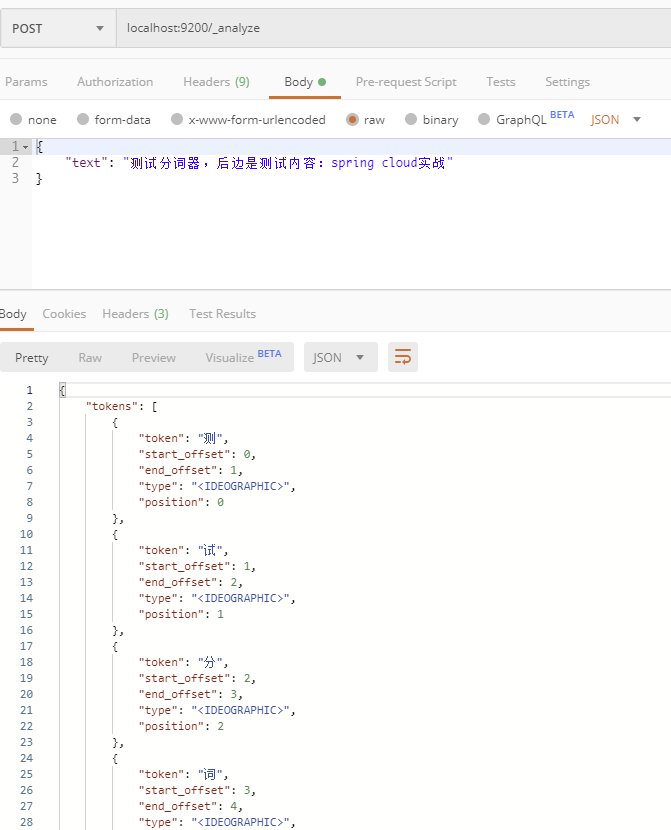
测试当前索引库使用的分词器,请求POST请求:http://localhost:9200/_analyze,测试的请求参数如下:
json
{
    "text": "测试分词器,后边是测试内容:spring cloud实战"
}
查看测试结果,会发现分词的效果将 “测试” 这个词拆分成两个单字“测”和“试”,这是因为当前索引库使用的分词器对中文就是单字分词
安装IK分词器
使用IK分词器可以实现对中文分词的效果。
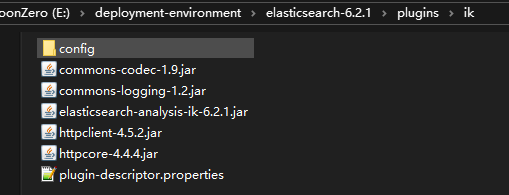
下载IK分词器:(Github地址:https://github.com/medcl/elasticsearch-analysis-ik),在releases标签页下载zip包(最好选择对应版本号的),解压,并将解压的文件拷贝到ES安装目录的plugins下的ik目录下,重启Elasticsearch服务
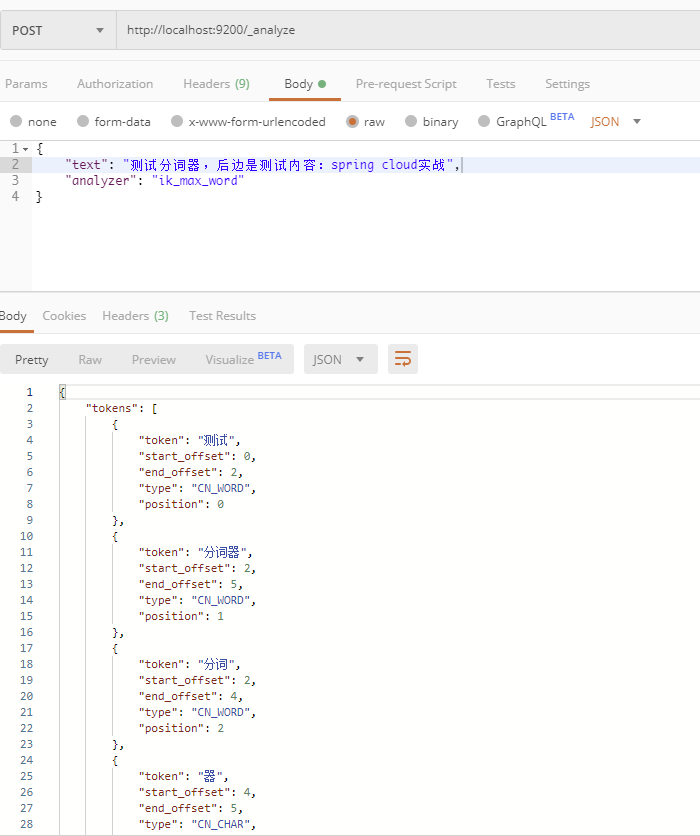
测试分词效果,发送POST请求:http://localhost:9200/_analyze,上送的参数增加"analyzer"属性
json
{
    "text": "测试分词器,后边是测试内容:spring cloud实战",
    "analyzer": "ik_max_word"
}
两种分词模式
ik分词器有两种分词模式:ik_max_word和ik_smart模式。
- ik_max_word:会将文本做最细粒度的拆分,比如会将“中华人民共和国人民大会堂”拆分为“中华人民共和国、中华人民、中华、华人、人民共和国、人民、共和国、大会堂、大会、会堂等词语
- ik_smart:会做最粗粒度的拆分,比如会将“中华人民共和国人民大会堂”拆分为中华人民共和国、人民大会堂
测试两种分词,发送POST请求:http://localhost:9200/_analyze
json
{
    "text": "中华人民共和国人民大会堂",
    "analyzer": "ik_smart"
}
自定义词库
如果要让分词器支持一些专有词语,可以自定义词库
iK分词器插件的config目录下有一个main.dic的文件,此文件为词库文件
在config目录中新建一个my.dic文件(注意文件格式为utf-8(不要选择utf-8 BOM)),在my.dic中自定义词语(定义方式可参考main.dic文件)
修改config/IKAnalyzer.cfg.xml配置文件,配置my.dic为扩展词库
xml
<?xml version="1.0" encoding="UTF-8"?>
<!DOCTYPE properties SYSTEM "http://java.sun.com/dtd/properties.dtd">
<properties>
	<comment>IK Analyzer 扩展配置</comment>
	<!--用户可以在这里配置自己的扩展字典 -->
	<entry key="ext_dict">my.dic</entry>
	 <!--用户可以在这里配置自己的扩展停止词字典-->
	<entry key="ext_stopwords"></entry>
	<!--用户可以在这里配置远程扩展字典 -->
	<!-- <entry key="remote_ext_dict">words_location</entry> -->
	<!--用户可以在这里配置远程扩展停止词字典-->
	<!-- <entry key="remote_ext_stopwords">words_location</entry> -->
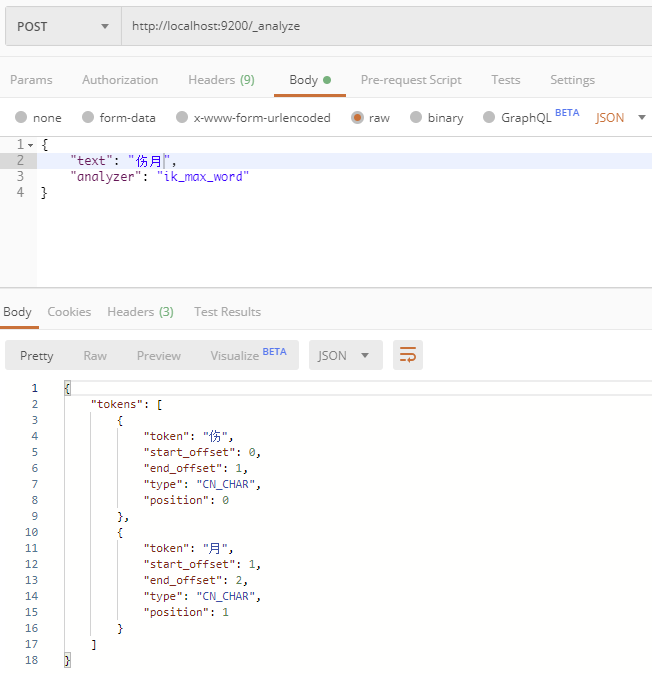
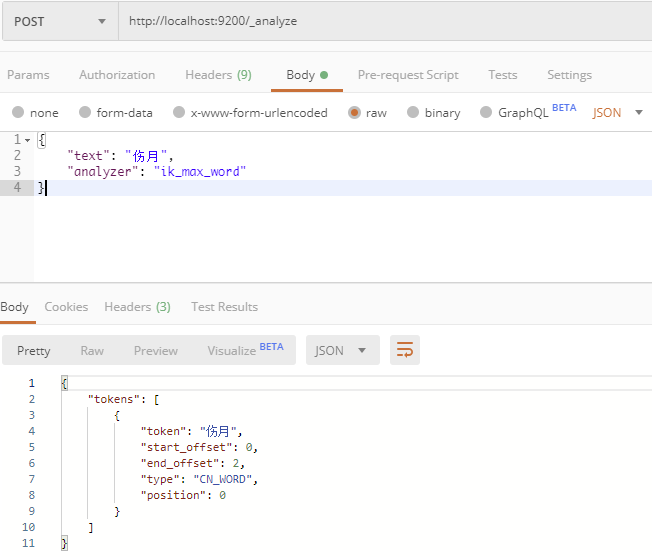
</properties>重启ES,测试分词效果,发送post请求:http://localhost:9200/_analyze,请求参数如下:
json
{
    "text": "伤月",
    "analyzer": "ik_max_word"
}- 自定义分词前效果:
- 自定义分词后效果:
映射
如果在索引和搜索时去使用ik分词器呢?如何指定其它类型的field,比如日期类型、数值类型等
映射维护方法
查询所有索引的映射
发送GET请求:http://localhost:9200/xc_course/_mapping
创建映射
发送 POST 请求:http://localhost:9200/xc_course/doc/_mapping,以下是一个示例的请求参数
json
{
    "properties": {
        "name": {
            "type": "text"
        },
        "description": {
            "type": "text"
        },
        "studymodel": {
            "type": "keyword"
        }
    }
}
更新映射
与创建映射发送一样的 POST 请求。但需要注意的是,只可以添加新字段,已有字段不允许更新。如果要更新已有字段,只能删除整个索引库,重新创建映射
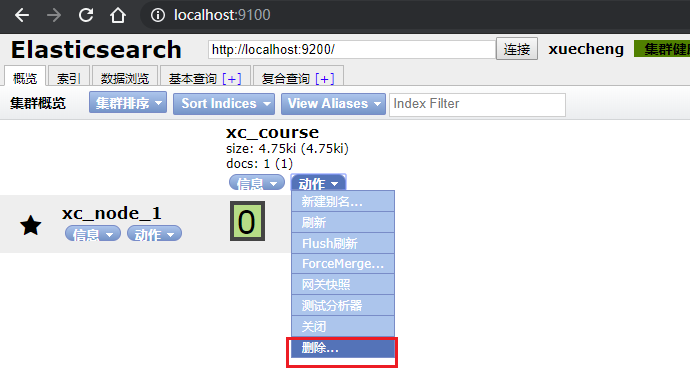
删除映射
通过删除索引来删除映射。使用head图形化插件进去操作
常用映射类型
下图是ES6.2核心的字段类型如下
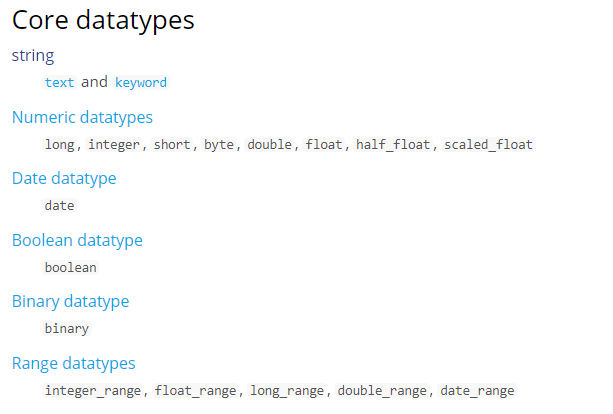
字符串包括 text 和 keyword 两种类型
text 文本字段
analyzer 属性,通过analyzer属性指定分词器
示例:指定name的字段类型为text,使用ik分词器的ik_max_word分词模式
json
"name": {
    "type": "text",
    "analyzer": "ik_max_word"
}上边示例指定了analyzer是指在索引和搜索都使用ik_max_word,如果单独想定义搜索时使用的分词器则可以通过search_analyzer属性。对于ik分词器建议是索引时使用ik_max_word将搜索内容进行细粒度分词,搜索时使用ik_smart提高搜索精确性
json
"name": {
    "type": "text",
    "analyzer": "ik_max_word",
    "search_analyzer": "ik_smart"
}
index 属性,通过index属性指定是否索引
- 默认为
index=true,即要进行索引,只有进行索引才可以从索引库搜索到。 - 但是也有一些内容不需要索引,比如:商品图片地址只被用来展示图片,不进行搜索图片,此时可以将index设置为false
json
"pic": {
    "type": "text",
    "index": false
}
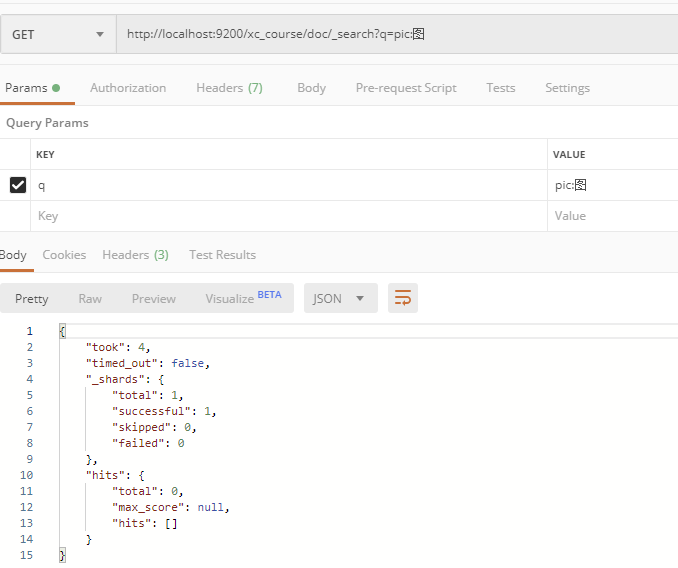
测试:删除索引,重新创建映射,将pic的index设置为false,尝试根据pic去搜索,结果搜索不到数据
store 属性
是否在source之外存储,每个文档索引后会在ES中保存一份原始文档,存放在"_source"中,一般情况下不需要设置store为true,因为在_source中已经有一份原始文档了
测试
- 删除xc_course/doc下的映射
- 创建新映射:Post http://localhost:9200/xc_course/doc/_mapping
json
{
    "properties": {
        "name": {
            "type": "text",
            "analyzer": "ik_max_word",
            "search_analyzer": "ik_smart"
        },
        "description": {
            "type": "text",
            "analyzer": "ik_max_word",
            "search_analyzer": "ik_smart"
        },
        "studymodel": {
            "type": "text"
        },
        "pic": {
            "type": "text",
            "index": false
        }
    }
}json
{
    "name": "Bootstrap开发框架",
    "description": "Bootstrap是由Twitter推出的一个前台页面开发框架,在行业之中使用较为广泛。此开发框架包含了大量的CSS、JS程序代码,可以帮助开发者(尤其是不擅长页面开发的程序人员)轻松的实现一个不受浏览器限制的精美界面效果。",
    "pic": "group1/M00/00/01/wKhlQFqO4MmAOP53AAAcwDwm6SU490.jpg",
    "studymodel": "201002"
}- 查询测试:
通过测试发现:name和description都支持全文检索,pic不可作为查询条件
keyword 关键字字段
keyword字段为关键字字段,通常搜索keyword是按照整体搜索,所以创建keyword字段的索引时是不进行分词的,比如:邮政编码、手机号码、身份证等。keyword字段通常用于过滤、排序、聚合等
测试
- 创建新的索引库:PUT http://localhost:9200/text_keyword
- 创建创建映射:POST http://localhost:9200/text_keyword/doc/_mapping
json
{
    "properties": {
        "name": {
            "type": "keyword"
        },
        "studymodel": {
            "type": "keyword"
        }
    }
}json
{
    "name": "java编程基础",
    "description": "java语言是世界第一编程语言,在软件开发领域使用人数最多。",
    "pic": "group1/M00/00/01/wKhlQFqO4MmAOP53AAAcwDwm6SU490.jpg",
    "studymodel": "201001"
}- 根据studymodel查询文档:GET http://localhost:9200/text_keyword/_search?q=studymodel:201001
name是keyword类型,所以查询方式是精确查询。所以搜索“name:java”,搜索不到记录
date 日期类型
- 日期类型不用设置分词器
- 通常日期类型的字段用于排序
format属性:通过format设置日期格式
示例:设置允许date字段存储年月日时分秒、年月日及毫秒三种格式。更新映射:POST http://localhost:9200/xc_course/doc/_mapping,增加timestamp属性映射
json
"timestamp": {
    "type": "date",
    "format": "yyyy‐MM‐dd HH:mm:ss||yyyy‐MM‐dd"
}
插入文档:POST http://localhost:9200/xc_course/doc/3
json
{
    "name": "spring开发基础",
    "description": "spring 在java领域非常流行,java程序员都在用。",
    "studymodel": "201001",
    "pic": "group1/M00/00/01/wKhlQFqO4MmAOP53AAAcwDwm6SU490.jpg",
    "timestamp": "2018‐07‐04 18:28:58"
}
数值类型
ES支持的数值类型如下图
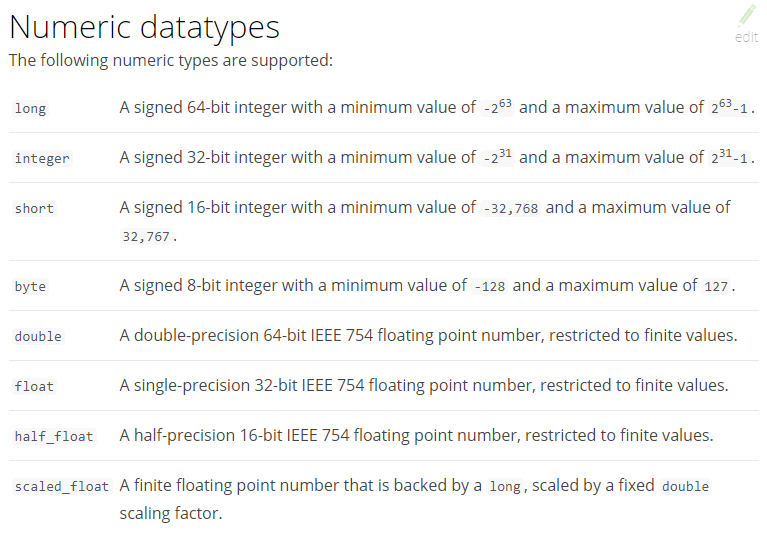
- 尽量选择范围小的类型,提高搜索效率
- 对于浮点数尽量用比例因子,比如一个价格字段,单位为元,我们将比例因子设置为100这在ES中会按“分”存储,映射如下
json
"price": {
    "type": "scaled_float",
    "scaling_factor": 100
}
由于比例因子为100,如果我们输入的价格是23.45则ES中会将23.45乘以100存储在ES中。
如果输入的价格是23.456,ES会将23.456乘以100再取一个接近原始值的数,得出2346。
使用比例因子的好处是整型比浮点型更易压缩,节省磁盘空间
如果比例因子不适合,则从下表选择范围小的去用
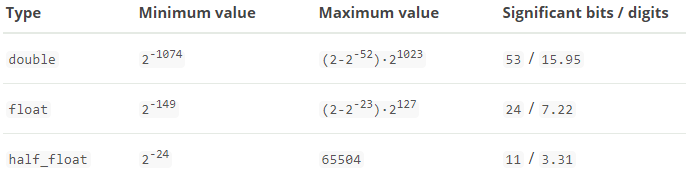
更新已有映射,并插入文档:POST http://localhost:9200/xc_course/doc/3
json
{
    "name": "spring开发基础",
    "description": "spring 在java领域非常流行,java程序员都在用。",
    "studymodel": "201001",
    "pic": "group1/M00/00/01/wKhlQFqO4MmAOP53AAAcwDwm6SU490.jpg",
    "timestamp": "2018‐07‐04 18:28:58",
    "price": 38.6
}
综合例子
json
{
    "properties": {
        "description": {
            "type": "text",
            "analyzer": "ik_max_word",
            "search_analyzer": "ik_smart"
        },
        "name": {
            "type": "text",
            "analyzer": "ik_max_word",
            "search_analyzer": "ik_smart"
        },
        "pic": {
            "type": "text",
            "index": false
        },
        "price": {
            "type": "float"
        },
        "studymodel": {
            "type": "keyword"
        },
        "timestamp": {
            "type": "date",
            "format": "yyyy-MM-dd HH:mm:ss||yyyy-MM-dd||epoch_millis"
        }
    }
}- 插入文档:Post http://localhost:9200/xc_course/doc/1
json
{
    "name": "Bootstrap 开发",
    "description": "Bootstrap是由Twitter推出的一个前台页面开发框架,是一个非常流行的开发框架,此框架集成了多种页面效果。此开发框架包含了大量的CSS、JS程序代码,可以帮助开发者(尤其是不擅长页面开发的程序人员)轻松的实现一个不受浏览器限制的精美界面效果。",
    "studymodel": "201002",
    "price": 38.6,
    "timestamp": "2018-04-25 19:11:35",
    "pic": "group1/M00/00/00/wKhlQFs6RCeAY0pHAAJx5ZjNDEM428.jpg"
}
搭建 JAVA 实现 ES 客户端操作
ES 客户端
ES提供多种不同的客户端:
- TransportClient。ES提供的传统客户端,官方计划8.0版本删除此客户端
- RestClient
- RestClient是官方推荐使用的,它包括两种:Java Low Level REST Client和 Java High Level REST Client
- ES在6.0之后提供 Java High Level REST Client,两种客户端官方更推荐使用 Java High Level REST Client,不过当前它还处于完善中,有些功能还没有
- 此测试工程使用Java High Level REST Client,如果它有不支持的功能,则使用Java Low Level REST Client
使用ES客户端,需要添加依赖
xml
<dependency>
    <groupId>org.elasticsearch.client</groupId>
    <artifactId>elasticsearch-rest-high-level-client</artifactId>
    <version>6.2.1</version>
</dependency>
<dependency>
    <groupId>org.elasticsearch</groupId>
    <artifactId>elasticsearch</artifactId>
    <version>6.2.1</version>
</dependency>
创建搜索工程
- 创建搜索工程(maven工程):xc-service-search,pom.xml文件中添加RestHighLevelClient依赖及junit依赖
xml
<?xml version="1.0" encoding="UTF-8"?>
<project xmlns="http://maven.apache.org/POM/4.0.0"
         xmlns:xsi="http://www.w3.org/2001/XMLSchema-instance"
         xsi:schemaLocation="http://maven.apache.org/POM/4.0.0
         http://maven.apache.org/xsd/maven-4.0.0.xsd">

    <parent>
        <artifactId>xc-framework-parent</artifactId>
        <groupId>com.xuecheng</groupId>
        <version>1.0-SNAPSHOT</version>
        <relativePath>../xc-framework-parent/pom.xml</relativePath>
    </parent>
    <modelVersion>4.0.0</modelVersion>
    <artifactId>xc-service-search</artifactId>
    <name>xc-service-search</name>
    <description>搜索服务</description>

    <dependencies>
        <dependency>
            <groupId>com.xuecheng</groupId>
            <artifactId>xc-framework-model</artifactId>
            <version>1.0-SNAPSHOT</version>
        </dependency>
        <dependency>
            <groupId>com.xuecheng</groupId>
            <artifactId>xc-framework-common</artifactId>
            <version>1.0-SNAPSHOT</version>
        </dependency>
        <dependency>
            <groupId>com.xuecheng</groupId>
            <artifactId>xc-service-api</artifactId>
            <version>1.0-SNAPSHOT</version>
        </dependency>
        <dependency>
            <groupId>org.springframework.boot</groupId>
            <artifactId>spring-boot-starter-web</artifactId>
        </dependency>
        <!-- ElasticSearch 客户端依赖 -->
        <dependency>
            <groupId>org.elasticsearch.client</groupId>
            <artifactId>elasticsearch-rest-high-level-client</artifactId>
            <version>6.2.1</version>
        </dependency>
        <!-- ElasticSearch 依赖 -->
        <dependency>
            <groupId>org.elasticsearch</groupId>
            <artifactId>elasticsearch</artifactId>
            <version>6.2.1</version>
        </dependency>
        <dependency>
            <groupId>org.springframework.boot</groupId>
            <artifactId>spring-boot-starter-test</artifactId>
            <scope>test</scope>
        </dependency>
        <dependency>
            <groupId>com.alibaba</groupId>
            <artifactId>fastjson</artifactId>
        </dependency>
        <dependency>
            <groupId>org.apache.commons</groupId>
            <artifactId>commons-io</artifactId>
        </dependency>
        <dependency>
            <groupId>org.apache.commons</groupId>
            <artifactId>commons-lang3</artifactId>
        </dependency>
    </dependencies>

</project>- 创建 application.yml 配置文件
yml
server:
  port: ${port:40100}
spring:
  application:
    name: xc-search-service
xuecheng:
  elasticsearch:
hostlist: ${eshostlist:127.0.0.1:9200} # 多个结点中间用逗号分隔- 创建配置类
在 com.xuecheng.search.config 包下创建配置类 ElasticsearchConfig,配置初始化 RestHighLevelClient 和 RestClient
java
package com.xuecheng.search.config;

import org.apache.http.HttpHost;
import org.elasticsearch.client.RestClient;
import org.elasticsearch.client.RestHighLevelClient;
import org.springframework.beans.factory.annotation.Value;
import org.springframework.context.annotation.Bean;
import org.springframework.context.annotation.Configuration;

/**
 * Elasticsearch 配置类
 */
@Configuration
public class ElasticsearchConfig {
    /* 引入配置文件中Elasticsearch主机列表 */
    @Value("${xuecheng.elasticsearch.hostlist}")
    private String hostList;

    /**
     * 初始化RestHighLevelClient客户端
     *
     * @return RestHighLevelClient
     */
    @Bean
    public RestHighLevelClient restHighLevelClient() {
        // 解析hostlist配置信息
        String[] hosts = hostList.split(",");

        // 创建HttpHost数组,其中存放es主机和端口的配置信息
        int length = hosts.length;
        HttpHost[] httpHostArray = new HttpHost[length];
        // 循环创建HttpHost对象
        for (int i = 0; i < length; i++) {
            String[] hostSplit = hosts[i].split(":");
            String ip = hostSplit[0];
            int port = Integer.parseInt(hostSplit[1]);
            httpHostArray[i] = new HttpHost(ip, port, "http");
        }

        // 创建RestHighLevelClient客户端
        return new RestHighLevelClient(RestClient.builder(httpHostArray));
    }

    /**
     * 项目主要使用RestHighLevelClient,对于低级的客户端暂时不用
     *
     * @return RestClient
     */
    @Bean
    public RestClient restClient() {
        // 解析hostlist配置信息
        String[] hosts = hostList.split(",");

        // 创建HttpHost数组,其中存放es主机和端口的配置信息
        int length = hosts.length;
        HttpHost[] httpHostArray = new HttpHost[length];
        // 循环创建HttpHost对象
        for (int i = 0; i < length; i++) {
            String[] hostSplit = hosts[i].split(":");
            String ip = hostSplit[0];
            int port = Integer.parseInt(hostSplit[1]);
            httpHostArray[i] = new HttpHost(ip, port, "http");
        }

        return RestClient.builder(httpHostArray).build();
    }
}- 创建项目启动类
java
/**
 * 搜索服务启动类
 */
@SpringBootApplication
@EntityScan("com.xuecheng.framework.domain.search") // 扫描实体类所在包
@ComponentScan(basePackages = {"com.xuecheng.api", "com.xuecheng.framework", "com.xuecheng.search"}) // 扫描接口,common工程所在包
public class SearchApplication {
    public static void main(String[] args) {
        SpringApplication.run(SearchApplication.class, args);
    }
}
索引管理
创建/删除索引库
API
- 创建索引:PUT
http://localhost:9200/索引名称
json
{
    "settings": {
        "index": {
            "number_of_shards": 1,
            "number_of_replicas": 0
        }
    }
}
- number_of_shards:分片的数量
- number_of_replicas:副本数量
- 创建映射:PUT
http://localhost:9200/索引库名称/类型名称/_mapping
示例:创建类型为xc_course的映射,共包括三个字段:name、description、studymodel。发送PUT请求
http://localhost:9200/xc_course/doc/_mapping
json
{
    "properties": {
        "name": {
            "type": "text",
            "analyzer": "ik_max_word",
            "search_analyzer": "ik_smart"
        },
        "description": {
            "type": "text",
            "analyzer": "ik_max_word",
            "search_analyzer": "ik_smart"
        },
        "studymodel": {
            "type": "keyword"
        },
        "price": {
            "type": "float"
        },
        "timestamp": {
            "type": "date",
            "format": "yyyy-MM-dd HH:mm:ss||yyyy-MM-dd||epoch_millis"
        }
    }
}
Java Client
java
package com.xuecheng.search;

import org.elasticsearch.action.admin.indices.create.CreateIndexRequest;
import org.elasticsearch.action.admin.indices.create.CreateIndexResponse;
import org.elasticsearch.action.admin.indices.delete.DeleteIndexRequest;
import org.elasticsearch.action.admin.indices.delete.DeleteIndexResponse;
import org.elasticsearch.client.IndicesClient;
import org.elasticsearch.client.RestClient;
import org.elasticsearch.client.RestHighLevelClient;
import org.elasticsearch.common.settings.Settings;
import org.elasticsearch.common.xcontent.XContentType;
import org.junit.Test;
import org.junit.runner.RunWith;
import org.springframework.beans.factory.annotation.Autowired;
import org.springframework.boot.test.context.SpringBootTest;
import org.springframework.test.context.junit4.SpringRunner;

import java.io.IOException;

/**
 * elasticsearch测试
 */
@SpringBootTest
@RunWith(SpringRunner.class)
public class TestIndex {

    /* 注入高等级客户端 */
    @Autowired
    private RestHighLevelClient client;
    /* 注入低等级客户端 */
    @Autowired
    private RestClient restClient;

    private static final String INDEX_NAME = "xc_course";

    /**
     * 创建索引库
     */
    @Test
    public void testCreateIndex() throws IOException {
        // 创建索引请求对象,并设置索引名称
        CreateIndexRequest createIndexRequest = new CreateIndexRequest(INDEX_NAME);
        // 设置索引参数
        createIndexRequest.settings(Settings
                .builder()
                .put("number_of_shards", "1")
                .put("number_of_replicas", "0"));
        // 设置映射
        createIndexRequest.mapping("doc","{\n" +
                "    \"properties\": {\n" +
                "        \"studymodel\": {\n" +
                "            \"type\": \"keyword\"\n" +
                "        },\n" +
                "        \"name\": {\n" +
                "            \"type\": \"keyword\"\n" +
                "        },\n" +
                "        \"description\": {\n" +
                "            \"type\": \"text\",\n" +
                "            \"analyzer\": \"ik_max_word\",\n" +
                "            \"search_analyzer\": \"ik_smart\"\n" +
                "        },\n" +
                "        \"pic\": {\n" +
                "            \"type\": \"text\",\n" +
                "            \"index\": false\n" +
                "        }\n" +
                "    }\n" +
                "}", XContentType.JSON);

        // 创建索引操作客户端
        IndicesClient indices = client.indices();
        // 执行创建索引库
        CreateIndexResponse response = indices.create(createIndexRequest);
        // 创建索引响应结果
        boolean acknowledged = response.isAcknowledged();
        System.out.println(acknowledged);
    }

    /**
     * 删除索引库
     */
    @Test
    public void testDeleteIndex() throws IOException {
        // 删除索引请求对象
        DeleteIndexRequest deleteIndexRequest = new DeleteIndexRequest(INDEX_NAME);
        // 获取操作索引的客户端
        IndicesClient indices = client.indices();
        // 执行删除索引
        DeleteIndexResponse response = indices.delete(deleteIndexRequest);
        // 删除索引响应结果
        boolean acknowledged = response.isAcknowledged();
        System.out.println(acknowledged);
    }
}
添加文档
API
格式如下: PUT请求 /{index}/{type}/{id},请求参数:{ "field": "value", ... }
如果不指定id,ES会自动生成
json
{
    "name": "spring cloud实战",
    "description": "本课程主要从四个章节进行讲解:1.微服务架构入门 2.spring cloud 基础入门 3.实战SpringBoot 4.注册中心eureka。",
    "studymodel": "201001",
    "price": 5.6
}
Java Client
java
/**
 * 添加文档
 */
@Test
public void testAddDoc() throws IOException {
    // 准备文档内容的JSON数据
    Map<String, Object> jsonMap = new HashMap<>();
    jsonMap.put("name", "spring cloud实战");
    jsonMap.put("description", "本课程主要从四个章节进行讲解: 1.微服务架构入门 2.spring cloud 基础入门 3.实战Spring Boot 4.注册中心eureka。");
    jsonMap.put("studymodel", "201001");
    SimpleDateFormat dateFormat = new SimpleDateFormat("yyyy-MM-dd HH:mm:ss");
    jsonMap.put("timestamp", dateFormat.format(new Date()));
    jsonMap.put("price", 5.6f);
    // 创建新增文档请求对象
    IndexRequest indexRequest = new IndexRequest(INDEX_NAME, "doc");
    // 指定索引文档内容
    indexRequest.source(jsonMap);
    // 通过client进行http的请求,获取索引响应对象
    IndexResponse response = client.index(indexRequest);
    // 获取响应结果
    DocWriteResponse.Result result = response.getResult();
    System.out.println(result);
}
查询文档
API
格式如下: GET请求 /{index}/{type}/{id}
Java Client
java
/**
 * 查询文档
 */
@Test
public void testGetDoc() throws IOException {
    // 创建查询文档请求对象,根据文档id查询
    GetRequest request = new GetRequest(INDEX_NAME, "doc", "9igtC24ByDhBg8HppxYW");
    // 执行查询
    GetResponse response = client.get(request);
    // 判断是否有查询结果
    boolean exists = response.isExists();
    if(exists){
        // 得到文档的内容
        Map<String, Object> sourceAsMap = response.getSourceAsMap();
        System.out.println(sourceAsMap);
    }
}
更新文档
API
ES更新文档的顺序是:先检索到文档、将原来的文档标记为删除、创建新文档、删除旧文档,创建新文档就会重建索引
通过请求Url有两种方法:
- 完全替换。发送POST请求 http://localhost:9200/xc_test/doc/3
json
{
    "name": "spring cloud实战",
    "description": "本课程主要从四个章节进行讲解:1.微服务架构入门 2.spring cloud 基础入门 3.实战SpringBoot 4.注册中心eureka。",
    "studymodel": "201001",
    "price": 5.6
}- 局部更新。发送POST请求 http://localhost:9200/xc_test/doc/3/_update
json
{
    "doc": {
        "price": 66.6
    }
}
Java Client
使用 Client Api更新文档的方法同上边第二种局部更新方法。可以指定文档的部分字段也可以指定完整的文档内容
java
/**
 * 查询文档
 */
@Test
public void updateDoc() throws IOException {
    // 创建更新文档请求对象,根据文档id更新
    UpdateRequest request = new UpdateRequest(INDEX_NAME, "doc", "9igtC24ByDhBg8HppxYW");
    // 准备更新的内容
    Map<String, Object> jsonMap = new HashMap<>();
    jsonMap.put("name", "DOTA2实战");
    request.doc(jsonMap);
    // 执行更新
    UpdateResponse response = client.update(request);
    // 获取更新的状态
    RestStatus status = response.status();
    System.out.println(status); // OK
}
删除文档
API
- 根据id删除,格式:
发送DELETE请求 /{index}/{type}/{id} - 搜索匹配删除,将搜索出来的记录删除,格式:
发送POST请求 /{index}/{type}/_delete_by_query
匹配删除示例请求参数,此示例搜索匹配删除会将studymodel为201001的记录全部删除
json
{
    "query": {
        "term": {
            "studymodel": "201001"
        }
    }
}
Java Client
搜索匹配删除还没有具体的api,可以采用先搜索出文档id,根据文档id删除
java
/**
 * 根据id删除文档
 */
@Test
public void testDelDoc() throws IOException {
    // 删除文档的id
    String id = "9igtC24ByDhBg8HppxYW";
    // 创建删除文档请求对象
    DeleteRequest request = new DeleteRequest(INDEX_NAME, "doc", id);
    // 执行删除,返回响应对象
    DeleteResponse response = client.delete(request);
    // 获取响应对象
    DocWriteResponse.Result result = response.getResult();
    System.out.println(result); // DELETED
}
搜索管理(DSL 搜索)
概述
DSL(Domain Specific Language) 是 ES 提出的基于 json 的搜索方式,在搜索时传入特定的 json 格式的数据来完成不同的搜索需求。
Tips: DSL 比 URI 搜索方式功能强大,在项目中建议使用 DSL 方式来完成搜索。
准备环境
创建映射
创建xc_course索引库,创建如下映射:POST http://localhost:9200/xc_course/doc/_mapping
json
{
    "properties": {
        "description": {
            "type": "text",
            "analyzer": "ik_max_word",
            "search_analyzer": "ik_smart"
        },
        "name": {
            "type": "text",
            "analyzer": "ik_max_word",
            "search_analyzer": "ik_smart"
        },
        "pic": {
            "type": "text",
            "index": false
        },
        "price": {
            "type": "float"
        },
        "studymodel": {
            "type": "keyword"
        },
        "timestamp": {
            "type": "date",
            "format": "yyyy-MM-dd HH:mm:ss||yyyy-MM-dd||epoch_millis"
        }
    }
}
参考 \day11 搜索服务\资料\搜索测试-初始化数据.txt
插入原始数据
向 xc_course/doc 中插入以下数据,发送:
json
# post请求:http://localhost:9200/xc_course/doc/1
{
    "name": "Bootstrap开发",
    "description": "Bootstrap是由Twitter推出的一个前台页面开发框架,是一个非常流行的开发框架,此框架集成了多种页面效果。此开发框架包含了大量的CSS、JS程序代码,可以帮助开发者(尤其是不擅长页面开发的程序人员)轻松的实现一个不受浏览器限制的精美界面效果。",
    "studymodel": "201002",
    "price": 38.6,
    "timestamp": "2018-04-25 19:11:35",
    "pic": "group1/M00/00/00/wKhlQFs6RCeAY0pHAAJx5ZjNDEM428.jpg"
}
# post请求:http://localhost:9200/xc_course/doc/2
{
    "name": "java编程基础",
    "description": "java语言是世界第一编程语言,在软件开发领域使用人数最多。",
    "studymodel": "201001",
    "price": 68.6,
    "timestamp": "2018-03-25 19:11:35",
    "pic": "group1/M00/00/00/wKhlQFs6RCeAY0pHAAJx5ZjNDEM428.jpg"
}
# post请求:http://localhost:9200/xc_course/doc/3
{
    "name": "spring开发基础",
    "description": "spring 在java领域非常流行,java程序员都在用。",
    "studymodel": "201001",
    "price": 88.6,
    "timestamp": "2018-02-24 19:11:35",
    "pic": "group1/M00/00/00/wKhlQFs6RCeAY0pHAAJx5ZjNDEM428.jpg"
}
参考 \day11 搜索服务\资料\搜索测试-初始化数据.txt
简单搜索
- 简单搜索就是通过url进行查询,以get方式请求ES。
- 语法格式:
发送GET请求 ../_search?q=.....- q:搜索字符串
例子:http://localhost:9200/xc_course/doc/_search?q=name:spring,搜索 name 中包括 spring 的文档
查询所有文档
HTTP 请求实现
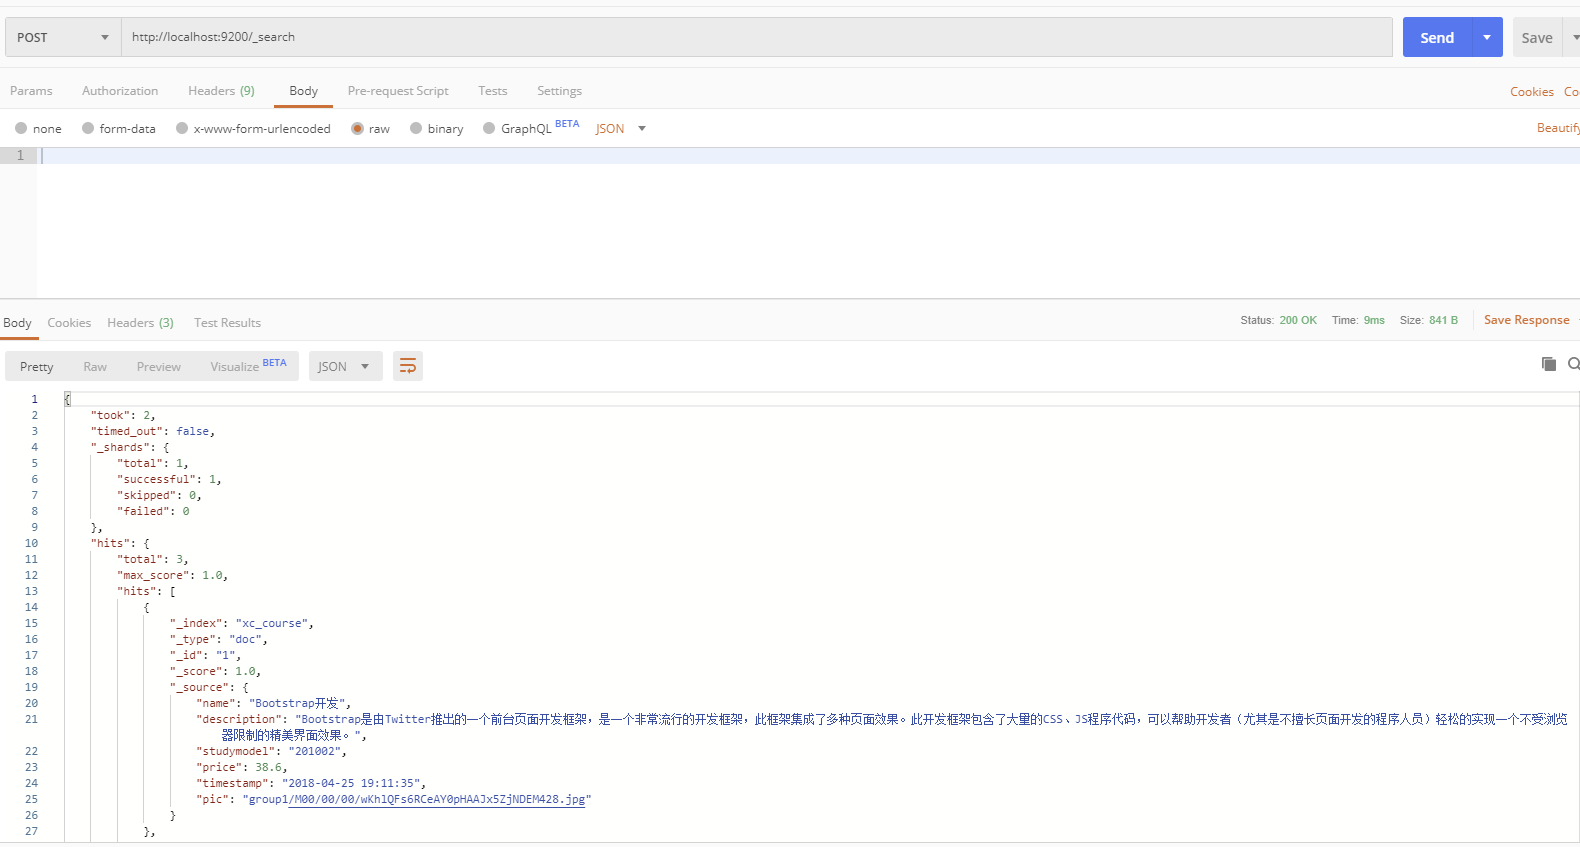
- 查询所有索引库的文档。例如发送:
post http://localhost:9200/_search
- 查询指定索引库指定类型下的文档。(通过使用此方法)。例如发送:
post http://localhost:9200/xc_course/doc/_search
json
{
    "query": {
        "match_all": {}
    },
    "_source": [
        "name",
        "studymodel"
    ]
}
_source:source源过滤设置,指定结果中所包括的字段有哪些
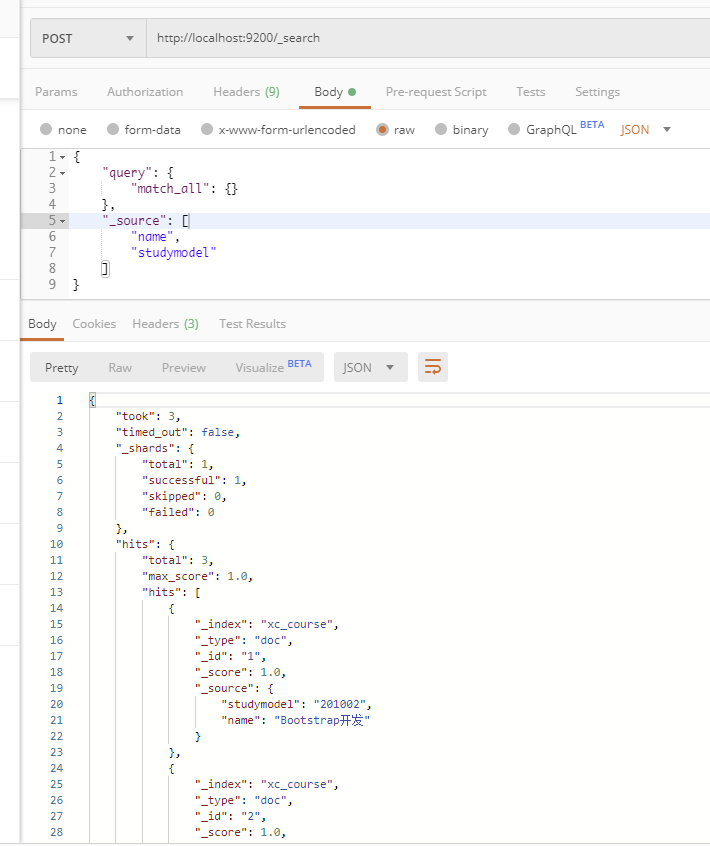
结果说明:
took:本次操作花费的时间,单位为毫秒。timed_out:请求是否超时_shards:说明本次操作共搜索了哪些分片hits:搜索命中的记录hits.total: 符合条件的文档总数hits.hits:匹配度较高的前N个文档hits.max_score:文档匹配得分,这里为最高分_score:每个文档都有一个匹配度得分,按照降序排列_source:显示了文档的原始内容。
JavaClient 实现
java
package com.xuecheng.search;

import org.elasticsearch.action.search.SearchRequest;
import org.elasticsearch.action.search.SearchResponse;
import org.elasticsearch.client.RestClient;
import org.elasticsearch.client.RestHighLevelClient;
import org.elasticsearch.index.query.QueryBuilders;
import org.elasticsearch.search.SearchHit;
import org.elasticsearch.search.SearchHits;
import org.elasticsearch.search.builder.SearchSourceBuilder;
import org.junit.Test;
import org.junit.runner.RunWith;
import org.springframework.beans.factory.annotation.Autowired;
import org.springframework.boot.test.context.SpringBootTest;
import org.springframework.test.context.junit4.SpringRunner;

import java.io.IOException;
import java.time.LocalDateTime;
import java.time.format.DateTimeFormatter;
import java.util.Map;

/**
 * elasticsearch - 搜索测试
 */
@SpringBootTest
@RunWith(SpringRunner.class)
public class TestSearch {

    @Autowired
    private RestHighLevelClient client;
    @Autowired
    private RestClient restClient;

    private static final String INDEX_NAME = "xc_course";
    private static final String TYPE_NAME = "doc";

    //日期格式化对象
    private static final DateTimeFormatter DATE_FORMAT = DateTimeFormatter.ofPattern("yyyy-MM-dd HH:mm:ss");

    /**
     * 搜索所有记录
     */
    @Test
    public void testSearchAll() throws IOException {
        // 创建搜索请求对象(SearchRequest)
        SearchRequest searchRequest = new SearchRequest(INDEX_NAME);
        // 指定类型
        searchRequest.types(TYPE_NAME);
        // 搜索源构建对象(SearchSourceBuilder)
        SearchSourceBuilder searchSourceBuilder = new SearchSourceBuilder();
        // 设置搜索方式:matchAllQuery搜索全部
        searchSourceBuilder.query(QueryBuilders.matchAllQuery());
        /*
         * 设置源字段
         *   public SearchSourceBuilder fetchSource(@Nullable String[] includes, @Nullable String[] excludes)
         *   参数includes:搜索的结果集包括哪些字段
         *   参数excludes:搜索的结果集不包括哪些字段
         */
        searchSourceBuilder.fetchSource(new String[]{"name", "studymodel", "price", "timestamp"}, new String[]{});
        // 向搜索请求对象(SearchRequest)中设置搜索源(SearchSourceBuilder)
        searchRequest.source(searchSourceBuilder);

        // 执行搜索,向ES发起http请求
        SearchResponse response = client.search(searchRequest);

        // 搜索结果
        SearchHits hits = response.getHits();
        // 匹配到的总记录数
        long totalHits = hits.getTotalHits();
        System.out.println("搜索匹配到的总记录数:" + totalHits);

        // 得到匹配度高的文档
        SearchHit[] searchHits = hits.getHits();
        // 循环搜索结果
        for (SearchHit hit : searchHits) {
            // 获取文档的主键
            String id = hit.getId();
            // 获取源文档内容Map
            Map<String, Object> sourceMap = hit.getSourceAsMap();
            // 获取文档的name字段内容
            String name = (String) sourceMap.get("name");
            // 由于前边设置了源文档字段过滤,这时description是取不到的
            String description = (String) sourceMap.get("description");
            // 获取文档的学习模式(studymodel字段)
            String studymodel = (String) sourceMap.get("studymodel");
            // 获取文档的价格(price)
            Double price = (Double) sourceMap.get("price");
            // 获取文档的日期(timestamp字段)
            LocalDateTime timestamp = LocalDateTime.parse((String) sourceMap.get("timestamp"), DATE_FORMAT);

            System.out.println("主键id====" + id);
            System.out.println("name字段====" + name);
            System.out.println("description字段====" + description);
            System.out.println("studymodel字段====" + studymodel);
            System.out.println("price字段====" + price);
            System.out.println("timestamp字段====" + timestamp);
        }
    }
}
测试结果
搜索匹配到的总记录数:3
主键id====1
name字段====Bootstrap开发
description字段====null
studymodel字段====201002
price字段====38.6
timestamp字段====2018-04-25T19:11:35
主键id====2
name字段====java编程基础
description字段====null
studymodel字段====201001
price字段====68.6
timestamp字段====2018-03-25T19:11:35
主键id====3
name字段====spring开发基础
description字段====null
studymodel字段====201001
price字段====88.6
timestamp字段====2018-02-24T19:11:35
分页查询
HTTP 请求实现
- ES支持分页查询,传入两个参数:
from和sizeform:表示起始文档的下标,从0开始size:查询的文档数量
- 发送:
post http://localhost:9200/xc_course/doc/_search
json
{
    "from": 0,
    "size": 1,
    "query": {
        "match_all": {}
    },
    "_source": [
        "name",
        "studymodel"
    ]
}
JavaClient 实现
java
/**
 * 分页搜索记录
 */
@Test
public void testSearchPage() throws IOException {
    // 创建搜索请求对象(SearchRequest)
    SearchRequest searchRequest = new SearchRequest(INDEX_NAME);
    // 指定类型
    searchRequest.types(TYPE_NAME);
    // 搜索源构建对象(SearchSourceBuilder)
    SearchSourceBuilder searchSourceBuilder = new SearchSourceBuilder();

    int page = 1; // 当前页码
    int size = 1; // 每页记录数
    int from = (page - 1) * size; // 计算出记录起始下标
    // 设置分页参数
    searchSourceBuilder.from(from); // 起始记录下标,从0开始
    searchSourceBuilder.size(size); // 每页显示的记录数

    // 设置搜索方式:matchAllQuery搜索全部
    searchSourceBuilder.query(QueryBuilders.matchAllQuery());
    // 设置源字段
    searchSourceBuilder.fetchSource(new String[]{"name", "studymodel", "price", "timestamp"}, new String[]{});
    // 向搜索请求对象(SearchRequest)中设置搜索源(SearchSourceBuilder)
    searchRequest.source(searchSourceBuilder);

    // 执行搜索,向ES发起http请求
    SearchResponse response = client.search(searchRequest);

    // 搜索结果
    SearchHits hits = response.getHits();
    // 匹配到的总记录数
    long totalHits = hits.getTotalHits();
    System.out.println("搜索匹配到的总记录数:" + totalHits);

    // 得到匹配度高的文档
    SearchHit[] searchHits = hits.getHits();
    // 循环搜索结果
    for (SearchHit hit : searchHits) {
        // 获取源文档内容Map
        Map<String, Object> sourceMap = hit.getSourceAsMap();
        System.out.println("主键id====" + hit.getId()); // 获取文档的主键
        System.out.println("name字段====" + sourceMap.get("name"));
        System.out.println("description字段====" + sourceMap.get("description"));
        System.out.println("studymodel字段====" + sourceMap.get("studymodel"));
        System.out.println("price字段====" + sourceMap.get("price"));
        System.out.println("timestamp字段====" + LocalDateTime.parse((String) sourceMap.get("timestamp"), DATE_FORMAT));
    }
}
搜索结果
搜索匹配到的总记录数:3
主键id====1
name字段====Bootstrap开发
description字段====null
studymodel字段====201002
price字段====38.6
timestamp字段====2018-04-25T19:11:35
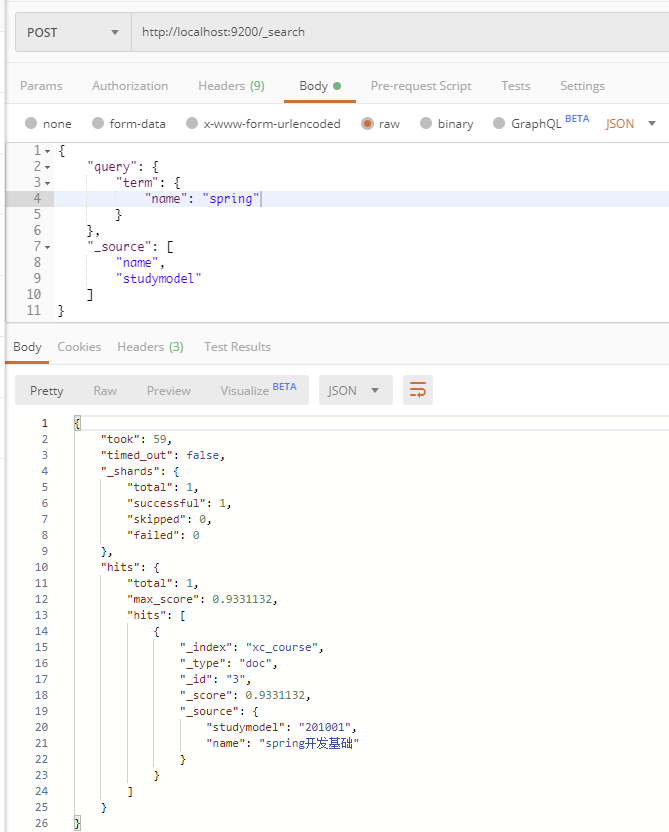
Term Query 精确查询
HTTP 请求实现
- Term Query为精确查询,在搜索时会整体匹配关键字,不再将关键字分词,即不会对搜索的内容分词
- 发送:
post http://localhost:9200/xc_course/doc/_search
json
{
    "query": {
        "term": {
            "name": "spring"
        }
    },
    "_source": [
        "name",
        "studymodel"
    ]
}
上边的搜索会查询name包括“spring”这个词的文档
JavaClient 实现
java
/**
 * TermQuery 精确查询
 */
@Test
public void testTermQuery() throws IOException {
    // 创建搜索请求对象(SearchRequest)
    SearchRequest searchRequest = new SearchRequest(INDEX_NAME);
    // 指定类型
    searchRequest.types(TYPE_NAME);
    // 搜索源构建对象(SearchSourceBuilder)
    SearchSourceBuilder searchSourceBuilder = new SearchSourceBuilder();

    // 设置搜索方式:termQuery精确查询
    searchSourceBuilder.query(QueryBuilders.termQuery("name", "spring"));
    // 设置源字段
    searchSourceBuilder.fetchSource(new String[]{"name", "studymodel", "price", "timestamp"}, new String[]{});
    // 向搜索请求对象(SearchRequest)中设置搜索源(SearchSourceBuilder)
    searchRequest.source(searchSourceBuilder);

    // 执行搜索,向ES发起http请求
    SearchResponse response = client.search(searchRequest);

    // 搜索结果
    SearchHits hits = response.getHits();
    // 匹配到的总记录数
    long totalHits = hits.getTotalHits();
    System.out.println("搜索匹配到的总记录数:" + totalHits);

    // 得到匹配度高的文档
    SearchHit[] searchHits = hits.getHits();
    // 循环搜索结果
    for (SearchHit hit : searchHits) {
        // 获取源文档内容Map
        Map<String, Object> sourceMap = hit.getSourceAsMap();
        System.out.println("主键id====" + hit.getId()); // 获取文档的主键
        System.out.println("name字段====" + sourceMap.get("name"));
        System.out.println("description字段====" + sourceMap.get("description"));
        System.out.println("studymodel字段====" + sourceMap.get("studymodel"));
        System.out.println("price字段====" + sourceMap.get("price"));
        System.out.println("timestamp字段====" + LocalDateTime.parse((String) sourceMap.get("timestamp"), DATE_FORMAT));
    }
}
搜索结果
搜索匹配到的总记录数:1
主键id====3
name字段====spring开发基础
description字段====null
studymodel字段====201001
price字段====88.6
timestamp字段====2018-02-24T19:11:35
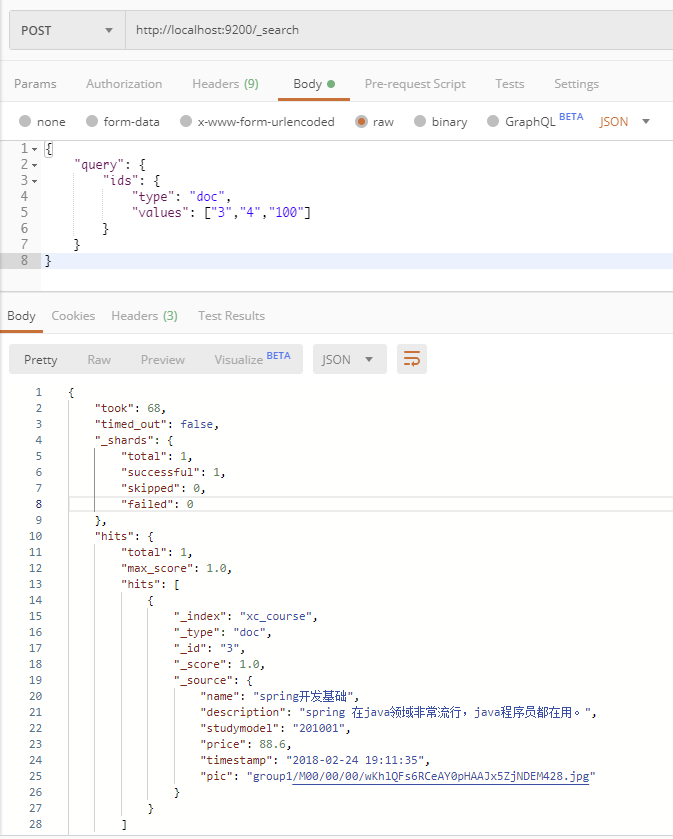
根据id精确匹配
HTTP 请求实现
- ES提供根据多个id值匹配的方法
- 发送:
post http://127.0.0.1:9200/xc_course/doc/_search
json
{
    "query": {
        "ids": {
            "type": "doc",
            "values": ["3","4","100"]
        }
    }
}
JavaClient 实现
java
/**
 * 根据id查询
 */
@Test
public void testTermQueryByIds() throws IOException {
    // 创建搜索请求对象(SearchRequest)
    SearchRequest searchRequest = new SearchRequest(INDEX_NAME);
    // 指定类型
    searchRequest.types(TYPE_NAME);
    // 搜索源构建对象(SearchSourceBuilder)
    SearchSourceBuilder searchSourceBuilder = new SearchSourceBuilder();

    // 设置搜索方式:根据id查询,定义需要查询的id数组
    String[] ids = new String[]{"1", "2"};
    // 此处注意:根据id查询设置是termsQuery,而不是termQuery
    searchSourceBuilder.query(QueryBuilders.termsQuery("_id", ids));
    // 设置源字段
    searchSourceBuilder.fetchSource(new String[]{"name", "studymodel", "price", "timestamp"}, new String[]{});
    // 向搜索请求对象(SearchRequest)中设置搜索源(SearchSourceBuilder)
    searchRequest.source(searchSourceBuilder);

    // 执行搜索,向ES发起http请求
    SearchResponse response = client.search(searchRequest);

    // 搜索结果
    SearchHits hits = response.getHits();
    // 匹配到的总记录数
    long totalHits = hits.getTotalHits();
    System.out.println("搜索匹配到的总记录数:" + totalHits);

    // 得到匹配度高的文档
    SearchHit[] searchHits = hits.getHits();
    // 循环搜索结果
    for (SearchHit hit : searchHits) {
        // 获取源文档内容Map
        Map<String, Object> sourceMap = hit.getSourceAsMap();
        System.out.println("主键id====" + hit.getId()); // 获取文档的主键
        System.out.println("name字段====" + sourceMap.get("name"));
        System.out.println("description字段====" + sourceMap.get("description"));
        System.out.println("studymodel字段====" + sourceMap.get("studymodel"));
        System.out.println("price字段====" + sourceMap.get("price"));
        System.out.println("timestamp字段====" + LocalDateTime.parse((String) sourceMap.get("timestamp"), DATE_FORMAT));
    }
}
搜索结果
搜索匹配到的总记录数:2
主键id====1
name字段====Bootstrap开发
description字段====null
studymodel字段====201002
price字段====38.6
timestamp字段====2018-04-25T19:11:35
主键id====2
name字段====java编程基础
description字段====null
studymodel字段====201001
price字段====68.6
timestamp字段====2018-03-25T19:11:35
matchQuery
基本操作 - HTTP 请求实现
- match Query即全文检索,它的搜索方式是先将搜索字符串分词,再使用各各词条从索引中搜索
match query与Term query区别是match query在搜索前先将搜索关键字分词,再拿各各词语去索引中搜索- 发送:
post http://localhost:9200/xc_course/doc/_search
json
{
    "query": {
        "match": {
            "description": {
                "query": "spring java",
                "operator": "or"
            }
        }
    }
}query:搜索的关键字,对于英文关键字如果有多个单词则中间要用半角逗号分隔,而对于中文关键字中间可以用逗号分隔也可以不用。operator:or表示只要有一个词在文档中出现则就符合条件,and表示每个词都在文档中出现则才符合条件
- 上边的搜索的执行过程是
- 将“spring java”分词,分为spring、java两个词
- 再使用spring和java两个词去匹配索引中搜索
- 由于设置了operator为or,只要有一个词匹配成功则就返回该文档
基本操作 - JavaClient 实现
java
/**
 * MatchQuery 查询
 */
@Test
public void testMatchQuery() throws IOException {
    // 创建搜索请求对象(SearchRequest)
    SearchRequest searchRequest = new SearchRequest(INDEX_NAME);
    // 指定类型
    searchRequest.types(TYPE_NAME);
    // 搜索源构建对象(SearchSourceBuilder)
    SearchSourceBuilder searchSourceBuilder = new SearchSourceBuilder();

    // 设置搜索方式:MatchQuery
    searchSourceBuilder.query(QueryBuilders.matchQuery("description", "spring java")
            .operator(Operator.OR));
    // 设置源字段
    searchSourceBuilder.fetchSource(new String[]{"name", "studymodel", "price", "timestamp"}, new String[]{});
    // 向搜索请求对象(SearchRequest)中设置搜索源(SearchSourceBuilder)
    searchRequest.source(searchSourceBuilder);

    // 执行搜索,向ES发起http请求
    SearchResponse response = client.search(searchRequest);

    // 搜索结果
    SearchHits hits = response.getHits();
    // 匹配到的总记录数
    long totalHits = hits.getTotalHits();
    System.out.println("搜索匹配到的总记录数:" + totalHits);

    // 得到匹配度高的文档
    SearchHit[] searchHits = hits.getHits();
    // 循环搜索结果
    for (SearchHit hit : searchHits) {
        // 获取源文档内容Map
        Map<String, Object> sourceMap = hit.getSourceAsMap();
        System.out.println("主键id====" + hit.getId()); // 获取文档的主键
        System.out.println("name字段====" + sourceMap.get("name"));
        System.out.println("description字段====" + sourceMap.get("description"));
        System.out.println("studymodel字段====" + sourceMap.get("studymodel"));
        System.out.println("price字段====" + sourceMap.get("price"));
        System.out.println("timestamp字段====" + LocalDateTime.parse((String) sourceMap.get("timestamp"), DATE_FORMAT));
    }
}
搜索结果
搜索匹配到的总记录数:2
主键id====3
name字段====spring开发基础
description字段====null
studymodel字段====201001
price字段====88.6
timestamp字段====2018-02-24T19:11:35
主键id====2
name字段====java编程基础
description字段====null
studymodel字段====201001
price字段====68.6
timestamp字段====2018-03-25T19:11:35
minimum_should_match - HTTP 请求实现
- 上边基本使用的
operator = or表示只要有一个词匹配上就得分,如果实现三个词至少有两个词匹配如何实现? - 使用minimum_should_match可以指定文档匹配词的占比,发送以下请求参数
json
{
    "query": {
        "match": {
            "description": {
                "query": "spring开发框架",
                "minimum_should_match": "80%"
            }
        }
    }
}
“spring开发框架”会被分为三个词:spring、开发、框架
设置"minimum_should_match": "80%"表示,三个词在文档的匹配占比为80%,即3*0.8=2.4,向上取整得2,表示至少有两个词在文档中要匹配成功
minimum_should_match - JavaClient 实现
java
// 设置搜索方式:MatchQuery,使用minimum_should_match匹配
searchSourceBuilder.query(QueryBuilders.matchQuery("description", "spring开发框架")
        .minimumShouldMatch("80%")); // 设置匹配占比
搜索结果
搜索匹配到的总记录数:1
主键id====1
name字段====Bootstrap开发
description字段====null
studymodel字段====201002
price字段====38.6
timestamp字段====2018-04-25T19:11:35
multiQuery
termQuery 和 matchQuery 一次只能匹配一个Field,multiQuery 一次可以匹配多个字段
基本使用 - HTTP 请求实现
单项匹配是在一个field中去匹配,多项匹配是拿关键字去多个Field中匹配
示例:发送 post http://localhost:9200/xc_course/doc/_search,拿关键字 “spring css”去分别匹配 name 和 description 字段
json
{
    "query": {
        "multi_match": {
            "query":"spring css",
            "minimum_should_match":"50%",
            "fields": ["name","description"]
        }
    }
}
提升boost - HTTP 请求实现
匹配多个字段时可以提升字段的 boost(权重)来提高得分
示例:提升boost之前,执行下边的查询,通过查询结果会发现Bootstrap排在前边
json
{
    "query": {
        "multi_match": {
            "query":"spring框架",
            "minimum_should_match":"50%",
            "fields": ["name","description"]
        }
    }
}
提升boost,通常关键字匹配上name的权重要比匹配上description的权重高,这里可以对name的权重提升。
json
{
    "query": {
        "multi_match": {
            "query":"spring框架",
            "minimum_should_match":"50%",
            "fields": ["name^10","description"]
        }
    }
}
“name^10” 表示权重提升10倍,执行上边的查询,发现name中包括spring关键字的文档排在前边
JavaClient 实现
java
/**
 * MultiMatchQuery 查询(匹配多字段查询)
 */
@Test
public void testMultiMatchQuery() throws IOException {
    // 创建搜索请求对象(SearchRequest)
    SearchRequest searchRequest = new SearchRequest(INDEX_NAME);
    // 指定类型
    searchRequest.types(TYPE_NAME);
    // 搜索源构建对象(SearchSourceBuilder)
    SearchSourceBuilder searchSourceBuilder = new SearchSourceBuilder();

    // 设置搜索方式:MultiMatchQuery,多字段匹配
    searchSourceBuilder.query(QueryBuilders.multiMatchQuery("spring框架", "name", "description")
            .minimumShouldMatch("50%") // 设置匹配占比
            .field("name", 10)); // 提升boost(权重)
    // 设置源字段
    searchSourceBuilder.fetchSource(new String[]{"name", "studymodel", "price", "timestamp"}, new String[]{});
    // 向搜索请求对象(SearchRequest)中设置搜索源(SearchSourceBuilder)
    searchRequest.source(searchSourceBuilder);

    // 执行搜索,向ES发起http请求
    SearchResponse response = client.search(searchRequest);

    // 搜索结果
    SearchHits hits = response.getHits();
    // 匹配到的总记录数
    long totalHits = hits.getTotalHits();
    System.out.println("搜索匹配到的总记录数:" + totalHits);

    // 得到匹配度高的文档
    SearchHit[] searchHits = hits.getHits();
    // 循环搜索结果
    for (SearchHit hit : searchHits) {
        // 获取源文档内容Map
        Map<String, Object> sourceMap = hit.getSourceAsMap();
        System.out.println("主键id====" + hit.getId()); // 获取文档的主键
        System.out.println("name字段====" + sourceMap.get("name"));
        System.out.println("description字段====" + sourceMap.get("description"));
        System.out.println("studymodel字段====" + sourceMap.get("studymodel"));
        System.out.println("price字段====" + sourceMap.get("price"));
        System.out.println("timestamp字段====" + LocalDateTime.parse((String) sourceMap.get("timestamp"), DATE_FORMAT));
    }
}
搜索结果
搜索匹配到的总记录数:2
主键id====3
name字段====spring开发基础
description字段====null
studymodel字段====201001
price字段====88.6
timestamp字段====2018-02-24T19:11:35
主键id====1
name字段====Bootstrap开发
description字段====null
studymodel字段====201002
price字段====38.6
timestamp字段====2018-04-25T19:11:35
布尔查询
HTTP 请求实现
布尔查询对应于 Lucene 的 BooleanQuery 查询,实现将多个查询组合起来,主要包含以下三个参数
must:表示必须,多个查询条件必须都满足。(通常使用must)。文档必须匹配must所包括的查询条件,相当于 “AND”should:表示或者,多个查询条件只要有一个满足即可。文档应该匹配should所包括的查询条件其中的一个或多个,相当于 "OR"must_not:表示非。文档不能匹配must_not所包括的该查询条件,相当于“NOT”
示例:发送 POST http://localhost:9200/xc_course/doc/_search
json
{
    "_source": ["name","studymodel","description"],
    "from": 0,
    "size": 1,
    "query": {
        "bool": {
            "must": [
                {
                    "multi_match": {
                        "query": "spring框架",
                        "minimum_should_match": "50%",
                        "fields": [
                            "name^10",
                            "description"
                        ]
                    }
                },
                {
                    "term": {
                        "studymodel": "201001"
                    }
                }
            ]
        }
    }
}
搜索结果
json
{
    "took": 143,
    "timed_out": false,
    "_shards": {
        "total": 1,
        "successful": 1,
        "skipped": 0,
        "failed": 0
    },
    "hits": {
        "total": 1,
        "max_score": 9.801136,
        "hits": [
            {
                "_index": "xc_course",
                "_type": "doc",
                "_id": "3",
                "_score": 9.801136,
                "_source": {
                    "studymodel": "201001",
                    "name": "spring开发基础",
                    "description": "spring 在java领域非常流行,java程序员都在用。"
                }
            }
        ]
    }
}
JavaClient 实现
java
/**
 * BoolQuery 查询(布尔查询,多个查询组合,将搜索关键字分词,拿分词去索引库搜索)
 */
@Test
public void testBoolQuery() throws IOException {
    // 创建搜索请求对象(SearchRequest)
    SearchRequest searchRequest = new SearchRequest(INDEX_NAME);
    // 指定类型
    searchRequest.types(TYPE_NAME);
    // 搜索源构建对象(SearchSourceBuilder)
    SearchSourceBuilder searchSourceBuilder = new SearchSourceBuilder();

    // 先定义一个MultiMatchQuery,多字段匹配
    MultiMatchQueryBuilder multiMatchQueryBuilder = QueryBuilders
            .multiMatchQuery("spring框架", "name", "description")
            .minimumShouldMatch("50%") // 设置匹配占比
            .field("name", 10); // 提升boost(权重)
    // 再定义一个termQuery
    TermQueryBuilder termQueryBuilder = QueryBuilders.termQuery("studymodel", "201001");

    // 定义一个boolQuery
    BoolQueryBuilder boolQueryBuilder = QueryBuilders.boolQuery();
    // 添加MultiMatchQuery与TermQuery两个查询条件
    boolQueryBuilder.must(multiMatchQueryBuilder);
    boolQueryBuilder.must(termQueryBuilder);

    // 设置搜索方式:boolQuery查询
    searchSourceBuilder.query(boolQueryBuilder);

    // 设置源字段
    searchSourceBuilder.fetchSource(new String[]{"name", "studymodel", "price", "timestamp"}, new String[]{});
    // 向搜索请求对象(SearchRequest)中设置搜索源(SearchSourceBuilder)
    searchRequest.source(searchSourceBuilder);

    // 执行搜索,向ES发起http请求
    SearchResponse response = client.search(searchRequest);

    // 搜索结果
    SearchHits hits = response.getHits();
    // 匹配到的总记录数
    long totalHits = hits.getTotalHits();
    System.out.println("搜索匹配到的总记录数:" + totalHits);

    // 得到匹配度高的文档
    SearchHit[] searchHits = hits.getHits();
    // 循环搜索结果
    for (SearchHit hit : searchHits) {
        // 获取源文档内容Map
        Map<String, Object> sourceMap = hit.getSourceAsMap();
        System.out.println("主键id====" + hit.getId()); // 获取文档的主键
        System.out.println("name字段====" + sourceMap.get("name"));
        System.out.println("description字段====" + sourceMap.get("description"));
        System.out.println("studymodel字段====" + sourceMap.get("studymodel"));
        System.out.println("price字段====" + sourceMap.get("price"));
        System.out.println("timestamp字段====" + LocalDateTime.parse((String) sourceMap.get("timestamp"), DATE_FORMAT));
    }
}
搜索结果
搜索匹配到的总记录数:1
主键id====3
name字段====spring开发基础
description字段====null
studymodel字段====201001
price字段====88.6
timestamp字段====2018-02-24T19:11:35
过滤器
HTTP 请求实现
过滤是针对搜索的结果进行过滤,过滤器主要判断的是文档是否匹配,不去计算和判断文档的匹配度得分,所以过滤器性能比查询要高,且方便缓存,推荐尽量使用过滤器去实现查询或者过滤器和查询共同使用。
过滤器在布尔查询中使用,下边是在搜索结果的基础上进行过滤
json
{
    "_source": [
        "name",
        "studymodel",
        "description"
    ],
    "from": 0,
    "size": 1,
    "query": {
        "bool": {
            "must": [
                {
                    "multi_match": {
                        "query": "spring框架",
                        "minimum_should_match": "50%",
                        "fields": [
                            "name^10",
                            "description"
                        ]
                    }
                }
            ],
            "filter": [
                {
                    "term": {
                        "studymodel": "201001"
                    }
                },
                {
                    "range": {
                        "price": {
                            "gte": 60,
                            "lte": 100
                        }
                    }
                }
            ]
        }
    }
}
- range:范围过滤,保留大于等于60 并且小于等于100的记录
- term:项匹配过滤,保留studymodel等于"201001"的记录
- 注意:range和term一次只能对一个Field设置范围过滤
JavaClient 实现
java
/**
 * 在布尔查询中使用过滤器(filter)
 */
@Test
public void testFilter() throws IOException {
    // 创建搜索请求对象(SearchRequest)
    SearchRequest searchRequest = new SearchRequest(INDEX_NAME);
    // 指定类型
    searchRequest.types(TYPE_NAME);
    // 搜索源构建对象(SearchSourceBuilder)
    SearchSourceBuilder searchSourceBuilder = new SearchSourceBuilder();

    // 先定义一个MultiMatchQuery,多字段匹配
    MultiMatchQueryBuilder multiMatchQueryBuilder = QueryBuilders
            .multiMatchQuery("spring框架", "name", "description")
            .minimumShouldMatch("50%") // 设置匹配占比
            .field("name", 10); // 提升boost(权重)

    // 定义一个boolQuery
    BoolQueryBuilder boolQueryBuilder = QueryBuilders.boolQuery();
    // 添加MultiMatchQuery查询条件
    boolQueryBuilder.must(multiMatchQueryBuilder);

    // 定义过滤器
    boolQueryBuilder.filter(QueryBuilders.termQuery("studymodel", "201001"));
    boolQueryBuilder.filter(QueryBuilders.rangeQuery("price").gte(60).lte(100)); // 测试使用gte(90),则查询不到数据

    // 设置搜索方式:boolQuery查询
    searchSourceBuilder.query(boolQueryBuilder);

    // 设置源字段
    searchSourceBuilder.fetchSource(new String[]{"name", "studymodel", "price", "timestamp"}, new String[]{});
    // 向搜索请求对象(SearchRequest)中设置搜索源(SearchSourceBuilder)
    searchRequest.source(searchSourceBuilder);

    // 执行搜索,向ES发起http请求
    SearchResponse response = client.search(searchRequest);

    // 搜索结果
    SearchHits hits = response.getHits();
    // 匹配到的总记录数
    long totalHits = hits.getTotalHits();
    System.out.println("搜索匹配到的总记录数:" + totalHits);

    // 得到匹配度高的文档
    SearchHit[] searchHits = hits.getHits();
    // 循环搜索结果
    for (SearchHit hit : searchHits) {
        // 获取源文档内容Map
        Map<String, Object> sourceMap = hit.getSourceAsMap();
        System.out.println("主键id====" + hit.getId()); // 获取文档的主键
        System.out.println("name字段====" + sourceMap.get("name"));
        System.out.println("description字段====" + sourceMap.get("description"));
        System.out.println("studymodel字段====" + sourceMap.get("studymodel"));
        System.out.println("price字段====" + sourceMap.get("price"));
        System.out.println("timestamp字段====" + LocalDateTime.parse((String) sourceMap.get("timestamp"), DATE_FORMAT));
    }
}
搜索结果
搜索匹配到的总记录数:1
主键id====3
name字段====spring开发基础
description字段====null
studymodel字段====201001
price字段====88.6
timestamp字段====2018-02-24T19:11:35
排序
HTTP 请求实现
可以在字段上添加一个或多个排序,支持在keyword、date、float等类型上添加,text类型的字段上不允许添加排序
示例:发送 POST http://localhost:9200/xc_course/doc/_search,过滤0-10元价格范围的文档,并且对结果进行排序,先按studymodel降序,再按价格升序
json
{
    "_source": [
        "name",
        "studymodel",
        "description"
    ],
    "query": {
        "bool": {
            "filter": [
                {
                    "range": {
                        "price": {
                            "gte": 0,
                            "lte": 100
                        }
                    }
                }
            ]
        }
    },
    "sort": [
        {
            "studymodel": "desc"
        },
        {
            "price": "asc"
        }
    ]
}
JavaClient 实现
java
/**
 * 排序查询(Sort)
 */
@Test
public void testSort() throws IOException {
    // 创建搜索请求对象(SearchRequest)
    SearchRequest searchRequest = new SearchRequest(INDEX_NAME);
    // 指定类型
    searchRequest.types(TYPE_NAME);
    // 搜索源构建对象(SearchSourceBuilder)
    SearchSourceBuilder searchSourceBuilder = new SearchSourceBuilder();

    // 定义一个boolQuery
    BoolQueryBuilder boolQueryBuilder = QueryBuilders.boolQuery();
    // 定义过滤器
    boolQueryBuilder.filter(QueryBuilders.rangeQuery("price").gte(0).lte(100));
    // 设置搜索方式:boolQuery查询
    searchSourceBuilder.query(boolQueryBuilder);

    // 添加排序
    searchSourceBuilder.sort("studymodel", SortOrder.DESC);
    searchSourceBuilder.sort("price", SortOrder.ASC);

    // 设置源字段
    searchSourceBuilder.fetchSource(new String[]{"name", "studymodel", "price", "timestamp"}, new String[]{});
    // 向搜索请求对象(SearchRequest)中设置搜索源(SearchSourceBuilder)
    searchRequest.source(searchSourceBuilder);

    // 执行搜索,向ES发起http请求
    SearchResponse response = client.search(searchRequest);

    // 搜索结果
    SearchHits hits = response.getHits();
    // 匹配到的总记录数
    long totalHits = hits.getTotalHits();
    System.out.println("搜索匹配到的总记录数:" + totalHits);

    // 得到匹配度高的文档
    SearchHit[] searchHits = hits.getHits();
    // 循环搜索结果
    for (SearchHit hit : searchHits) {
        // 获取源文档内容Map
        Map<String, Object> sourceMap = hit.getSourceAsMap();
        System.out.println("主键id====" + hit.getId()); // 获取文档的主键
        System.out.println("name字段====" + sourceMap.get("name"));
        System.out.println("description字段====" + sourceMap.get("description"));
        System.out.println("studymodel字段====" + sourceMap.get("studymodel"));
        System.out.println("price字段====" + sourceMap.get("price"));
        System.out.println("timestamp字段====" + LocalDateTime.parse((String) sourceMap.get("timestamp"), DATE_FORMAT));
    }
}
搜索结果
搜索匹配到的总记录数:3
主键id====1
name字段====Bootstrap开发
description字段====null
studymodel字段====201002
price字段====38.6
timestamp字段====2018-04-25T19:11:35
主键id====2
name字段====java编程基础
description字段====null
studymodel字段====201001
price字段====68.6
timestamp字段====2018-03-25T19:11:35
主键id====3
name字段====spring开发基础
description字段====null
studymodel字段====201001
price字段====88.6
timestamp字段====2018-02-24T19:11:35
高亮显示
HTTP 请求实现
高亮显示可以将搜索结果一个或多个字突出显示,以便向用户展示匹配关键字的位置。在搜索语句中添加highlight即可实现
示例:发送 Post http://127.0.0.1:9200/xc_course/doc/_search
json
{
    "_source": [
        "name",
        "studymodel",
        "description",
        "price"
    ],
    "query": {
        "bool": {
            "must": [
                {
                    "multi_match": {
                        "query": "开发框架",
                        "minimum_should_match": "50%",
                        "fields": [
                            "name^10",
                            "description"
                        ],
                        "type": "best_fields"
                    }
                }
            ],
            "filter": [
                {
                    "range": {
                        "price": {
                            "gte": 0,
                            "lte": 100
                        }
                    }
                }
            ]
        }
    },
    "sort": [
        {
            "price": "asc"
        }
    ],
    "highlight": {
        "pre_tags": [
            "<tag>"
        ],
        "post_tags": [
            "</tag>"
        ],
        "fields": {
            "name": {},
            "description": {}
        }
    }
}
JavaClient 实现
java
/**
 * 高亮查询(Highlight)
 */
@Test
public void testHighlight() throws IOException {
    // 创建搜索请求对象(SearchRequest)
    SearchRequest searchRequest = new SearchRequest(INDEX_NAME);
    // 指定类型
    searchRequest.types(TYPE_NAME);
    // 搜索源构建对象(SearchSourceBuilder)
    SearchSourceBuilder searchSourceBuilder = new SearchSourceBuilder();

    // 先定义一个MultiMatchQuery,多字段匹配
    MultiMatchQueryBuilder multiMatchQueryBuilder = QueryBuilders
            .multiMatchQuery("开发框架", "name", "description")
            .minimumShouldMatch("50%") // 设置匹配占比
            .field("name", 10); // 提升boost(权重)

    // 定义一个boolQuery
    BoolQueryBuilder boolQueryBuilder = QueryBuilders.boolQuery();
    // 添加MultiMatchQuery查询条件
    boolQueryBuilder.must(multiMatchQueryBuilder);

    // 定义过滤器
    boolQueryBuilder.filter(QueryBuilders.rangeQuery("price").gte(0).lte(100));
    // 设置搜索方式:boolQuery查询
    searchSourceBuilder.query(boolQueryBuilder);

    // 添加排序
    searchSourceBuilder.sort("studymodel", SortOrder.DESC);
    searchSourceBuilder.sort("price", SortOrder.ASC);

    // 设置源字段
    searchSourceBuilder.fetchSource(new String[]{"name", "studymodel", "price", "timestamp", "description"}, new String[]{});

    // 在执行搜索前,进行高亮设置
    HighlightBuilder highlightBuilder = new HighlightBuilder();
    highlightBuilder.preTags("<tag>"); // 设置前缀
    highlightBuilder.postTags("</tag>"); // 设置后缀
    // 设置高亮字段
    highlightBuilder.fields().add(new HighlightBuilder.Field("name"));
    highlightBuilder.fields().add(new HighlightBuilder.Field("description"));
    // 在搜索对象中设置高亮
    searchSourceBuilder.highlighter(highlightBuilder);

    // 向搜索请求对象(SearchRequest)中设置搜索源(SearchSourceBuilder)
    searchRequest.source(searchSourceBuilder);
    // 执行搜索,向ES发起http请求
    SearchResponse response = client.search(searchRequest);

    // 搜索结果
    SearchHits hits = response.getHits();
    // 匹配到的总记录数
    long totalHits = hits.getTotalHits();
    System.out.println("搜索匹配到的总记录数:" + totalHits);

    // 得到匹配度高的文档
    SearchHit[] searchHits = hits.getHits();
    // 循环搜索结果
    for (SearchHit hit : searchHits) {
        // 获取源文档内容Map
        Map<String, Object> sourceMap = hit.getSourceAsMap();

        /* 获取name字段 */
        String name = (String) sourceMap.get("name");
        /* 获取高亮字段内容 */
        Map<String, HighlightField> highlightFields = hit.getHighlightFields();
        if (highlightFields != null) {
            // 取出name高亮字段
            HighlightField nameHighlightField = highlightFields.get("name");
            if (nameHighlightField != null) {
                Text[] fragments = nameHighlightField.getFragments();
                StringBuilder stringBuilder = new StringBuilder();
                for (Text text : fragments) {
                    stringBuilder.append(text.toString());
                }
                name = stringBuilder.toString();
            }
        }

        System.out.println("主键id====" + hit.getId()); // 获取文档的主键
        System.out.println("name字段====" + name);
        System.out.println("description字段====" + sourceMap.get("description"));
        System.out.println("studymodel字段====" + sourceMap.get("studymodel"));
        System.out.println("price字段====" + sourceMap.get("price"));
        System.out.println("timestamp字段====" + LocalDateTime.parse((String) sourceMap.get("timestamp"), DATE_FORMAT));
    }
}
搜索结果
搜索匹配到的总记录数:3
主键id====1
name字段====Bootstrap<tag>开发</tag>
description字段====Bootstrap是由Twitter推出的一个前台页面开发框架,是一个非常流行的开发框架,此框架集成了多种页面效果。此开发框架包含了大量的CSS、JS程序代码,可以帮助开发者(尤其是不擅长页面开发的程序人员)轻松的实现一个不受浏览器限制的精美界面效果。
studymodel字段====201002
price字段====38.6
timestamp字段====2018-04-25T19:11:35
主键id====2
name字段====java编程基础
description字段====java语言是世界第一编程语言,在软件开发领域使用人数最多。
studymodel字段====201001
price字段====68.6
timestamp字段====2018-03-25T19:11:35
主键id====3
name字段====spring<tag>开发</tag>基础
description字段====spring 在java领域非常流行,java程序员都在用。
studymodel字段====201001
price字段====88.6
timestamp字段====2018-02-24T19:11:35
集群管理
集群结构
要解决海量数据检索、高并发、高可用等问题,就必须要引入分布式系统,集群模式下吞吐量和稳定性都能有保证。因此,ES 通常以集群方式工作,这样做不仅能够提高ES的搜索能力还可以处理大数据搜索的能力,同时也增加了系统的容错能力及高可用,ES可以实现PB级数据的搜索。
下图是ES集群结构的示意图
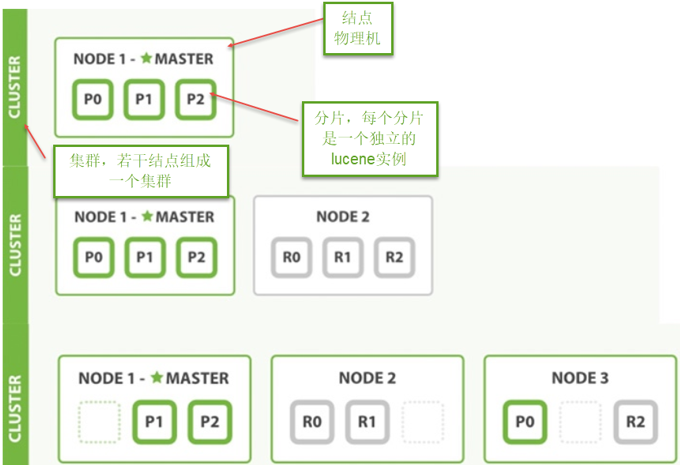
ES集群图涉及以下概念
- 结点:ES 集群由多个服务器组成,每个服务器即为一个 Node 结点(该服务只部署了一个 ES 进程)。
- 分片:
- 当文档量很大时,由于内存和硬盘的限制,同时也为了提高 ES 的处理能力、容错能力及高可用能力,将索引分成若干分片,每个分片可以放在不同的服务器,这样就实现了多个服务器共同对外提供索引及搜索服务。
- 一个搜索请求过来,会分别从各各分片去查询,最后将查询到的数据合并返回给用户。
- 副本:为了提高 ES 的高可用同时也为了提高搜索的吞吐量,将分片复制一份或多份存储在其它的服务器,这样即使当前的服务器挂掉了,拥有副本的服务器照常可以提供服务。
- 主结点:一个集群中会有一个或多个主结点,主结点的作用是集群管理,比如增加节点,移除节点等,主结点挂掉后 ES 会重新选一个主结点。
- 结点转发:每个结点都知道其它结点的信息,可以对任意一个结点发起请求,接收请求的结点会转发给其它结点查询数据。
搭建集群
下边的例子实现创建一个2结点的集群,并且索引的分片我们设置2片,每片一个副本
结点的三个角色
主结点(Master Node):master 节点主要用于集群的管理及索引。负责监控和协调工作,保证整个集群的稳定性,管事的节点。比如新增结点、分片分配、索引的新增和删除等。
数据结点:data 节点上保存了数据分片,它负责索引和搜索操作。
客户端结点:client 节点仅作为请求客户端存在,client 的作用也作为负载均衡器,client 节点不存数据,只是将请求均衡转发到其它结点
通过下边两项参数来配置结点的功能:
node.master:是否允许为主结点node.data:允许存储数据作为数据结点node.ingest:是否允许成为协调节点
四种组合方式:
master=true,data=true:即是主结点又是数据结点master=false,data=true:仅是数据结点master=true,data=false:仅是主结点,不存储数据master=false,data=false:即不是主结点也不是数据结点,此时可设置 ingest 为 true 表示它是一个客户端
创建结点1
解压 elasticsearch-6.2.1.zip 到 E:\deployment-environment\elasticsearch-6.2.1\
- 结点1对外服务的 http 端口是:9200
- 集群管理端口是 9300
- 配置 elasticsearch.yml,设置结点名:xc_node_1
结点1 elasticsearch.yml 配置如下
yml
# 配置elasticsearch的集群名称
cluster.name: xuecheng
# 节点名
node.name: xc_node_1
# 设置绑定主机的ip地址,设置为0.0.0.0表示绑定任何ip,允许外网访问,生产环境建议设置为具体的ip
network.host: 0.0.0.0
# 设置对外服务的http端口,默认为9200
http.port: 9200
# 集群结点之间通信端口
transport.tcp.port: 9300
# 该节点是否有资格被选举成为master结点
node.master: true
# 指定该节点是否存储索引数据
node.data: true
# 设置集群中master节点的初始列表
discovery.zen.ping.unicast.hosts: ["0.0.0.0:9300", "0.0.0.0:9301"]
discovery.zen.minimum_master_nodes: 1
node.ingest: true
bootstrap.memory_lock: false
node.max_local_storage_nodes: 2

# 设置索引数据的存储路径
path.data: E:\deployment-environment\elasticsearch-6.2.1\data
# 设置日志文件的存储路径
path.logs: E:\deployment-environment\elasticsearch-6.2.1\logs

# 开启cors跨域访问支持,默认为false
http.cors.enabled: true
# 跨域访问允许的域名地址,(允许所有域名)使用正则
http.cors.allow-origin: /.*/
创建结点2
解压 elasticsearch-6.2.1.zip 到 E:\deployment-environment\elasticsearch-6.2.1-2\
- 结点2对外服务的http端口是:9201
- 集群管理端口是9301
- 配置elasticsearch.yml,设置结点名:xc_node_2
结点2 elasticsearch.yml配置如下
yml
# 配置elasticsearch的集群名称
cluster.name: xuecheng
# 节点名
node.name: xc_node_2
# 设置绑定主机的ip地址,设置为0.0.0.0表示绑定任何ip,允许外网访问,生产环境建议设置为具体的ip
network.host: 0.0.0.0
# 设置对外服务的http端口,默认为9200
http.port: 9201
# 集群结点之间通信端口
transport.tcp.port: 9301
# 该节点是否有资格被选举成为master结点
node.master: true
# 指定该节点是否存储索引数据
node.data: true
# 设置集群中master节点的初始列表
discovery.zen.ping.unicast.hosts: ["0.0.0.0:9300", "0.0.0.0:9301"]
discovery.zen.minimum_master_nodes: 1
node.ingest: true
bootstrap.memory_lock: false
node.max_local_storage_nodes: 2

# 设置索引数据的存储路径
path.data: E:\deployment-environment\elasticsearch-6.2.1-2\data
# 设置日志文件的存储路径
path.logs: E:\deployment-environment\elasticsearch-6.2.1-2\logs

# 开启cors跨域访问支持,默认为false
http.cors.enabled: true
# 跨域访问允许的域名地址,(允许所有域名)使用正则
http.cors.allow-origin: /.*/
注:每个结点需要安装IK分词器
创建索引库
- 使用head连上其中一个结点
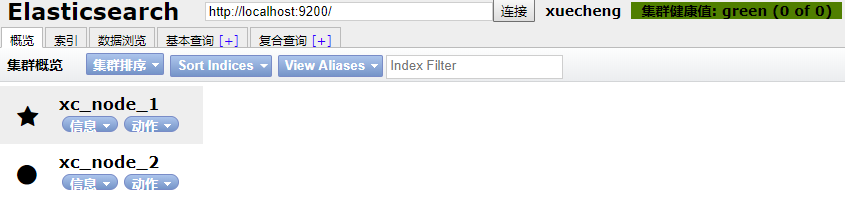
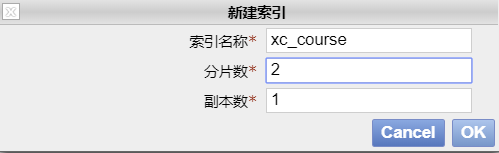
- 创建索引库,共2个分片,每个分片一个副本
创建成功
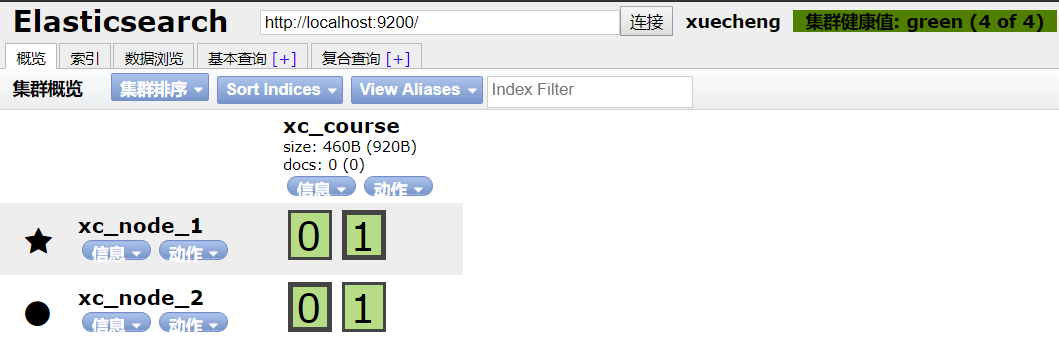
集群的健康
通过访问 GET /_cluster/health 来查看Elasticsearch 的集群健康情况
- 有三种颜色来展示健康状态:
green、yellow或者redgreen:所有的主分片和副本分片都正常运行yellow:所有的主分片都正常运行,但有些副本分片运行不正常red:存在主分片运行不正常
Get请求:http://localhost:9200/_cluster/health,响应结果如下:
json
{
    "cluster_name": "xuecheng",
    "status": "green",
    "timed_out": false,
    "number_of_nodes": 2,
    "number_of_data_nodes": 2,
    "active_primary_shards": 2,
    "active_shards": 4,
    "relocating_shards": 0,
    "initializing_shards": 0,
    "unassigned_shards": 0,
    "delayed_unassigned_shards": 0,
    "number_of_pending_tasks": 0,
    "number_of_in_flight_fetch": 0,
    "task_max_waiting_in_queue_millis": 0,
    "active_shards_percent_as_number": 100.0
}
集群相关测试
- 创建映射并写入文档,连接其中任意一台结点,创建映射写入文档。发送:
Post http://localhost:9200/xc_course/doc/3
json
{
    "name": "spring开发基础",
    "description": "spring 在java领域非常流行,java程序员都在用。",
    "studymodel": "201001",
    "price": 66.6
}
响应结果
json
{
    "_index": "xc_course",
    "_type": "doc",
    "_id": "3",
    "_version": 1,
    "result": "created",
    "_shards": {
        "total": 2,
        "successful": 2,
        "failed": 0
    },
    "_seq_no": 0,
    "_primary_term": 1
}
从结果的提示可看出,两个分片都保存成功
- 搜索,向其它一个结点发起搜索请求,查询全部数据
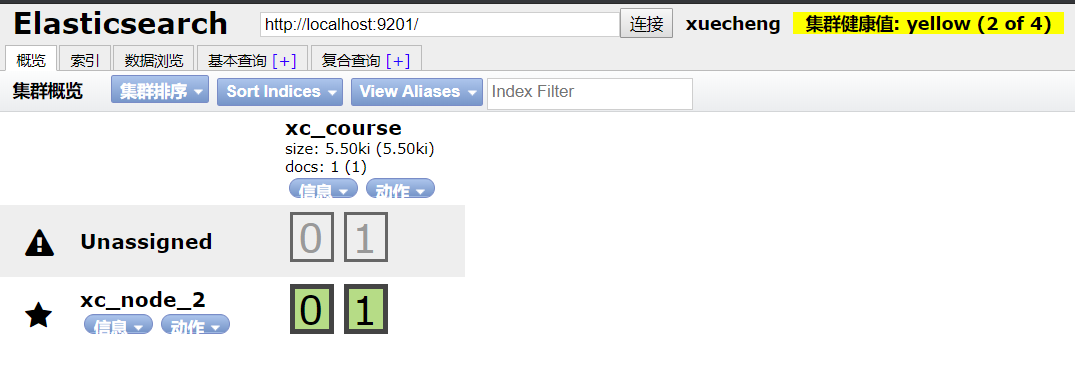
- 关闭一个结点。ES会重新选中一个主结点(前提在配置结点时允许它可以为主结点)。此时向活的结点发起搜索请求,仍然正常
- 添加一个结点
- 结点3对外服务的http端口是:9202
- 集群管理端口是9302
- 配置elasticsearch.yml,设置结点名:xc_node_3
- 此结点的配置:node.master: false node.data: true
启动结点3,刷新head,下图显示ES将分片分在了3个结点
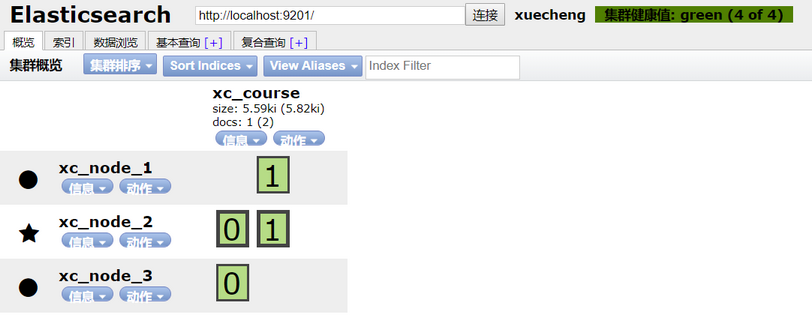
向结点3发起搜索请求:Get http://127.0.0.1:9202/xc_course/doc/_search 全部数据可被正常搜索到
Elasticsearch 实现过程
索引数据写入的过程
协调节点默认使用文档 id 计算分片所在位置,然后将请求转发到相应分片。默认计算方式:
shard = hash(document_id) % (num_of_primary_shards)分片接收到请求之后首先将数据写入到 index-buffer,同时记录 translog;默认情况下这个过程在主分片与副本分片都完成之后,再给客户端返回写入成功的响应。可以配置,写入大于 n 个分片之后就返回到客户端写入成功。
- 每隔一定时间就会写入到 filesystem-cache(refresh 过程)。
- 每隔一段时间或者 filesystem-cache 数据量到一定程度之后,就会写入到磁盘(flush)。
如果两次 flush 直接出现异常,可以通过 translog 恢复数据。
特别说明:为了提高写数据性能,可以将写 translog 设置为异步写,但异常情况下可能会造成少量数据丢失。
更新和删除文档的过程
- 删除和更新也都是写操作,但是 Elasticsearch 中的文档是不可变的,因此不能被删除或者改动以展示其变更。
- 磁盘上的每个段都有一个相应的
.del文件。当删除请求发送后,文档并没有真的被删除,而是在.del文件中被标记为删除。该文档依然能匹配查询,但是会在结果中被过滤掉。当段合并时,在.del 文件中被标记为删除的文档将不会被写入新段。 - 在新的文档被创建时,Elasticsearch 会为该文档指定一个版本号,当执行更新时,旧版本的文档在
.del文件中被标记为删除,新版本的文档被索引到一个新段。旧版本的文档依然能匹配查询,但是会在结果中被过滤掉。
搜索的过程
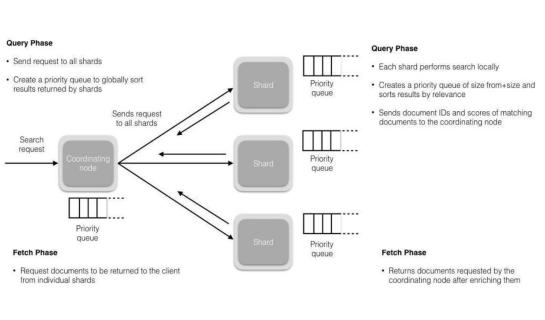
搜索被执行的过程分为两阶段,称为 Query Then Fetch。
- 在初始查询阶段时,查询会广播到索引中每一个分片拷贝(主分片或者副本分片)。每个分片在本地执行搜索并构建一个匹配文档的大小为
from + size的优先队列。Tips: 在搜索的时候是会查询 Filesystem Cache 的,但是有部分数据还在 MemoryBuffer,所以搜索是近实时的。
- 每个分片返回各自优先队列中所有文档的 ID 和排序值给协调节点,它合并这些值到自己的优先队列中来产生一个全局排序后的结果列表。
- 接下来是取回阶段,协调节点辨别出哪些文档需要被取回并向相关的分片提交多个 GET 请求。每个分片加载并丰富文档,如果有需要的话,接着返回文档给协调节点。一旦所有的文档都被取回了,协调节点返回结果给客户端。
补充:Query Then Fetch 的搜索类型在文档相关性打分的时候参考的是本分片的数据,这样在文档数量较少的时候可能不够准确,DFS Query Then Fetch 增加了一个预查询的处理,询问 Term 和 Document frequency,这个评分更准确,但是性能会变差。