Appearance
Gradle 基础笔记
Gradle 简介
引用百度百科:Gradle是一个基于 Apache Ant 和 Apache Maven 概念的项目自动化构建开源工具。它使用一种基于 Groovy 的特定领域语言(DSL)来声明项目设置,目前也增加了基于 Kotlin 语言的 kotlin-based DSL,抛弃了基于 XML 的各种繁琐配置。
Gradle 的优势
- 依赖管理:即将项目中的 jar 包管理起来,可以使用 Maven 或者 Ivy 的远程仓库、或者本地文件系统等
- 编译打包:可以通过脚本实现花样打包,包括修改文件、添加抑或排除某些类或资源、采用指定 JDK 版本构建、打包后自动上传等等等等
- 多项目支持:Gradle 对多项目有着良好的支持,比如一个很具有代表性的实践就是 spring framework
- 多语言支持:无论是 java、groovy、scala、c++ 都有良好的支持
- 跨平台支持:gradle 是基于 jvm 的,只要有 jvm 就可以让 gradle 运行
- 灵活的的脚本:可以使用 groovy 灵活的编写任务完成你想要做的任何事情
约定优于配置
约定优于配置(convention over configuration),简单而言就是遵循一定的固定规则从而可以避免额外的配置。虽然这一定程度上降低了灵活性,但却能减少重复的额外配置,同时也可以帮助开发人员遵守一定的规则。当然,约定并不是强制性约束,Gradle 提供了各种灵活的途径可以让你更改默认的配置。
Gradle 安装说明
引用官网的安装教程
Step 1. Download the latest Gradle distribution
The current Gradle release is version 6.0.1, released on 18 Nov 2019. The distribution zip file comes in two flavors:

Binary-only
Complete, with docs and sources
If in doubt, choose the binary-only version and browse docs and sources online.

Need to work with an older version? See the releases page.

Step 2. Unpack the distribution

Microsoft Windows users
Create a new directory C:\Gradle with File Explorer.

Open a second File Explorer window and go to the directory where the Gradle distribution was downloaded. Double-click the ZIP archive to expose the content. Drag the content folder gradle-6.0.1 to your newly created C:\Gradle folder.

Alternatively you can unpack the Gradle distribution ZIP into C:\Gradle using an archiver tool of your choice.

Step 3. Configure your system environment

Microsoft Windows users
In File Explorer right-click on the This PC (or Computer) icon, then click Properties -> Advanced System Settings -> Environmental Variables.

Under System Variables select Path, then click Edit. Add an entry for C:\Gradle\gradle-6.0.1\bin. Click OK to save.

Step 4. Verify your installation
Open a console (or a Windows command prompt) and run gradle -v to run gradle and display the version, e.g.:


$ gradle -v

------------------------------------------------------------
Gradle 6.0.1
------------------------------------------------------------
下载 Gradle
从 Gralde 官方网站下载 Gradle 的最新发行包,Gradle 发行包是一个 ZIP 文件。需要 JDK8 及以上的版本。解压 Gradle 压缩包到无中文与空格的目录
配置系统环境变量
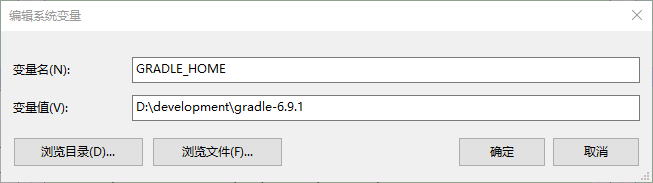
- 新建系统变量,定义变量名为
GRADLE_HOME,变量值为gradle安装包所在目录,如:D:\development\gradle-6.9.1\
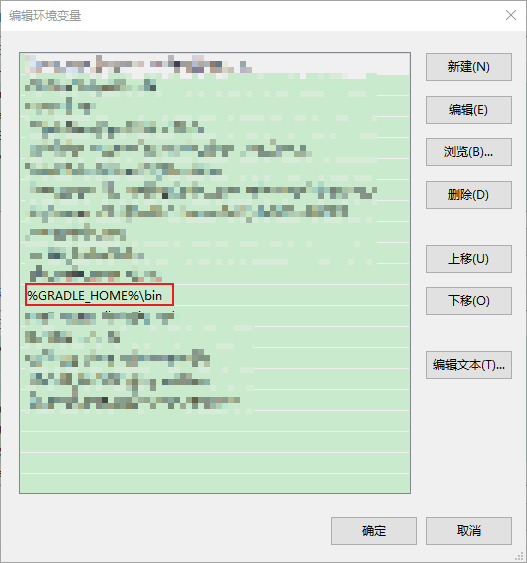
- 添加到 PATH 环境变量中
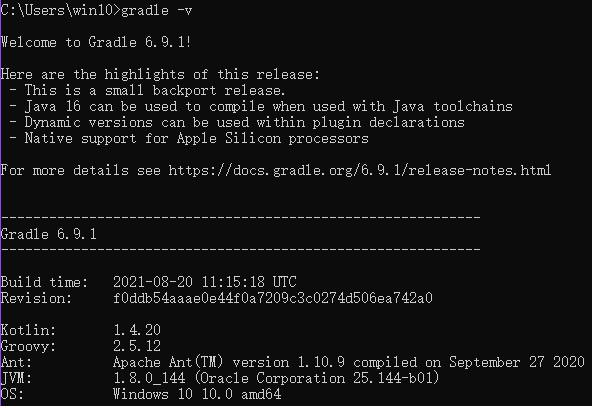
- 运行cmd模式下,使用
gradle -v命令查看,出现以下信息证明安装成功
配置 Gradle 本地仓库(本地缓存)
配置 Gradle 本地仓库,用于下载与管理 jar 包,有如下几种配置方式
方式1:配置环境变量(推荐)
增加一个环境变量 GRADLE_USER_HOME,指定本地仓库的位置
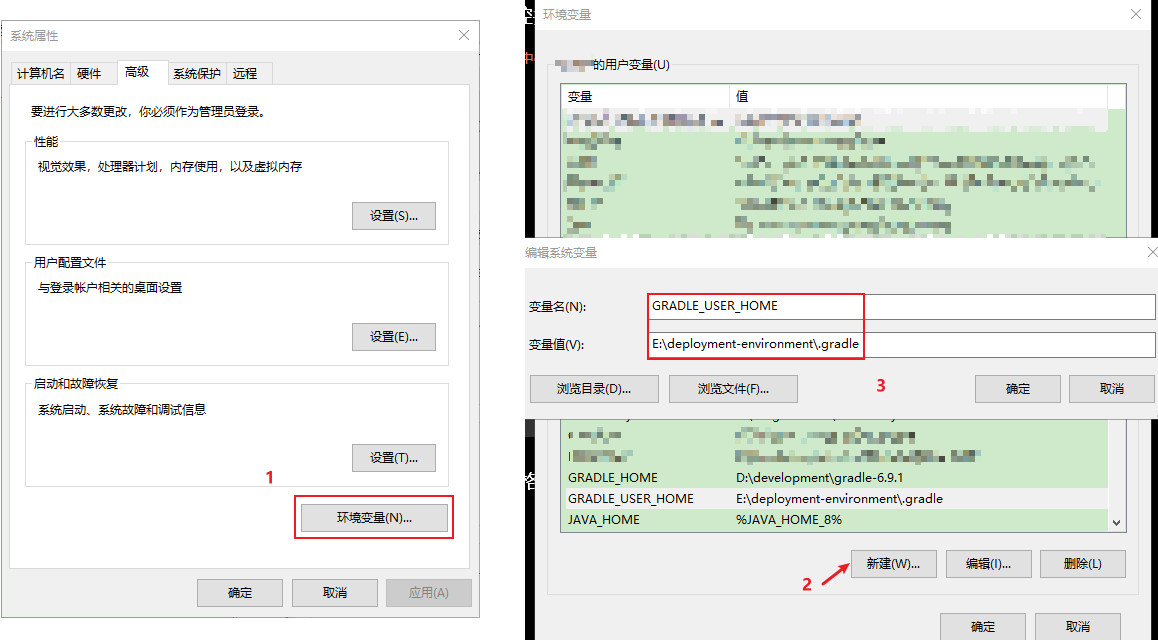
注:变量的名称必须叫“
GRADLE_USER_HOME”
方式2:初始化配置文件并配置镜像
在 Gradle 安装目录下的 init.d 文件夹下,新建一个 init.gradle 文件,在 repositories 节点中可以配置镜像源下载,具体配置如下:
groovy
allprojects {
    repositories {
        // maven { url 'file:///D:/development/maven/repository' } // 此方式配置有问题,后面再研究
        mavenLocal()
        maven { name "Alibaba"; url "https://maven.aliyun.com/repository/public" }
        maven { name "Bstek"; url "https://nexus.bsdn.org/content/groups/public/" }
        mavenCentral()
    }

    buildscript {
        repositories {
            maven { name "Alibaba"; url 'https://maven.aliyun.com/repository/public' }
            maven { name "Bstek"; url 'https://nexus.bsdn.org/content/groups/public/' }
            maven { name "M2"; url 'https://plugins.gradle.org/m2/' }
        }
    }
}
默认情况下,Gradle 没有定义任何仓库,需要在使用外部依赖之前至少定义一个仓库,例如 Maven 中央仓库。repositories 是配置获取 jar 包的顺序。以上配置是
- 先是本地的 Maven 仓库路径
mavenLocal()是获取 Maven 本地仓库的路径,是和第一条一样,但是不冲突- 第三条和第四条是从国内和国外的网络上仓库获取
- 最后的
mavenCentral()是从Apache提供的中央仓库获取 jar 包
Tips:实际操作方式是 gradle 找到 maven 对应的 jar 包,然后复制到上面配置的环境变量 GRADLE_USER_HOME 中,所以当仓库是 gradle 和 maven 混合使用时,大概率会有两份数据冗余
Notes: 上面配置的远程仓库的协议注意必须是 https,否则会提示协议错误,不安全

方式3:在 gradle 启动脚本设置本地仓库位置
进入 gradle 安装的 bin 目录,使用文本编辑器打开 gradle 启动脚本 (注:配置后无法使用全局命令,待研究)gradle.bat,增加设置用户配置路径变量,在如图的位置添加以下语句
bash
set GRADLE_OPTS="-Dgradle.user.home=E:\deployment-environment\.gradle\"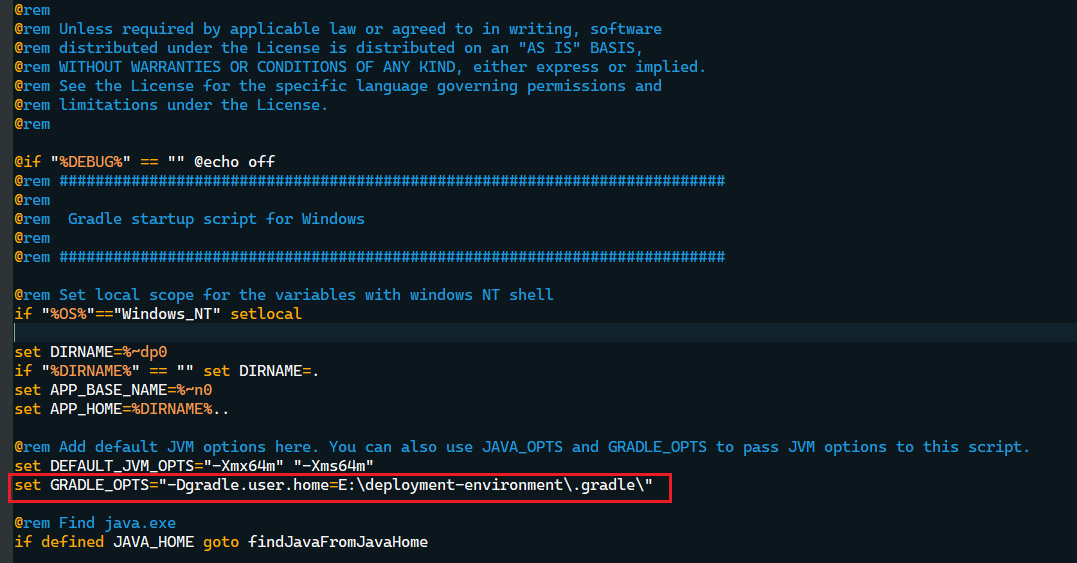
方式4:IDEA 专用配置
在 idea 中修改 gradle 用户目录,此方式只适用于使用 idea 进行开发。
在某个项目打开设置(快捷键 Ctrl+alt+S),定位到 Gradle 菜单,做如下设置:
- 将【Use Gradle From】选项改为【Specified location】,然后右侧就会出现一个框,选择 Gradle 安装目录(即将
%GRADLE_HOME%的路径复制到这里即可)。如果是多模块项目,需要将每个模块都修改才可以。 - 修改【Gradle user home】,填写jar包保存路径(即复制环境变量中的【
GRADLE_USER_HOME】的值)。注:如果配置与环境变量不同的目录,会覆盖默认的 gradle 本地仓库
这样 IDEA 的 Gradle 就配置好了。
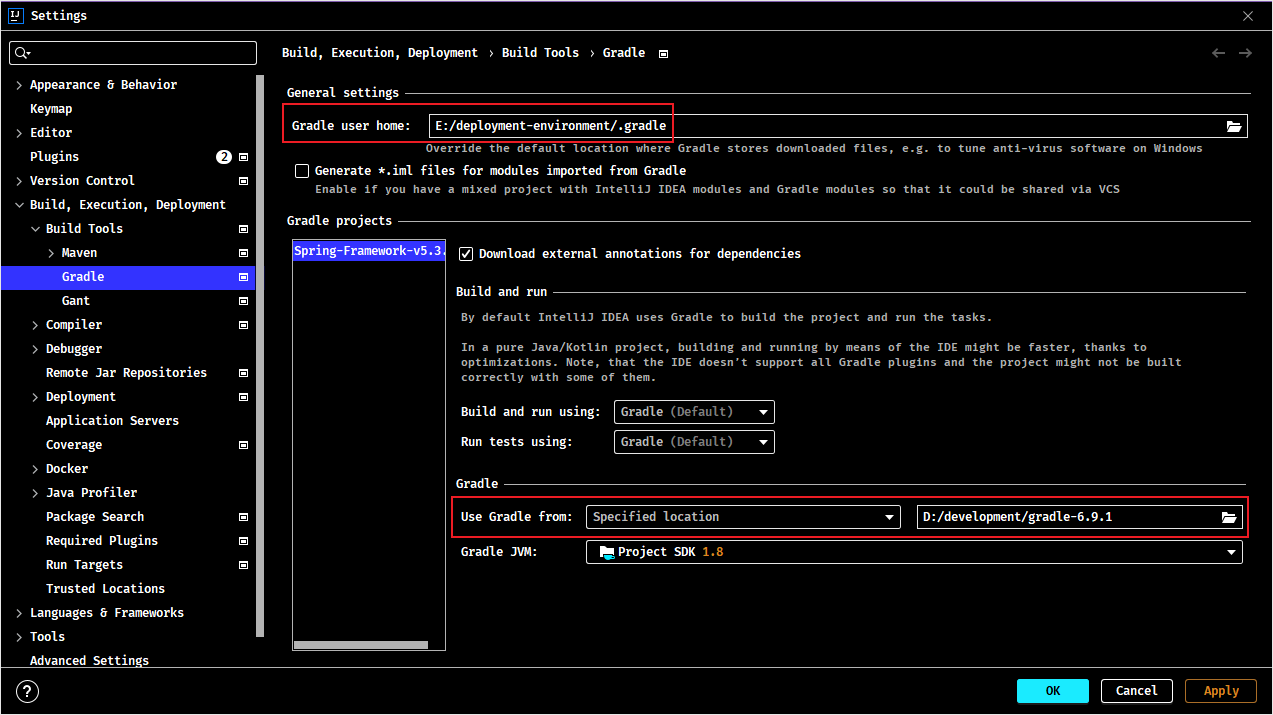
如果要更改 IDEA 的全局配置,选择【File】->【New Projects Setup】->【Settings for New Projects...】,和 【Settings】的相似,配置【Gradle user home】即可
方式5:对指定项目设置缓存目录(不建议)
此方式适用指定某个项目的本地仓库缓存目录。修改 Gradle 项目中的 gradle.properties 文件,增加以下语句。
properties
gradle.user.home=E:\deployment-environment\.gradle\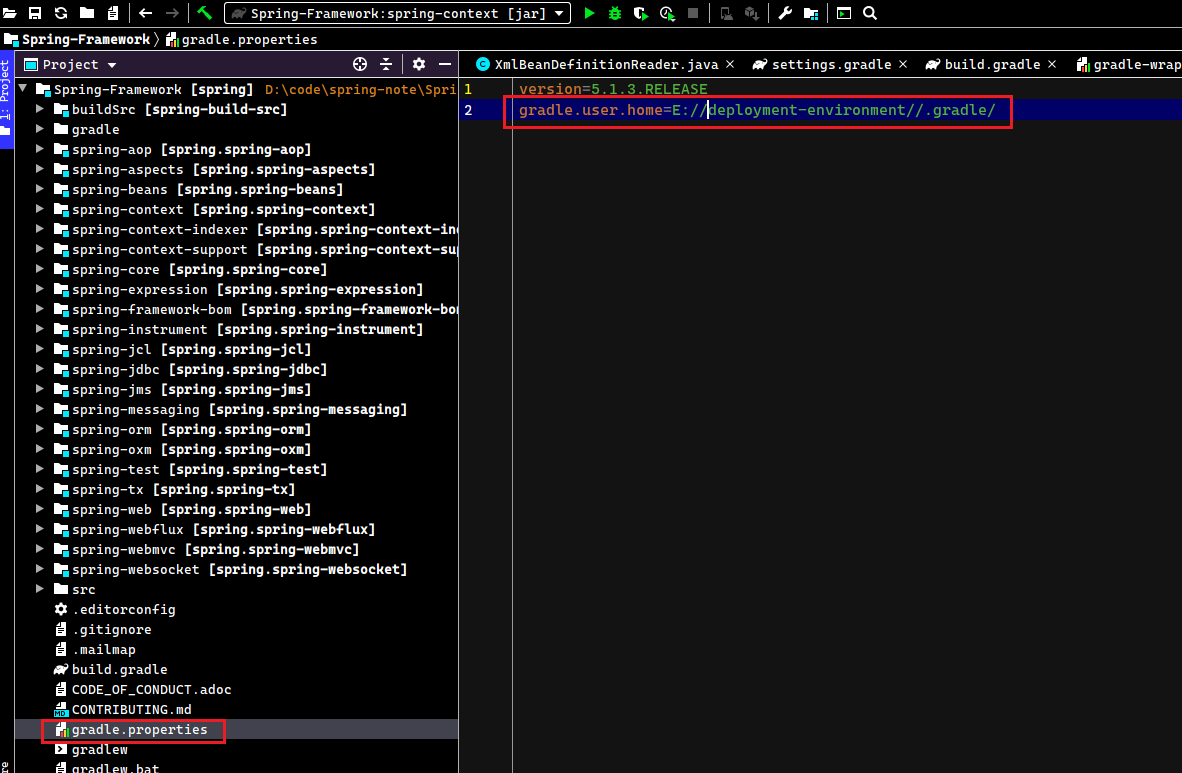
PS. 但这种方法,需要每个项目文件都要改一遍,如果只是临时修改,可以采用这种方法,如果是针对所有项目的,不建议这种方法.
build.gradle 构建脚本
配置说明
build.gradle 是 Gradle 的构建脚本,包含如下内容(其中标明可选的都是可以不用配置)
- 插件引入:声明项目所需的插件
- 属性定义(可选):定义扩展属性
- 局部变量(可选):定义局部变量
- 属性修改(可选):指定 project 自带属性
- 仓库定义:指明要从哪些仓库下载 jar 包
- 依赖声明:声明项目中需要哪些依赖
- 自定义任务(可选):自定义一些任务
基础示例如下:
groovy
// 定义扩展属性(给脚本用的脚本)
buildScript {
    repositories {
        mavenCentral()
    }
}

// 应用插件,这里引入了 Gradle 的 Java 插件,此插件提供了 Java 构建和测试所需的一切
plugins {
    id 'java'
}

// 定义项目属性(可选)
group 'com.moon'
version '1.0-SNAPSHOT'

/*
 * 指定 gradle 项目使用的仓库
 * 以下配置表示,先从本地仓库寻找依赖,如果没有再从中仓库下载
 * 如果只配置中央仓库,表示直接从中央仓库下载jar包。但是如果指定下载的位置已经有了,就不会再次下载了。
 */
repositories {
    // 添加 maven 本地仓库
    mavenLocal()
    // 添加 maven 远程中央仓库
    mavenCentral()
}

/*
 * 项目所有 jar 包的依赖在 dependencies 中定义
 * 每一个 jar 包的坐标都有三个基本元素组成(group,name,version)
 * 添加依赖坐标时,需要声明 jar 包的作用域,如:compile、runtime、testCompile、testRuntime
 */
dependencies {
    testImplementation 'org.junit.jupiter:junit-jupiter-api:5.7.0'
    testRuntimeOnly 'org.junit.jupiter:junit-jupiter-engine:5.7.0'
    // 方式1: 通过 map 结构来描述依赖。分别是 group,name,version
    // compile group: 'org.springframework', name: 'spring-context', version: '5.3.19'
    // 方式2: 通过字符串简写方式描述依赖,组成结构是:'group:name:version:classifier@extension',如版本号使用“+”加号代表了最新版本
    compile 'org.springframework:spring-context:5.3.19'
}

test {
    useJUnitPlatform()
}

// 自定义任务(可选)。此处是配置项目编译的编码方式
tasks.withType(JavaCompile) {
    options.encoding = "utf-8"
}

// 定义扩展属性(可选)
ext {
    foo = "foo"
}
// 定义局部变量(可选)
def bar = "bar"
Gradle 插件
Gradle 是一个通用工具。它可以通过脚本构建任何你想要实现的东西,真正实现开箱即用,但前提是需要在脚本中编写好代码。
Gradle 在提供了一些小但有用的功能,用于实现自动化功能。所有功能(例如以能够编译 Java 代码),都是通过插件进行添加的。插件就是 Gradle 的扩展,简而言之就是为项目添加一些非常有用的默认配置。Gradle 自带了很多插件,把插件应用到项目中可以让插件来扩展项目的功能。它可以做的事情如:
- 将任务添加到项目(如编译、测试)
- 使用有用的默认设置对已添加的任务进行预配置
- 向项目中添加依赖配置
- 通过扩展对现有类型添加新的属性和方法
Java 插件
Java plugin 作为 Gradle 插件其中之一,提供了如编译,测试,打包等一些功能。
修改项目的 build.gradle 文件的 plugins 选项,配置项目插件。语法如下:
groovy
plugins {
    id «plugin id»
    id «plugin id» version «plugin version» [apply «false»]
}
注:
- 第1种:用于引用核心 Gradle 插件或已经提供给构建脚本的插件
- 第2种:用于需要解决的二进制 Gradle 插件
示例:配置 java 插件
groovy
plugins {
    id 'java'
}
示例:配置多个插件
groovy
plugins {
    id 'java'
    id 'war'
    id 'com.example.goodbye' version '1.0.0' apply false
}
添加 Maven 仓库
通常,一个 Java 项目拥有许多外部依赖,因此需要配置 Gradle 中 Jar 包存储的仓库位置。下面是以 Maven 仓库为例的配置,修改项目的 build.gradle 文件的 repositories 选项:
groovy
/*
 * 指定 gradle 项目使用的仓库
 */
repositories {
    // 添加 maven 本地仓库
    mavenLocal()
    // 添加 maven 远程中央仓库
    mavenCentral()
    // 以上配置表示,先从本地仓库寻找依赖,如果没有再从中仓库下载
    // 如果只配置中央仓库,表示直接从中央仓库下载jar包。但是如果指定下载的位置已经有了,就不会再次下载了。
}
依赖管理
依赖管理包括两部分,对项目依赖的管理以及发布项目的管理
- 项目依赖是指构建项目所需的构件(jar包等)
- 发布项目是指项目产出的需要上传的项目产物
声明依赖
依赖坐标基础语法
仓库中构件(jar包)的坐标语法如下:
groovy
// 方式1:
configurationName group: 'xxx', name: 'xxx', version: 'x.x'
// 方式2:
configurationName 'group:name:version:classifier@extension'
参数解析:
| 参数名称 | 描述 |
|---|---|
configurationName | 依赖的作用范围 |
group | 通常用来描述组织、公司、团队或者其它有象征代表意义的名字,相当于maven坐标的groupId |
name | 依赖的名称。相当于maven坐标的artifactId |
version | 版本号 |
classifier | 类库版本,在前三项相同的情况下,如果目标依赖还存在对应不同JDK版本的版本,可以通过此属性指明 |
extension | 依赖的归档类型,如aar、jar等,默认不指定的话是jar |
声明依赖是在项目的 build.gradle 文件中 dependencies 选项,添加项目需要的依赖,并声明 jar 包的作用域
groovy
/*
 * 项目所有 jar 包的依赖在 dependencies 中定义
 * 每一个 jar 包的坐标都有三个基本元素组成(group,name,version)
 * 添加依赖坐标时,需要声明 jar 包的作用域,如:compile、runtime、testCompile、testRuntime
 */
dependencies {
    testImplementation 'org.junit.jupiter:junit-jupiter-api:5.7.0'
    testRuntimeOnly 'org.junit.jupiter:junit-jupiter-engine:5.7.0'
    compile group: 'org.springframework', name: 'spring-context', version: '5.0.2.RELEASE'
}
采用变量统一控制版本号
groovy
dependencies {
    def bootVersion = "2.5.8"
    compile     "org.springframework.boot:spring-boot-starter-web:${bootVersion}",
                "org.springframework.boot:spring-boot-starter-data-jpa:${bootVersion}",
                "org.springframework.boot:spring-boot-starter-tomcat:${bootVersion}"
}
自动获取最新版本依赖
如果需要某个库每次构建时都检查是否有新版本,将版本号修改为“+”即可,让 Gradle 在每次构建时都检查并应用最新版本的依赖。
groovy
dependencies {
    compile     "org.springframework.boot:spring-boot-starter-web:+"
}
依赖作用范围
在引入依赖时,需要声明依赖的作用范围,关于各种作用范围的见下表:
| 依赖范围名称 | 说明 |
|---|---|
compileOnly | 2.12版本后新增,曾叫provided,后续版本改成了compileOnly,由java插件提供,适用于编译期需要而不需要打包的情况 |
providedCompile | war插件提供的范围类型:与compile作用类似,但不会被添加到最终的war包中这是由于编译、测试阶段代码需要依赖此类jar包,而运行阶段容器已经提供了相应的支持,所以无需将这些文件打入到war包中了。例如Servlet API |
api | 3.4版本以后由java-library提供。当其他模块依赖于此模块时,此模块使用api声明的依赖包是可以被其他模块使用 |
implementation | 3.4版本以后由java-library提供。当其他模块依赖此模块时,此模块使用implementation声明的依赖包只限于模块内部使用,不允许其他模块使用。 |
compile | 编译时依赖,同时依赖也会被打包 |
providedRuntime | 同proiveCompile类似 |
runtime | 在运行和测试系统的时候依赖,但在编译的时候不依赖 |
testCompile | 用于编译测试的其他依赖 |
testRuntime | 只用于运行测试的其他依赖 |
archives | 由本项目生产的构件(如jar包) |
default | 本项目上的默认项目依赖配置。包含本项目运行时所需要的构件和依赖 |
Tips: 需要注意的是,
provided范围内的传递依赖也不会被打包
依赖的分类
外部依赖
Gradle 支持通过 map 方式或者 g:a:v 的简写方式传入依赖描述,这些声明依赖会去配置的 repository 查找
groovy
dependencies {
 // 采用map方式传入单个
  compile group: 'commons-lang', name: 'commons-lang', version: '2.6'
 // 采用map方式传入多个
  compile(
      [group: 'org.springframework', name: 'spring-core', version: '2.5'],
      [group: 'org.springframework', name: 'spring-aop', version: '2.5']
  )
  // 采用简写方式声明
  compile 'org.projectlombok:lombok:1.16.10'
  // 采用简写方式传入多个
  compile 'org.springframework:spring-core:2.5',
          'org.springframework:spring-aop:2.5'
}
项目依赖
此类依赖用多模块项目,语法如下:
groovy
dependencies {
    compile project(':project-foo')
}
注:其中
:是基于跟项目的相对路径描述符
文件依赖
依赖存在于本地文件系统中,即中央仓库与私服都没有的jar,,可以通过 FileCollection 接口及其子接口提供的方法加载这些依赖(支持文件通配符)
groovy
dependencies {
    // 指定多个依赖
    compile files('hibernate.jar', 'libs/spring.jar')

    // 读取lib文件夹下的全部文件作为项目依赖
    compile fileTree('libs')

    // 根据指定基准来加载依赖。分别是目录(dir)、包含(include)、排除条件(exclude)
    compile fileTree(dir: 'libs', include: 'spring*.jar', exclude: 'hibernate*.jar')
}
内置依赖
跟随 Gradle 发行包或者基于 Gradle API 的一些依赖,通常在插件开发时使用,当前提供了如下三种:
groovy
dependencies {
    // 加载Gradle自带的groovy作为依赖
    compile localGroovy()

    // 使用Gradle API作为依赖
    compile gradleApi()

    // 使用 Gradle test-kit API 作为依赖
    testCompile gradleTestKit()
}
传递依赖
传递依赖特性可以通过 transitive 参数进行开启或关闭,也可以采用添加 @jar 的方式忽略该依赖的所有传递性依赖。
groovy
compile('com.android.support:support-v4:23.1.1'){
    transitive = false
}
groovy
compile 'com.android.support:support-v4:23.1.1'@jar全局性的关闭依赖的传递特性
groovy
configurations.all {
    transitive = false
}
排除依赖
如需要排除一些传递性依赖中的某个模块,可以通过 exclude 来实现。exclude 可以接收 group 和 module 两个参数:
groovy
dependencies {
    compile('com.github.nanchen2251:CompressHelper:1.0.5') {
        // 排除 com.android.support:appcompat-v7:23.1.1
        exclude group: 'com.android.support' // 排除组织依赖
        exclude module: 'appcompat-v7' // 排除模块依赖
    }
}
Gradle Java 项目构建
创建 Java 项目(IDEA)
创建 Gradle 项目,选择 JDK 与相应的项目语言
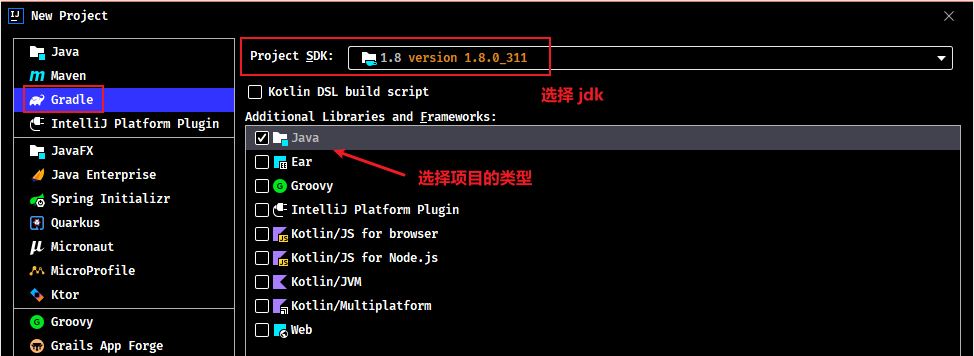
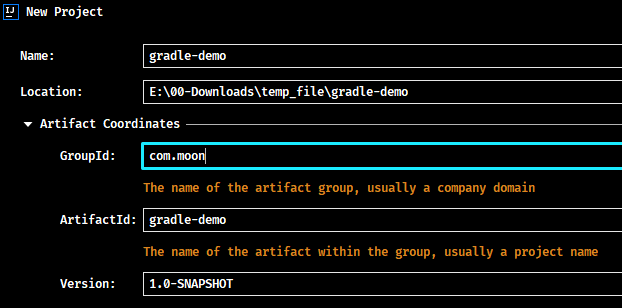
修改项目的 build.gradle 配置,添加一些测试代码进行测试
示例工程:java-technology-stack\java-stack-gradle\gradle-java
Gradle 基础的目录结构
标准结构
Gradle 遵循 COC(convention over configuration 约定优于配置)的理念,默认情况下提供了与 maven 相同的项目结构配置。使用 IDEA 创建 Gradle 项目成功后,项目的基础目录结构如下:
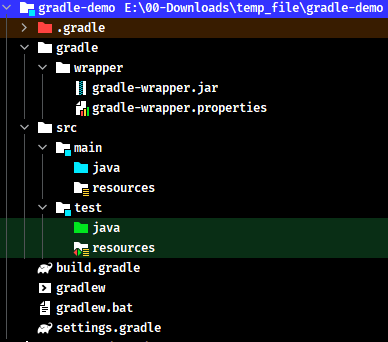
gradle-demo
    ├──gradle
    |   └──wrapper
    |        ├──gradle-wrapper.jar
    |        └──gradle-wrapper.properties # Gradle 项目构建脚本使用的变量
    ├──src
    |   ├──main
    |   |   ├──java       # 项目源代码目录
    |   |   ├──resources  # 项目配置文件目录
    |   |   └──webapp     # web 工程放置页面元素
    |   └──test
    |       ├──java       # 单元测试代码目录
    |       └──resources  # 测试配置文件目录
    ├──build.gradle       # Gradle 项目构建配置
    ├──gradlew            # Gradle 项目构建脚本(linux 系统)
    ├──gradlew.bat        # Gradle 项目构建脚本(windows 系统)
    └──settings.gradle    # Gradle 项目信息配置
非标准结构配置
在一些老项目上,可能目录结构并不是标准结构,然而一般开发人员又不好进行结构调整。此时可以通过修改 build.gradle 配置文件中的 sourceSet 项来指定目录结构
groovy
sourceSets {
    main {
        java {
            srcDir 'src/java'
        }
        resources {
            srcDir 'src/resources'
        }
    }
}
或者
groovy
sourceSets {
    main.java.srcDirs = ['src/java']
    main.resources.srcDirs = ['src/resources']
}
gradle wrapper
IDEA 默认会使用 gradle wrapper 来创建项目,其实无需安装 gradle 也可以正常运行。
在 gradle 文件夹和 gradlew 那几个文件就是 gradle wrapper 的文件,而 .gradle 后缀名的文件正是 gradle 的配置文件,对应于 Maven 的 pom.xml。
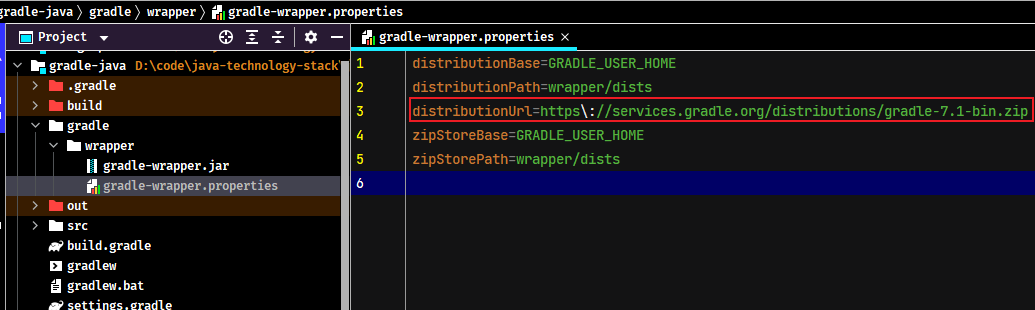
gradle wrapper 的优点之一就是可以自定义下载的 gradle 的版本,如果是团队协作的话,这个功能就非常方便,简单设置即可统一团队的构建工具版本。
下图设定成 gradle 7.1,默认下载安装的是bin版,仅包含二进制。如果使用IDEA的话,它会推荐下载all版,包含源代码,这样IDEA就可以分析源代码,提供更加精确的gradle脚本支持。
创建 web 项目
与创建普通 java 项目一样,只需要在 src 目录下多新增一个 webapp 目录,然后再 build.gradle 配置中增加 war 包的插件
groovy
plugins {
    id 'java'
    id 'war'
}

group 'com.moon'
version '1.0-SNAPSHOT'

repositories {
    mavenLocal()
    mavenCentral()
}

dependencies {
    compile group: 'org.springframework', name: 'spring-webmvc', version: '5.3.19'
    compile group: 'javax.servlet', name: 'javax.servlet-api', version: '4.0.1'
    compileOnly 'javax.servlet.jsp:javax.servlet.jsp-api:2.3.3'
}

test {
    useJUnitPlatform()
}
修改项目的 build.gradle 配置,添加一些测试代码进行测试
示例工程:java-technology-stack\java-stack-gradle\gradle-web
创建多模块项目
创建父模块
与创建普通的项目一样,为了让其他子模块共享公共的配置,需要将配置放到 allprojects 闭包中
groovy
allprojects {
    plugins {
        id 'java'
    }

    group 'com.moon'
    version '1.0-SNAPSHOT'

    sourceCompatibility = 1.8

    repositories {
        mavenLocal();
        mavenCentral()
    }

    dependencies {
        compile group: 'org.springframework', name: 'spring-webmvc', version: '5.3.19'
        compile group: 'javax.servlet', name: 'javax.servlet-api', version: '4.0.1'
        compile 'javax.servlet.jsp:javax.servlet.jsp-api:2.3.3'
    }
}
创建相应的子模块后,会在父工程的 settings.gradle 文件中引入相应的模块名称
groovy
rootProject.name = 'gradle-multiple-modules'
include 'gradle-multiple-dao'
include 'gradle-multiple-service'
include 'gradle-multiple-web'
子模块配置
示例工程:java-technology-stack\java-stack-gradle\gradle-multiple-modules
在子模块中,可以将父工程所配置公共部分删除,只需配置该模块独有的配置即可
如果某个子模块需要依赖其他子模块,只需要修改 build.gradle 文件通过 dependencies 引入即可,如:
groovy
dependencies {
    compile project(":gradle-multiple-dao")
}
添加一些简单的业务代码进行测试
Notes: 后面比较新的版本中,
compile语句已弃用,并已在 Gradle 7.0+ 中删除。新版本需要改用implementation或api
Gradle 配置与缓存目录
在用户目录的 gradle 文件夹下看到 gradle 的相关配置和缓存。
在创建 Gradle 项目时,在 gradle-wrapper.properties 配置下载的 gradle 也存放在该文件夹下,位置是 wrapper/dists。

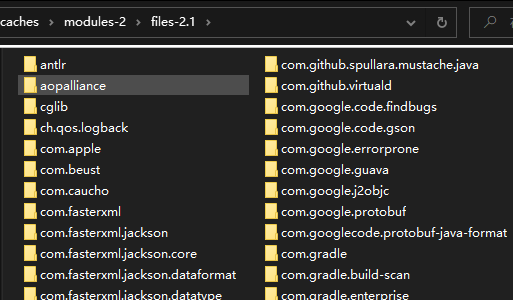
而依赖的本地缓存在 caches\modules-2\files-2.1 文件夹下。目录结构和 Maven 的本地缓存类似,都是包名+版本号的方式,但是gradle的目录结构最后一层和Maven不同,这导致它们无法共用本地缓存。
其他
查询 gradle 相关命令
使用命令gradle -?或gradle -h或gradle --help查询gradle相关命令与说明
-?, -h, --help            Shows this help message.
-a, --no-rebuild          Do not rebuild project dependencies.
-b, --build-file          Specify the build file.
--build-cache             Enables the Gradle build cache. Gradle will try to reuse outputs from previous builds.
-c, --settings-file       Specify the settings file.
--configure-on-demand     Configure necessary projects only. Gradle will attempt to reduce configuration time for large multi-project builds. [incubating]
--console                 Specifies which type of console output to generate. Values are 'plain', 'auto' (default), 'rich' or 'verbose'.
--continue                Continue task execution after a task failure.
-D, --system-prop         Set system property of the JVM (e.g. -Dmyprop=myvalue).
-d, --debug               Log in debug mode (includes normal stacktrace).
--daemon                  Uses the Gradle Daemon to run the build. Starts the Daemon if not running.
--foreground              Starts the Gradle Daemon in the foreground.
-g, --gradle-user-home    Specifies the gradle user home directory.
-I, --init-script         Specify an initialization script.
-i, --info                Set log level to info.
--include-build           Include the specified build in the composite.
-m, --dry-run             Run the builds with all task actions disabled.
--max-workers             Configure the number of concurrent workers Gradle is allowed to use.
--no-build-cache          Disables the Gradle build cache.
--no-configure-on-demand  Disables the use of configuration on demand. [incubating]
--no-daemon               Do not use the Gradle daemon to run the build. Useful occasionally if you have configured Gradle to always run with the daemon by default.
--no-parallel             Disables parallel execution to build projects.
--no-scan                 Disables the creation of a build scan. For more information about build scans, please visit https://gradle.com/build-scans.
--offline                 Execute the build without accessing network resources.
-P, --project-prop        Set project property for the build script (e.g. -Pmyprop=myvalue).
-p, --project-dir         Specifies the start directory for Gradle. Defaults to current directory.
--parallel                Build projects in parallel. Gradle will attempt to determine the optimal number of executor threads to use.
--priority                Specifies the scheduling priority for the Gradle daemon and all processes launched by it. Values are 'normal' (default) or 'low' [incubating]
--profile                 Profile build execution time and generates a report in the <build_dir>/reports/profile directory.
--project-cache-dir       Specify the project-specific cache directory. Defaults to .gradle in the root project directory.
-q, --quiet               Log errors only.
--refresh-dependencies    Refresh the state of dependencies.
--rerun-tasks             Ignore previously cached task results.
-S, --full-stacktrace     Print out the full (very verbose) stacktrace for all exceptions.
-s, --stacktrace          Print out the stacktrace for all exceptions.
--scan                    Creates a build scan. Gradle will emit a warning if the build scan plugin has not been applied. (https://gradle.com/build-scans)
--status                  Shows status of running and recently stopped Gradle Daemon(s).
--stop                    Stops the Gradle Daemon if it is running.
-t, --continuous          Enables continuous build. Gradle does not exit and will re-execute tasks when task file inputs change.
--update-locks            Perform a partial update of the dependency lock, letting passed in module notations change version. [incubating]
-v, --version             Print version info.
-w, --warn                Set log level to warn.
--warning-mode            Specifies which mode of warnings to generate. Values are 'all', 'summary'(default) or 'none'
--write-locks             Persists dependency resolution for locked configurations, ignoring existing locking information if it exists [incubating]
-x, --exclude-task        Specify a task to be excluded from execution.