Appearance
MyBatis-Plus 简介
MyBatis-Plus(简称 MP)是一个 MyBatis 的增强工具,在 MyBatis 的基础上只做增强不做改变,为简化开发、提高效率而生
- 官网:https://baomidou.com/
- 文档地址:https://baomidou.com/guide/
- 源码地址:https://github.com/baomidou/mybatis-plus
- 码云地址:https://gitee.com/baomidou/mybatis-plus
特性
- 无侵入:只做增强不做改变,引入它不会对现有工程产生影响,如丝般顺滑
- 损耗小:启动即会自动注入基本 CURD,性能基本无损耗,直接面向对象操作
- 强大的 CRUD 操作:内置通用 Mapper、通用 Service,仅仅通过少量配置即可实现单表大部分 CRUD 操作,更有强大的条件构造器,满足各类使用需求
- 支持 Lambda 形式调用:通过 Lambda 表达式,方便的编写各类查询条件,无需再担心字段写错
- 支持多种数据库:支持 MySQL、MariaDB、Oracle、DB2、H2、HSQL、SQLite、Postgre、SQLServer2005、SQLServer 等多种数据库
- 支持主键自动生成:支持多达 4 种主键策略(内含分布式唯一 ID 生成器 - Sequence),可自由配置,完美解决主键问题
- 支持 XML 热加载:Mapper 对应的 XML 支持热加载,对于简单的 CRUD 操作,甚至可以无 XML 启动
- 支持 ActiveRecord 模式:支持 ActiveRecord 形式调用,实体类只需继承 Model 类即可进行强大的 CRUD 操作
- 支持自定义全局通用操作:支持全局通用方法注入( Write once, use anywhere )
- 支持关键词自动转义:支持数据库关键词(order、key......)自动转义,还可自定义关键词
- 内置代码生成器:采用代码或者 Maven 插件可快速生成 Mapper 、 Model 、 Service 、 Controller 层代码,支持模板引擎,更有超多自定义配置等您来使用
- 内置分页插件:基于 MyBatis 物理分页,开发者无需关心具体操作,配置好插件之后,写分页等同于普通 List 查询
- 内置性能分析插件:可输出 Sql 语句以及其执行时间,建议开发测试时启用该功能,能快速揪出慢查询
- 内置全局拦截插件:提供全表 delete 、 update 操作智能分析阻断,也可自定义拦截规则,预防误操作
- 内置 Sql 注入剥离器:支持 Sql 注入剥离,有效预防 Sql 注入攻击
架构
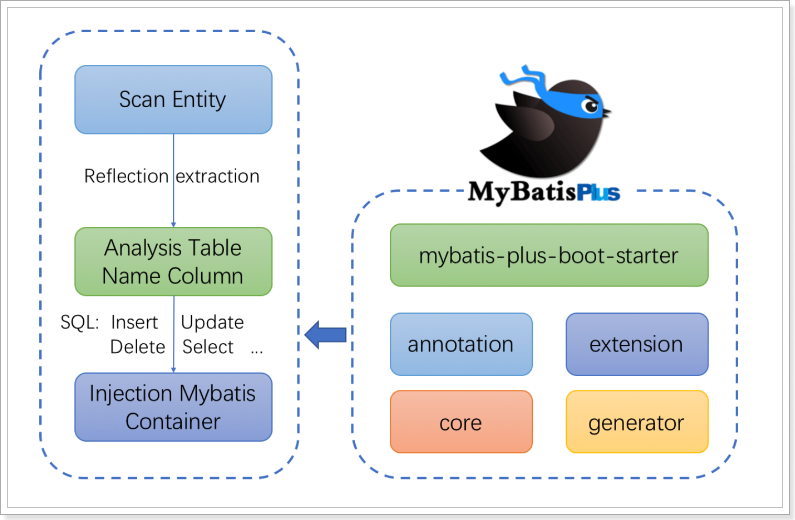
示例项目说明
示例项目代码位置:mybatis-note\mybatis-plus-samples\
github 位置:https://github.com/MooNkirA/mybatis-note/tree/master/mybatis-plus-samples
MyBatis-Plus 快速入门示例
创建示例数据库以及表
脚本的位置:mybatis-note\mybatis-plus-samples\document\sql\mysql-sample.sql
SpringBoot + Mybatis + MP
引入依赖
xml
<dependencies>
    <dependency>
        <groupId>org.springframework.boot</groupId>
        <artifactId>spring-boot-starter</artifactId>
    </dependency>
    <dependency>
        <groupId>mysql</groupId>
        <artifactId>mysql-connector-java</artifactId>
        <version>8.0.26</version>
        <scope>runtime</scope>
    </dependency>
    <dependency>
        <groupId>com.baomidou</groupId>
        <artifactId>mybatis-plus-boot-starter</artifactId>
        <version>3.4.3.4</version>
    </dependency>
    <dependency>
        <groupId>org.springframework.boot</groupId>
        <artifactId>spring-boot-starter-test</artifactId>
        <scope>test</scope>
    </dependency>

    <dependency>
        <groupId>org.assertj</groupId>
        <artifactId>assertj-core</artifactId>
        <scope>test</scope>
    </dependency>
    <dependency>
        <groupId>org.projectlombok</groupId>
        <artifactId>lombok</artifactId>
        <scope>provided</scope>
    </dependency>
</dependencies>
配置
- 在
application.yml配置文件中添加数据库的相关配置:
yml
spring:
  # DataSource Config
  datasource:
    driver-class-name: com.mysql.cj.jdbc.Driver
    url: jdbc:mysql://127.0.0.1:3306/mybatis_plus_sample_db?useSSL=false&useUnicode=true&characterEncoding=UTF-8
    username: root
password: ****- 在 Spring Boot 启动类中添加
@MapperScan注解,扫描 Mapper 文件夹:
java
@SpringBootApplication
@MapperScan("com.moon.mybatisplus.mapper") // 设置mapper接口的扫描包
public class QuickstartApplication {
    public static void main(String[] args) {
        SpringApplication.run(QuickstartApplication.class, args);
    }
}
创建实体类
java
@Data
public class User {
    private Long id;
    private String name;
    private Integer age;
    private String email;
}
编写 mapper 接口
java
import com.baomidou.mybatisplus.core.mapper.BaseMapper;
import com.moon.mybatisplus.entity.User;

public interface UserMapper extends BaseMapper<User> {
}
编写测试用例
java
@SpringBootTest
public class BaseTest {
    @Autowired
    private UserMapper userMapper;

    @Test
    public void testSelect() {
        System.out.println(("----- selectAll method test ------"));
        List<User> userList = userMapper.selectList(null);
        Assertions.assertEquals(5, userList.size());
        userList.forEach(System.out::println);
    }
}
项目入门示例
注:此快速入门示例是在好客租房项目开发时的入门示例,代码位置在
haoke-project\haoke-technology-stack-sample\sample-mybatis-plus
创建数据库与相关表格
- 创建数据库
sql
create database haoke default character set utf8;- 创建相关数据库表与测试数据
sql
SET NAMES utf8mb4;
SET FOREIGN_KEY_CHECKS = 0;

DROP TABLE IF EXISTS `user`;
CREATE TABLE `user`  (
  `id` bigint(20) NOT NULL AUTO_INCREMENT COMMENT '主键ID',
  `name` varchar(30) CHARACTER SET utf8 COLLATE utf8_general_ci NULL DEFAULT NULL COMMENT '姓名',
  `age` int(11) NULL DEFAULT NULL COMMENT '年龄',
  `email` varchar(50) CHARACTER SET utf8 COLLATE utf8_general_ci NULL DEFAULT NULL COMMENT '邮箱',
  PRIMARY KEY (`id`) USING BTREE
) ENGINE = InnoDB CHARACTER SET = utf8 COLLATE = utf8_general_ci ROW_FORMAT = Dynamic;

INSERT INTO `user` VALUES (1, 'Jone', 18, 'test1@baomidou.com');
INSERT INTO `user` VALUES (2, 'Jack', 20, 'test2@baomidou.com');
INSERT INTO `user` VALUES (3, 'Tom', 28, 'test3@baomidou.com');
INSERT INTO `user` VALUES (4, 'Sandy', 21, 'test4@baomidou.com');
INSERT INTO `user` VALUES (5, 'Billie', 24, 'test5@baomidou.com');

SET FOREIGN_KEY_CHECKS = 1;
创建工程以及导入依赖
创建 jar 类型的sample-mybatis-plus示例工程,修改pom.xml文件引入相关依赖
xml
<?xml version="1.0" encoding="UTF-8"?>
<project xmlns="http://maven.apache.org/POM/4.0.0"
         xmlns:xsi="http://www.w3.org/2001/XMLSchema-instance"
         xsi:schemaLocation="http://maven.apache.org/POM/4.0.0 http://maven.apache.org/xsd/maven-4.0.0.xsd">
    <!-- 添加SpringBoot parent支持 -->
    <parent>
        <groupId>org.springframework.boot</groupId>
        <artifactId>spring-boot-starter-parent</artifactId>
        <version>2.1.0.RELEASE</version>
    </parent>

    <modelVersion>4.0.0</modelVersion>
    <artifactId>sample-mybatis-plus</artifactId>
    <name>${project.artifactId}</name>
    <packaging>jar</packaging>
    <description>技术栈示例 - MyBatis-Plus快速入门示例</description>

    <dependencies>
        <!-- spring boot 依赖 -->
        <dependency>
            <groupId>org.springframework.boot</groupId>
            <artifactId>spring-boot-starter</artifactId>
        </dependency>
        <dependency>
            <groupId>org.springframework.boot</groupId>
            <artifactId>spring-boot-starter-test</artifactId>
            <scope>test</scope>
        </dependency>

        <!-- mybatis-plus的springboot支持(注:不需要再依赖mybatis,此插件已包含引入mybatis) -->
        <dependency>
            <groupId>com.baomidou</groupId>
            <artifactId>mybatis-plus-boot-starter</artifactId>
            <version>3.0.5</version>
        </dependency>
        <!-- mysql驱动 -->
        <dependency>
            <groupId>mysql</groupId>
            <artifactId>mysql-connector-java</artifactId>
            <version>5.1.47</version>
        </dependency>
        <!-- 实体类工具包 -->
        <dependency>
            <groupId>org.projectlombok</groupId>
            <artifactId>lombok</artifactId>
            <optional>true</optional>
            <version>1.18.4</version>
        </dependency>
    </dependencies>

    <!-- 项目构建 -->
    <build>
        <plugins>
            <plugin>
                <groupId>org.springframework.boot</groupId>
                <artifactId>spring-boot-maven-plugin</artifactId>
            </plugin>
        </plugins>
    </build>
</project>
编写项目的配置文件
编写 spring boot 项目的默认配置文件 application.properties
properties
spring.application.name=sample-mybatis-plus
# 数据库(MySQl)相关配置
spring.datasource.driver-class-name=com.mysql.jdbc.Driver
spring.datasource.url=jdbc:mysql://192.168.12.134:3306/haoke?useUnicode=true&characterEncoding=utf8&autoReconnect=true&allowMultiQueries=true&useSSL=false
spring.datasource.username=root
spring.datasource.password=123456
创建实体类
java
@Data
public class User {
    private Long id;
    private String name;
    private Integer age;
    private String email;
}
创建持久层 Mapper 接口
使用 MyBatis-Plus 插件,需要继承此工具框架提供的public interface BaseMapper<T>接口,泛型为接口操作的数据库表相应的实体类。此BaseMapper<T>接口时定义很多基础操作方法
java
public interface UserMapper extends BaseMapper<User> { }编写 SpringBoot 启动类
java
// 设置mybatis框架对mapper接口的扫描包路径
@MapperScan("com.moon.sample.mybatisplus.mapper")
@SpringBootApplication
public class MyBatisPlusApplication {
    public static void main(String[] args) {
        SpringApplication.run(MyBatisPlusApplication.class, args);
    }
}
编写单元测试用例
java
@RunWith(SpringRunner.class)
@SpringBootTest
public class UserMapperTest {
    // 注入测试的接口
    @Autowired
    private UserMapper userMapper;

    /* 基础的查询测试 */
    @Test
    public void selectTest(){
        List<User> users = this.userMapper.selectList(null);
        for (User user : users) {
            System.out.println(user);
        }
    }
}
运行测试用例,查看测试结果
BaseMapper(CRUD 基础接口)
在 Mybatis Plus 中,BaseMapper接口中定义了一些常用的 CRUD 方法,当自定义的Mapper接口继承BaseMapper后即可以获取到各种各样的单表操作。官方说明如下:
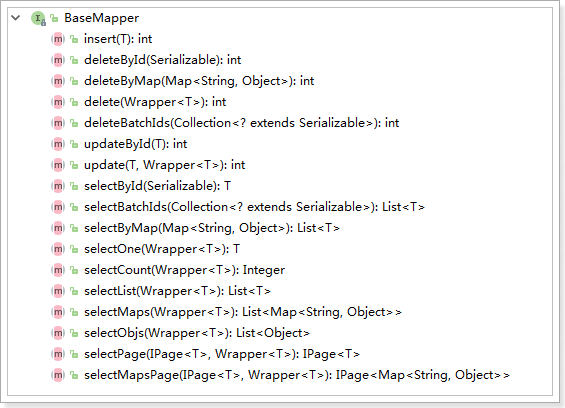
- 通用 CRUD 封装
BaseMapper接口,为Mybatis-Plus启动时自动解析实体表关系映射转换为Mybatis内部对象注入容器 - 泛型
T为任意实体对象 - 参数
Serializable为任意类型主键Mybatis-Plus不推荐使用复合主键约定每一张表都有自己的唯一id主键 - 对象
Wrapper为条件构造器
注:这些方法仅适合单表操作
官方文档地址:Mapper CRUD 接口
新增操作
java
@Test
public void testSave(){
    User user = new User();
    user.setAge(25);
    user.setEmail("shiyuan@qq.com");
    user.setName("石原里美");
    int count = this.userMapper.insert(user);
    System.out.println("新增数据成功! count => " + count);
}
设置主键 ID 生成策略
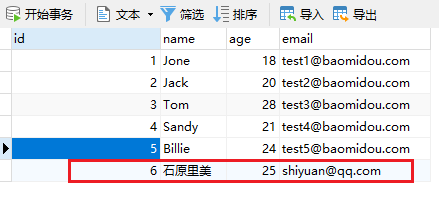
上面示例数据插入结果:
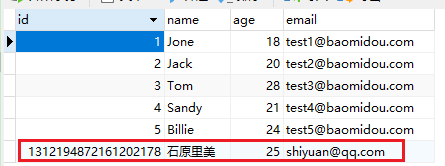
可以看到,数据已经写入到了数据库,但是,id 的值不正确。期望的是数据库自增长,实际是 MP 生成了 id 的值写入到了数据库。
如何设置 id 的生成策略呢?需要修改操作的表相应的实体类,增加 MP 的 id 策略为自增长。注:数据库表的 id 字段也需要设置为自增长
java
@Data
public class User {
    @TableId(value = "id", type = IdType.AUTO)
    private Long id;
    private String name;
    private Integer age;
    private String email;
}
MP 支持的 id 策略详见源码
com.baomidou.mybatisplus.annotation.IdType
再次运行测试,查看结果
更新操作
在 MP 中,更新操作有 2 种,一种是根据 id 更新,另一种是根据条件更新。
根据 ID 更新数据
源码方法定义:
java
/**
 * 根据 ID 修改
 *
 * @param entity 实体对象
 */
int updateById(@Param(Constants.ENTITY) T entity);
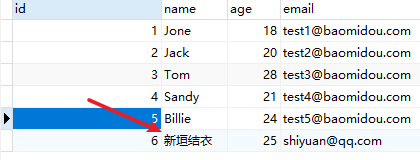
根据 id 修改数据,只会修改传的对象的属性不为 null 的相应字段。
java
@Test
public void testUpdateById() {
    User u1 = new User();
    u1.setId(5L);
    u1.setName("新垣结衣");

    // 返回的result是受影响的行数
    int result = userMapper.updateById(u1);
    System.out.println("根据id更新影响行数:" + result);
}
根据 Wrapper 条件更新
源码方法定义:
java
/**
 * 根据 whereEntity 条件,更新记录
 *
 * @param entity        实体对象 (set 条件值,可以为 null)
 * @param updateWrapper 实体对象封装操作类(可以为 null,里面的 entity 用于生成 where 语句)
 */
int update(@Param(Constants.ENTITY) T entity, @Param(Constants.WRAPPER) Wrapper<T> updateWrapper);
可以有两种方式更新数据
- 方式 1: 通过 QueryWrapper 对象更新
- 方式 2:通过 LambdaUpdateWrapper<T>对象更新
java
@Test
public void testUpdateByWrapper() {
    // 方式1: 通过QueryWrapper对象更新
    User user = new User();
    user.setEmail("mk@moon.com");
    int result1 = userMapper.update(user, new QueryWrapper<User>().lambda().eq(User::getId, 4L));
    System.out.println("影响行数result1:" + result1);
    assertThat(result1).isGreaterThan(0);

    // 方式2:通过LambdaUpdateWrapper<T>对象更新
    int result2 = userMapper.update(null, Wrappers.<User>lambdaUpdate().set(User::getEmail, null).eq(User::getId, 3L));
    System.out.println("影响行数result1:" + result2);
    assertThat(result2).isGreaterThan(0);
}
删除操作
根据 ID 删除
源码方法定义:
java
/**
 * 根据 ID 删除
 *
 * @param id 主键ID
 */
int deleteById(Serializable id);

/**
 * 根据实体(ID)删除
 *
 * @param entity 实体对象
 * @since 3.4.4
 */
int deleteById(T entity);
示例:
java
@Test
public void testDeleteById() {
    // 直接根据id值删除
    int result1 = userMapper.deleteById("1452460873191886851");
    System.out.println("根据id删除影响行数:" + result1);

    // 根据实体对象(ID)主键属性删除
    User user = new User();
    user.setId(1452460873191886852L);
    int result2 = userMapper.deleteById(user);
    System.out.println("根据实体对象(ID)删除影响行数:" + result2);
}
根据 columnMap 条件删除
源码方法定义:
java
/**
 * 根据 columnMap 条件,删除记录
 *
 * @param columnMap 表字段 map 对象
 */
int deleteByMap(@Param(Constants.COLUMN_MAP) Map<String, Object> columnMap);
示例
java
@Test
public void testDeleteByMap() {
    // 创建 map 条件
    Map<String, Object> columnMap = new HashMap<>();
    columnMap.put("age", 24);
    columnMap.put("name", "石原里美");

    // 根据 columnMap 的元素设置为删除的条件,多个值之间为and关系
    int result = userMapper.deleteByMap(columnMap);
    System.out.println("根据 Map 条件删除影响行数:" + result);
}
根据 Wrapper 对象条件删除
源码方法定义:
java
/**
 * 根据 entity 条件,删除记录
 *
 * @param queryWrapper 实体对象封装操作类(可以为 null,里面的 entity 用于生成 where 语句)
 */
int delete(@Param(Constants.WRAPPER) Wrapper<T> queryWrapper);
示例:
java
@Test
public void testDeleteByWrapper() {
    // 创建实体对象查询条件
    User user = new User();
    user.setAge(24);
    user.setName("石原里美");

    // 将实体对象进行包装,包装为查询操作条件
    Wrapper<User> wrapper = new QueryWrapper<>(user);
    int result = userMapper.delete(wrapper);
    System.out.println("根据 Wrapper 对象条件删除影响行数:" + result);
}
根据 ID 集合批量删除
源码方法定义:
java
/**
 * 删除(根据ID 批量删除)
 *
 * @param idList 主键ID列表(不能为 null 以及 empty)
 */
int deleteBatchIds(@Param(Constants.COLLECTION) Collection<? extends Serializable> idList);
示例:
java
@Test
public void testDeleteBatchIds() {
    // 创建ID集合批量删除
    int result = userMapper.deleteBatchIds(Arrays.asList(1L, 2L, 4L, 5L));
    System.out.println("根据id批量删除影响行数:" + result);
}
查询操作
MP 提供了多种查询操作,包括根据 id 查询、批量查询、查询单条数据、查询列表、分页查询、根据条件查询等操作。
selectById - 根据 id 查询
源码方法定义:
java
/**
 * 查询(根据ID 批量查询)
 *
 * @param idList 主键ID列表(不能为 null 以及 empty)
 */
List<T> selectBatchIds(@Param(Constants.COLLECTION) Collection<? extends Serializable> idList);
示例:
java
@Test
public void testSelectById() {
    // 根据ID查询
    User user = userMapper.selectById(3L);
    System.out.println("根据id查询结果:" + user);
}
selectBatchIds - 根据 ID 批量查询
源码方法定义:
java
/**
 * 查询(根据ID 批量查询)
 *
 * @param idList 主键ID列表(不能为 null 以及 empty)
 */
List<T> selectBatchIds(@Param(Constants.COLLECTION) Collection<? extends Serializable> idList);
示例:
java
@Test
public void testSelectBatchIds() {
    List<TableUser> users = tableUserMapper.selectBatchIds(Arrays.asList(1L, 2L, 4L, 5L));
    System.out.println("根据id批量查询结果:" + users);
}
selectOne - 查询单条记录
源码方法定义:
java
/**
 * 根据 entity 条件,查询一条记录
 * <p>查询一条记录,例如 qw.last("limit 1") 限制取一条记录, 注意:多条数据会报异常</p>
 *
 * @param queryWrapper 实体对象封装操作类(可以为 null)
 */
default T selectOne(@Param(Constants.WRAPPER) Wrapper<T> queryWrapper)
示例:
java
@Test
public void testSelectOne() {
    // 创建查询条件
    QueryWrapper<TableUser> wrapper = new QueryWrapper<>();
    wrapper.eq("name", "Tom");
    // 根据条件查询一条数据,如果结果超过一条会报错
    TableUser user = tableUserMapper.selectOne(wrapper);
    System.out.println("查询结果:" + user);
}
selectCount - 查询总记录数
源码方法定义:
java
/**
 * 根据 Wrapper 条件,查询总记录数
 *
 * @param queryWrapper 实体对象封装操作类(可以为 null)
 */
Long selectCount(@Param(Constants.WRAPPER) Wrapper<T> queryWrapper);
示例:
java
@Test
public void testSelectCount() {
    // 创建查询条件
    QueryWrapper<TableUser> wrapper = new QueryWrapper<>();
    wrapper.ge("age", 21); // 查询年龄大于等于21
    // 根据条件查询数据条数
    Long count = tableUserMapper.selectCount(wrapper);
    System.out.println("查询总记录数:" + count);
}
selectList - 条件查询
源码方法定义:
java
/**
 * 根据 entity 条件,查询全部记录
 *
 * @param queryWrapper 实体对象封装操作类(可以为 null)
 */
List<T> selectList(@Param(Constants.WRAPPER) Wrapper<T> queryWrapper);
示例:
java
/* 条件查询记录 */
@Test
public void testSelectList() {
    // 方式1:创建 QueryWrapper 查询条件
    QueryWrapper<TableUser> wrapper = new QueryWrapper<>();
    wrapper.ge("age", 21); // 查询年龄大于等于21
    // 根据条件查询数据
    List<TableUser> users = tableUserMapper.selectList(wrapper);
    System.out.println("QueryWrapper 查询结果:" + users);

    // 方式1:创建 lambdaQuery 查询条件
    List<User> userList = userMapper.selectList(Wrappers.<User>lambdaQuery().select(User::getId, User::getName));
    // 上面是查询所有记录,但只返回id与name属性
    System.out.println("LambdaQueryWrapper 查询结果:" + userList);
}
selectPage - 分页查询
源码方法定义:
java
/**
 * 根据 entity 条件,查询全部记录(并翻页)
 *
 * @param page         分页查询条件(可以为 RowBounds.DEFAULT)
 * @param queryWrapper 实体对象封装操作类(可以为 null)
 */
<P extends IPage<T>> P selectPage(P page, @Param(Constants.WRAPPER) Wrapper<T> queryWrapper);
使用 MyBatis-Plus 进行分页查询操作,需要在项目中启动类(或者配置类)创建分页插件,并注册到 spring 的 ioc 容器中。更多分页插件详细用法,详见《分页插件》章节
java
@Configuration
@MapperScan("com.moon.mybatisplus.mapper")
public class MybatisPlusConfig {
    // 创建MyBatis-Plus的分页插件(旧版)
    /*@Bean
    public PaginationInterceptor paginationInterceptor() {
        PaginationInterceptor paginationInterceptor = new PaginationInterceptor();
        // 设置请求的页面大于最大页后操作, true调回到首页,false 继续请求  默认false
        // paginationInterceptor.setOverflow(false);
        // 设置最大单页限制数量,默认 500 条,-1 不受限制
        // paginationInterceptor.setLimit(500);
        // 开启 count 的 join 优化,只针对部分 left join
        paginationInterceptor.setCountSqlParser(new JsqlParserCountOptimize(true));
        return paginationInterceptor;
    }*/

    /**
     * 创建MyBatis-Plus的分页插件,注册到spring ioc容器中 (最新版)
     *
     * @return
     */
    @Bean
    public MybatisPlusInterceptor mybatisPlusInterceptor() {
        MybatisPlusInterceptor interceptor = new MybatisPlusInterceptor();
        interceptor.addInnerInterceptor(new PaginationInnerInterceptor(DbType.MYSQL));
        return interceptor;
    }
}
示例:
java
@Test
public void testSelectPage() {
    // 创建 QueryWrapper 查询条件
    QueryWrapper<User> wrapper = new QueryWrapper<>();
    wrapper.ge("age", 21); // 查询年龄大于等于21
    // 创建分页对象
    Page<User> page = new Page<>(1, 2);
    // 根据条件分页查询数据
    IPage<User> iPage = userMapper.selectPage(page, wrapper);
    System.out.println("数据总条数:" + iPage.getTotal());
    System.out.println("总页数:" + iPage.getPages());
    List<User> users = iPage.getRecords();
    for (User user : users) {
        System.out.println("user = " + user);
    }
}
通用 Service CRUD 封装
Mybatis-Plus 为了开发更加快捷,对业务层也进行了封装,直接提供了相关的接口和实现类。在进行业务层开发时,可以继承 MP 提供的接口和实现类,使得编码更加高效。
IService 接口概述
com.baomidou.mybatisplus.extension.service.IService,该接口是一个泛型接口,里面提供了很多方法,包括基本的增删改查。
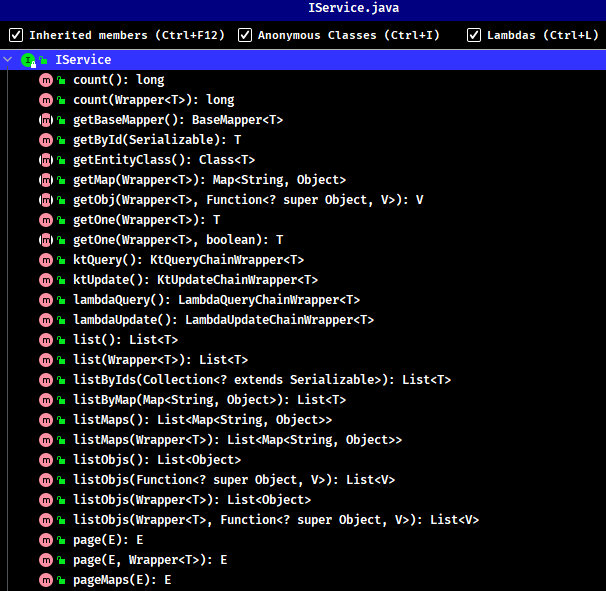
说明:
- 通用 Service CRUD 封装
IService接口,进一步封装 CRUD 采用get 查询单行、remove 删除、list 查询集合、page 分页。前缀命名方式区分Mapper层避免混淆 - 泛型
T为任意实体对象 - 建议如果存在自定义通用
Service方法的可能,请创建自己的IBaseService继承 Mybatis-Plus 提供的基类 - 对象
Wrapper为条件构造器
ServiceImpl 实现类
com.baomidou.mybatisplus.extension.service.impl.ServiceImpl 类是 MP 提供的 IService 接口实现类,该类实现了上面接口中的所有方法
接口方法
新增操作 (Save)
java
// 插入一条记录(选择字段,策略插入)
boolean save(T entity);
// 插入(批量)
boolean saveBatch(Collection<T> entityList);
// 插入(批量)
boolean saveBatch(Collection<T> entityList, int batchSize);
参数说明:
| 类型 | 参数名 | 参数名 |
|---|---|---|
T | entity | 实体对象 |
Collection<T> | entityList | 实体对象集合 |
int | batchSize | 插入批次数量 |
新增或更新操作 (SaveOrUpdate)
java
// TableId 注解存在更新记录,否插入一条记录
boolean saveOrUpdate(T entity);
// 根据updateWrapper尝试更新,否继续执行saveOrUpdate(T)方法
boolean saveOrUpdate(T entity, Wrapper<T> updateWrapper);
// 批量修改插入
boolean saveOrUpdateBatch(Collection<T> entityList);
// 批量修改插入
boolean saveOrUpdateBatch(Collection<T> entityList, int batchSize);
参数说明:
| 类型 | 参数名 | 参数名 |
|---|---|---|
T | entity | 实体对象 |
Wrapper<T> | updateWrapper | 实体对象封装操作类 UpdateWrapper |
Collection<T> | entityList | 实体对象集合 |
int | batchSize | 插入批次数量 |
更新操作 (Update)
java
// 根据 UpdateWrapper 条件,更新记录 需要设置sqlset
boolean update(Wrapper<T> updateWrapper);
// 根据 whereWrapper 条件,更新记录
boolean update(T updateEntity, Wrapper<T> whereWrapper);
// 根据 ID 选择修改
boolean updateById(T entity);
// 根据ID 批量更新
boolean updateBatchById(Collection<T> entityList);
// 根据ID 批量更新
boolean updateBatchById(Collection<T> entityList, int batchSize);
参数说明:
| 类型 | 参数名 | 参数名 |
|---|---|---|
Wrapper<T> | updateWrapper | 实体对象封装操作类 UpdateWrapper |
T | entity | 实体对象 |
Collection<T> | entityList | 实体对象集合 |
int | batchSize | 插入批次数量 |
删除操作 (Remove)
java
// 根据 entity 条件,删除记录
boolean remove(Wrapper<T> queryWrapper);
// 根据 ID 删除
boolean removeById(Serializable id);
// 根据 columnMap 条件,删除记录
boolean removeByMap(Map<String, Object> columnMap);
// 删除(根据ID 批量删除)
boolean removeByIds(Collection<? extends Serializable> idList);
参数说明:
| 类型 | 参数名 | 参数名 |
|---|---|---|
Wrapper<T> | queryWrapper | 实体包装类 QueryWrapper |
Serializable | id | 主键 ID |
Map<String, Object> | columnMap | 表字段 map 对象 |
Collection<? extends Serializable> | idList | 主键 ID 列表 |
查询单个操作 (Get)
java
// 根据 ID 查询
T getById(Serializable id);
// 根据 Wrapper,查询一条记录。结果集,如果是多个会抛出异常,随机取一条加上限制条件 wrapper.last("LIMIT 1")
T getOne(Wrapper<T> queryWrapper);
// 根据 Wrapper,查询一条记录
T getOne(Wrapper<T> queryWrapper, boolean throwEx);
// 根据 Wrapper,查询一条记录
Map<String, Object> getMap(Wrapper<T> queryWrapper);
// 根据 Wrapper,查询一条记录
<V> V getObj(Wrapper<T> queryWrapper, Function<? super Object, V> mapper);
参数说明:
| 类型 | 参数名 | 参数名 |
|---|---|---|
Serializable | id | 主键 ID |
Wrapper<T> | queryWrapper | 实体包装类 QueryWrapper |
boolean | throwEx | 有多个 result 是否抛出异常 |
T | entity | 实体对象 |
Function<? super Object, V> | mapper | 转换函数 |
查询多个操作 (List)
java
// 查询所有
List<T> list();
// 查询列表
List<T> list(Wrapper<T> queryWrapper);
// 查询(根据ID 批量查询)
Collection<T> listByIds(Collection<? extends Serializable> idList);
// 查询(根据 columnMap 条件)
Collection<T> listByMap(Map<String, Object> columnMap);
// 查询所有列表
List<Map<String, Object>> listMaps();
// 查询列表
List<Map<String, Object>> listMaps(Wrapper<T> queryWrapper);
// 查询全部记录
List<Object> listObjs();
// 查询全部记录
<V> List<V> listObjs(Function<? super Object, V> mapper);
// 根据 Wrapper 条件,查询全部记录
List<Object> listObjs(Wrapper<T> queryWrapper);
// 根据 Wrapper 条件,查询全部记录
<V> List<V> listObjs(Wrapper<T> queryWrapper, Function<? super Object, V> mapper);
参数说明:
| 类型 | 参数名 | 参数名 |
|---|---|---|
Wrapper<T> | queryWrapper | 实体对象封装操作类 QueryWrapper |
Collection<? extends Serializable> | idList | 主键 ID 列表 |
Map<String, Object> | columnMap | 表字段 map 对象 |
Function<? super Object, V> | mapper | 转换函数 |
分页操作 (Page)
java
// 无条件分页查询
IPage<T> page(IPage<T> page);
// 条件分页查询
IPage<T> page(IPage<T> page, Wrapper<T> queryWrapper);
// 无条件分页查询
IPage<Map<String, Object>> pageMaps(IPage<T> page);
// 条件分页查询
IPage<Map<String, Object>> pageMaps(IPage<T> page, Wrapper<T> queryWrapper);
参数说明:
| 类型 | 参数名 | 参数名 |
|---|---|---|
IPage<T> | page | 翻页对象 |
Wrapper<T> | queryWrapper | 实体对象封装操作类 QueryWrapper |
聚合统计操作 (Count)
java
// 查询总记录数
int count();
// 根据 Wrapper 条件,查询总记录数
int count(Wrapper<T> queryWrapper);
参数说明:
| 类型 | 参数名 | 参数名 |
|---|---|---|
Wrapper<T> | queryWrapper | 实体对象封装操作类 QueryWrapper |
链式操作(Chain)
query 查询
java
// 链式查询 普通
QueryChainWrapper<T> query();
// 链式查询 lambda 式。注意:不支持 Kotlin
LambdaQueryChainWrapper<T> lambdaQuery();
示例:
java
query().eq("column", value).one();
lambdaQuery().eq(Entity::getId, value).list();
update 更新
java
// 链式更改 普通
UpdateChainWrapper<T> update();
// 链式更改 lambda 式。注意:不支持 Kotlin
LambdaUpdateChainWrapper<T> lambdaUpdate();
示例:
java
update().eq("column", value).remove();
lambdaUpdate().eq(Entity::getId, value).update(entity);
基础使用测试
以用户表为示例
- 创建 mapper 接口,继承 MP 的
BaseMapper接口
java
public interface UserMapper extends BaseMapper<User> {
}- 自定义业务层接口,继承
IService<T>接口
java
// 此接口需要继承 IService 接口,否则使用接口注入的时候就无法调用相关基础方法
public interface IUserService extends IService<User> {
    // 此接口中可以自定义相关的业务方法...
}- 创建业务层实现类,继承
ServiceImpl<M extends BaseMapper<T>, T>类
java
@Service
public class UserServiceImpl extends ServiceImpl<UserMapper, User> implements IUserService {
}- 测试
java
@SpringBootTest
public class ServiceCrudTest {

    @Autowired
    private IUserService userService;

    /* 新增操作 */
    @Test
    public void testSave() {
        User user = new User();
        user.setName("石原里美");
        user.setAge(24);
        user.setEmail("aaaa@moon.com");
        user.setRoleId(1L);

        // 方法返回是否成功布尔值
        boolean result = userService.save(user);
        System.out.println("是否新增成功:" + result);
    }

    /* 批量新增操作 */
    @Test
    public void testSaveBatch() {
        List<User> list = new ArrayList<>();
        for (int i = 1; i < 11; i++) {
            User user = new User();
            user.setName("石原里美" + i);
            user.setAge(24 + i);
            user.setEmail("aaaa@moon.com");
            user.setRoleId(1L);
            list.add(user);
        }

        // 方法返回是否成功布尔值
        boolean result = userService.saveBatch(list);
        System.out.println("是否批量新增成功:" + result);
    }

    /* 新增或者更新操作 */
    @Test
    public void testSaveOrUpdate() {
        User user = new User();
        user.setId(101L);
        user.setName("天锁斩月");
        user.setAge(25);
        user.setEmail("moon@moon.com");
        user.setRoleId(1L);

        // 方法返回是否成功布尔值
        boolean result = userService.saveOrUpdate(user);
        System.out.println("是否新增/更新成功:" + result);
    }

    /* 根据id更新操作 */
    @Test
    public void testUpdateById() {
        User user = new User();
        user.setId(20L);
        user.setName("香风智乃");
        user.setRoleId(3L);

        // 方法返回是否成功布尔值
        boolean result = userService.updateById(user);
        System.out.println("是否更新成功:" + result);
    }

    /* 根据 id 删除操作 */
    @Test
    public void testRemoveById() {
        User user = new User();
        user.setId(13L);

        // 方法返回是否成功布尔值
        boolean result = userService.removeById(user);
        System.out.println("是否删除成功:" + result);
    }

    /* 根据条件删除操作 */
    @Test
    public void testRemove() {
        QueryWrapper<User> wrapper = new QueryWrapper<>();
        wrapper.ge("age", 27);

        // 方法返回是否成功布尔值
        boolean result = userService.remove(wrapper);
        System.out.println("是否删除成功:" + result);
    }

    /* 查询单个操作 */
    @Test
    public void testGetById() {
        User user = new User();
        user.setId(11L);

        // 方法返回查询对象
        User result = userService.getById(user);
        System.out.println(result);
    }

    /* 根据条件查询单个操作 */
    @Test
    public void testGetOne() {
        QueryWrapper<User> wrapper = new QueryWrapper<>();
        wrapper.eq("id", 102L);

        // 查询一条记录。结果集,如果是多个会抛出异常,随机取一条加上限制条件 wrapper.last("LIMIT 1")
        User result = userService.getOne(wrapper);
        System.out.println(result);
    }

    /* 根据条件查询多个操作 */
    @Test
    public void testList() {
        QueryWrapper<User> wrapper = new QueryWrapper<>();
        wrapper.le("age", 23);

        // 返回多条记录
        List<User> list = userService.list(wrapper);
        if (!CollectionUtils.isEmpty(list)) {
            list.forEach(System.out::println);
        }
    }

    /* 根据条件分页查询多个操作 */
    @Test
    public void testPage() {
        QueryWrapper<User> wrapper = new QueryWrapper<>();
        wrapper.le("age", 23);

        Page<User> page = new Page<>(1, 2);

        // 返回分页多条记录
        IPage<User> list = userService.page(page, wrapper);
        if (!CollectionUtils.isEmpty(list.getRecords())) {
            list.getRecords().forEach(System.out::println);
        }
    }

    /* 聚合统计操作 */
    @Test
    public void testCount() {
        QueryWrapper<User> wrapper = new QueryWrapper<>();
        wrapper.le("age", 23);

        // 返回记录数
        long count = userService.count(wrapper);
        System.out.println("记录数:" + count);
    }

    /* 链式查询操作 */
    @Test
    public void testQuery() {
        List<User> list = userService.query().le("age", 24).list();
        if (!CollectionUtils.isEmpty(list)) {
            list.forEach(System.out::println);
        }
    }
}
注解(!整理中)
此章节介绍 MybatisPlus 注解包相关类详解(注解类包:mybatis-plus-annotation)
@TableName
描述:表名注解,用于实体类上
| 属性 | 类型 | 必须指定 | 默认值 | 描述 |
|---|---|---|---|---|
value | String | 否 | "" | 表名 |
schema | String | 否 | "" | schema |
keepGlobalPrefix | boolean | 否 | false | 是否保持使用全局的 tablePrefix 的值(如果设置了全局 tablePrefix 且自行设置了 value 的值) |
resultMap | String | 否 | "" | xml 中 resultMap 的 id |
autoResultMap | boolean | 否 | false | 是否自动构建 resultMap 并使用(如果设置 resultMap 则不会进行 resultMap 的自动构建并注入) |
excludeProperty | String[] | 否 | {} | 需要排除的属性名(@since 3.3.1) |
@TableField
描述:实体类字段注解(非主键)
| 属性 | 类型 | 必须指定 | 默认值 | 描述 |
|---|---|---|---|---|
value | String | 否 | "" | 数据库字段名 |
el | String | 否 | "" | 映射为原生 #{ ... } 逻辑,相当于写在 xml 里的 #{ ... } 部分 |
exist | boolean | 否 | true | 是否为数据库表字段 |
condition | String | 否 | "" | 字段 where 实体查询比较条件,有值设置则按设置的值为准,没有则为默认全局的 %s=#{%s} |
update | String | 否 | "" | 字段 update set 部分注入, 例如update="%s+1":表示更新时会set version=version+1(该属性优先级高于 el 属性) |
insertStrategy | Enum | 否 | DEFAULT | 举例:NOT_NULL: insert into table_a(<if test="columnProperty != null">column</if>) values (<if test="columnProperty != null">#{columnProperty}</if>) |
updateStrategy | Enum | 否 | DEFAULT | 举例:IGNORED: update table_a set column=#{columnProperty} |
whereStrategy | Enum | 否 | DEFAULT | 举例:NOT_EMPTY: where <if test="columnProperty != null and columnProperty!=''">column=#{columnProperty}</if> |
fill | Enum | 否 | FieldFill.DEFAULT | 字段自动填充策略 |
select | boolean | 否 | true | 是否进行 select 查询 |
keepGlobalFormat | boolean | 否 | false | 是否保持使用全局的 format 进行处理 |
jdbcType | JdbcType | 否 | JdbcType.UNDEFINED | JDBC 类型 (该默认值不代表会按照该值生效) |
typeHandler | Class<? extends TypeHandler> | 否 | UnknownTypeHandler.class | 类型处理器 (该默认值不代表会按照该值生效) |
numericScale | String | 否 | "" | 指定小数点后保留的位数 |
关于
jdbcType和typeHandler以及numericScale的说明:
numericScale只生效于 update 的 sql。jdbcType和typeHandler如果不配合@TableName#autoResultMap = true一起使用,也只生效于 update 的 sql。对于typeHandler如果你的字段类型和 set 进去的类型为equals关系,则只需要让你的typeHandler让 Mybatis 加载到即可,不需要使用注解
@Version(opens new window)
描述:乐观锁注解、标记 @Verison 在字段上
@EnumValue(opens new window)
描述:通枚举类注解(注解在枚举字段上)
配置
虽然在 MybatisPlus 中可以实现零配置,但是有些时候需要自定义一些配置,就需要使用 Mybatis 原生的一些配置文件方式了。在 MyBatis-Plus 中有大量的配置,其中有一部分是 Mybatis 原生的配置,另一部分是 MyBatis-Plus 的配置。
更详细配置参考官方文档:https://baomidou.com/config/
基本配置
configLocation
MyBatis 配置文件位置,如果您有单独的 MyBatis 配置,请将其路径配置到 configLocation 中。 MyBatis Configuration 的具体内容请参考 MyBatis 官方文档
- Spring Boot 配置:
properties
mybatis-plus.config-location = classpath:mybatis-config.xml- Spring MVC 配置:
xml
<bean id="sqlSessionFactory" class="com.baomidou.mybatisplus.extension.spring.MybatisSqlSessionFactoryBean">
    <property name="configLocation" value="classpath:mybatis-config.xml"/>
</bean>
mapperLocations
- 类型:
String[] - 默认值:
["classpath*:/mapper/**/*.xml"]
MyBatis Mapper 所对应的 XML 文件位置,如果在 Mapper 中有自定义方法(XML 中有自定义实现),需要进行该配置,告诉 Mapper 所对应的 XML 文件位置。
Spring Boot:
properties
mybatis-plus.mapper-locations = classpath*:mybatis/*.xmlSpring MVC:
xml
<bean id="sqlSessionFactory" class="com.baomidou.mybatisplus.extension.spring.MybatisSqlSessionFactoryBean">
    <property name="mapperLocations" value="classpath*:mybatis/*.xml"/>
</bean>注意:Maven 多模块项目的扫描路径需以
classpath*:开头 (即加载多个 jar 包下的 XML 文件)
测试:
UserMapper.xml:
xml
<?xml version="1.0" encoding="UTF-8" ?>
<!DOCTYPE mapper
        PUBLIC "-//mybatis.org//DTD Mapper 3.0//EN"
        "http://mybatis.org/dtd/mybatis-3-mapper.dtd">
<mapper namespace="com.moon.mybatisplus.mapper.UserMapper">

    <select id="findById" resultType="com.moon.mybatisplus.entity.User">
        select * from user where id = #{id}
    </select>

</mapper>
java
package com.moon.mybatisplus.mapper;

import com.moon.mybatisplus.pojo.User;
import com.baomidou.mybatisplus.core.mapper.BaseMapper;

public interface UserMapper extends BaseMapper<User> {
    User findById(Long id);
}
测试用例:
java
@RunWith(SpringRunner.class)
@SpringBootTest
public class UserMapperTest {
    @Autowired
    private UserMapper userMapper;

    @Test
    public void testSelectPage() {
        User user = this.userMapper.findById(2L);
        System.out.println(user);

    }
}
typeAliasesPackage
MyBaits 别名包扫描路径,通过该属性可以给包中的类注册别名,注册后在 Mapper 对应的 XML 文件中可以直接使用类名,而不用使用全限定的类名(即 XML 中调用的时候不用包含包名)。
Spring Boot:
properties
mybatis-plus.type-aliases-package = com.moon.mybatisplus.pojoSpring MVC:
xml
<bean id="sqlSessionFactory" class="com.baomidou.mybatisplus.extension.spring.MybatisSqlSessionFactoryBean">
    <property name="typeAliasesPackage" value="com.baomidou.mybatisplus.samples.quickstart.entity"/>
</bean>
Configuration
本部分(Configuration)的配置大都为 MyBatis 原生支持的配置,这意味着您可以通过 MyBatis XML 配置文件的形式进行配置。
mapUnderscoreToCamelCase
- 类型:
boolean - 默认值:
true
是否开启自动驼峰命名规则(camel case)映射,即从经典数据库列名 A_COLUMN(下划线命名) 到经典 Java 属性名 aColumn(驼峰命名) 的类似映射。
注意
此属性在 MyBatis 中原默认值为
false,在 MyBatis-Plus 中,此属性也将用于生成最终的 SQL 的 select body如果数据库命名符合规则无需使用
@TableField注解指定数据库字段名
示例(Spring Boot):
properties
#关闭自动驼峰映射,该参数不能和mybatis-plus.config-location同时存在
mybatis-plus.configuration.map-underscore-to-camel-case=false
cacheEnabled
- 类型:
boolean - 默认值:
true
全局地开启或关闭配置文件中的所有映射器已经配置的任何缓存(Mybatis 二级缓存),默认为true。
示例(Spring Boot):
properties
mybatis-plus.configuration.cache-enabled=falseDbConfig(DB 策略配置)
idType
- 类型:
com.baomidou.mybatisplus.annotation.IdType - 默认值:
ASSIGN_ID
全局默认主键类型。设置后,即可省略实体对象中的@TableId(type = IdType.AUTO)配置。
示例(SpringBoot):
properties
mybatis-plus.global-config.db-config.id-type=auto示例(SpringMVC):
xml
<!-- 这里使用MP提供的sqlSessionFactory,完成了Spring与MP的整合 -->
<bean id="sqlSessionFactory" class="com.baomidou.mybatisplus.extension.spring.MybatisSqlSessionFactoryBean">
    <property name="dataSource" ref="dataSource"/>
    <property name="globalConfig">
        <bean class="com.baomidou.mybatisplus.core.config.GlobalConfig">
            <property name="dbConfig">
                <bean class="com.baomidou.mybatisplus.core.config.GlobalConfig$DbConfig">
                    <property name="idType" value="AUTO"/>
                </bean>
            </property>
        </bean>
    </property>
</bean>
tablePrefix
- 类型:
String - 默认值:
null
表名前缀。全局配置后可省略@TableName()配置。
示例(SpringBoot):
properties
mybatis-plus.global-config.db-config.table-prefix=tb_示例(SpringMVC):
xml
<bean id="sqlSessionFactory" class="com.baomidou.mybatisplus.extension.spring.MybatisSqlSessionFactoryBean">
    <property name="dataSource" ref="dataSource"/>
    <property name="globalConfig">
        <bean class="com.baomidou.mybatisplus.core.config.GlobalConfig">
            <property name="dbConfig">
                <bean class="com.baomidou.mybatisplus.core.config.GlobalConfig$DbConfig">
                    <property name="idType" value="AUTO"/>
                    <property name="tablePrefix" value="tb_"/>
                </bean>
            </property>
        </bean>
    </property>
</bean>
Wrapper 条件构造器
在 MP 中,Wrapper接口的实现类AbstractWrapper和AbstractChainWrapper,其关系如下:
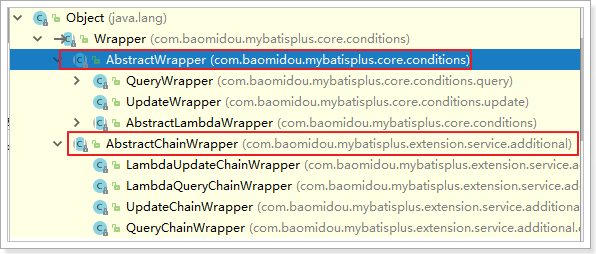
说明:
- 以下出现的第一个入参
boolean condition表示该条件是否加入最后生成的 sql 中,例如:query.like(StringUtils.isNotBlank(name), Entity::getName, name).eq(age!=null && age >= 0, Entity::getAge, age)- 以下代码块内的多个方法均为从上往下补全个别
boolean类型的入参,默认为true- 以下出现的泛型
Param均为Wrapper的子类实例(均具有AbstractWrapper的所有方法)- 以下方法在入参中出现的
R为泛型,在普通 wrapper 中是 String,在LambdaWrapper中是函数(例:Entity::getId,Entity 为实体类,getId为字段 id 的 getMethod)- 以下方法入参中的 R column 均表示数据库字段,当 R 具体类型为 String 时则为数据库字段名(字段名是数据库关键字的自己用转义符包裹!)!而不是实体类数据字段名!!!,另当 R 具体类型为 SFunction 时项目 runtime 不支持 eclipse 自家的编译器!!!
- 以下举例均为使用普通 wrapper,入参为 Map 和 List 的均以 json 形式表现!
- 使用中如果入参的 Map 或者 List 为空,则不会加入最后生成的 sql 中!!!
AbstractWrapper
注意:
QueryWrapper(LambdaQueryWrapper) 和UpdateWrapper(LambdaUpdateWrapper) 的父类。用于生成 sql 的where条件,entity 属性也用于生成 sql 的 where 条件。- 注意: entity 生成的 where 条件与 使用各个 api 生成的 where 条件没有任何关联行为
官方文档地址:https://baomidou.com/guide/wrapper.html#abstractwrapper
全匹配 allEq
allEq方法定义:
java
allEq(Map<R, V> params)
allEq(Map<R, V> params, boolean null2IsNull)
allEq(boolean condition, Map<R, V> params, boolean null2IsNull)
allEq(BiPredicate<R, V> filter, Map<R, V> params)
allEq(BiPredicate<R, V> filter, Map<R, V> params, boolean null2IsNull)
allEq(boolean condition, BiPredicate<R, V> filter, Map<R, V> params, boolean null2IsNull)- 此方法代表,全部条件为
eq(或个别isNull) - 个别参数说明:
params:key为数据库字段名,value为字段值null2IsNull:为true则在 map 的value为null时调用isNull方法,为false时则忽略value为null的情况filter:过滤函数,是否允许字段传入比对条件中params与null2IsNull:同上
- 示例:
- 例 1:
allEq({id:1, name:"老王", age:null})--->id = 1 and name = '老王' and age is null - 例 2:
allEq({id:1, name:"老王", age:null}, false)--->id = 1 and name = '老王' - 例 3:
allEq((k,v) -> k.indexOf("a") >= 0, {id:1, name:"老王", age:null})--->name = '老王' and age is null - 例 4:
allEq((k,v) -> k.indexOf("a") >= 0, {id:1, name:"老王", age:null}, false)--->name = '老王'
- 例 1:
使用示例:
java
@Test
public void testAllEq() {
    // 创建QueryWrapper条件查询器
    QueryWrapper<User> wrapper = new QueryWrapper<>();
    // 设置查询条件
    Map<String, Object> params = new HashMap<>();
    params.put("name", "石原里美");
    params.put("age", "24");
    params.put("email", null);

    // allEq(Map<R, V> params)
    // wrapper.allEq(params); // 相当于 name = ? AND age = ? AND email IS NULL

    // allEq(Map<R, V> params, boolean null2IsNull)
    // wrapper.allEq(params, false); // 相当于 name = ? AND age = ?

    // allEq(boolean condition, Map<R, V> params, boolean null2IsNull)
    // wrapper.allEq(false, params, false); // condition设置为false,代表条件都不加入最后生成的sql中,相当于无查询条件

    // allEq(BiPredicate<R, V> filter, Map<R, V> params)
    // allEq(BiPredicate<R, V> filter, Map<R, V> params, boolean null2IsNull)
    // allEq(boolean condition, BiPredicate<R, V> filter, Map<R, V> params, boolean null2IsNull)
    wrapper.allEq((k, v) -> k.equals("age"), params); // 过滤key为age的查询条件,相当于 age = ?

    List<User> users = userMapper.selectList(wrapper);
    for (User user : users) {
        System.out.println(user);
    }
}
基本比较操作
| 方法定义 | 含义 | 示例 |
|---|---|---|
eq | 等于 = | eq("name", "老王")--->name = '老王' |
ne | 不等于 <> | ne("name", "老王")--->name <> '老王' |
gt | 大于 > | gt("age", 18)--->age > 18 |
ge | 大于等于 >= | ge("age", 18)--->age >= 18 |
lt | 小于 < | lt("age", 18)--->age < 18 |
le | 小于等于 <= | le("age", 18)--->age <= 18 |
between | BETWEEN 值 1 AND 值 2 | between("age", 18, 30)--->age between 18 and 30 |
notBetween | NOT BETWEEN 值 1 AND 值 2 | notBetween("age", 18, 30)--->age not between 18 and 30 |
in | 字段 IN (值 1, 值 2, ...) | in("age", 1, 2, 3)--->age in (1,2,3) |
notIn | 字段 NOT IN (值 1, 值 2, ...) | notIn("age", 1, 2, 3)--->age not in (1,2,3) |
使用示例:
java
@Test
public void testBasicQuery() {
    // 等于 =
    List<User> users = userMapper.selectList(new QueryWrapper<User>().eq("age", 24));
    forEachPrint(users);

    // 不等于 <>
    List<User> users1 = userMapper.selectList(new QueryWrapper<User>().ne("name", "石原里美"));
    forEachPrint(users1);

    // 大于 >
    List<User> users2 = userMapper.selectList(new QueryWrapper<User>().gt("age", 21));
    forEachPrint(users2);

    // 大于等于 >=
    List<User> users3 = userMapper.selectList(new QueryWrapper<User>().ge("age", 21));
    forEachPrint(users3);

    // 小于 <
    List<User> users4 = userMapper.selectList(new QueryWrapper<User>().lt("age", 21));
    forEachPrint(users4);

    // 小于等于 <=
    List<User> users5 = userMapper.selectList(new QueryWrapper<User>().le("age", 21));
    forEachPrint(users5);

    // BETWEEN 值1 AND 值2
    List<User> users6 = userMapper.selectList(new QueryWrapper<User>().between("age", 20, 28));
    forEachPrint(users6);

    // NOT BETWEEN 值1 AND 值2
    List<User> users7 = userMapper.selectList(new QueryWrapper<User>().notBetween("age", 20, 28));
    forEachPrint(users7);

    // IN (值1, 值2, ...)
    List<User> users8 = userMapper.selectList(new QueryWrapper<User>().in("age", 20, 24));
    forEachPrint(users8);

    // NOT IN (值1, 值2, ...)
    List<User> users9 = userMapper.selectList(new QueryWrapper<User>().notIn("age", 20, 24));
    forEachPrint(users9);

    // 多个基本操作符连接使用
    List<User> users10 = userMapper.selectList(new QueryWrapper<User>()
            .between("role_id", 1, 4)
            .gt("age", 20)
            .ne("name", "Tom")); // sql: SELECT * FROM user WHERE (role_id BETWEEN 1 AND 4 AND age > 20 AND name <> 'Tom'
    forEachPrint(users10);
}
模糊查询
| 方法定义 | 含义 | 示例 |
|---|---|---|
like | LIKE '%值%' | like("name", "王")--->name like '%王%' |
notLike | NOT LIKE '%值%' | notLike("name", "王")--->name not like '%王%' |
likeLeft | LIKE '%值' | likeLeft("name", "王")--->name like '%王' |
likeRight | LIKE '值%' | likeRight("name", "王")--->name like '王%' |
使用示例:
java
排序
| 方法定义 | 含义 | 示例 |
|---|---|---|
orderBy | ORDER BY 字段, ... | orderBy(true, true, "id", "name")--->order by id ASC,name ASC |
orderByAsc | ORDER BY 字段, ... ASC | orderByAsc("id", "name")--->order by id ASC,name ASC |
orderByDesc | ORDER BY 字段, ... DESC | orderByDesc("id", "name")--->order by id DESC,name DESC |
使用示例:
java
@Test
public void testOrderQuery() {
    // ORDER BY 字段, ...
    List<User> users = userMapper.selectList(new QueryWrapper<User>().orderBy(true, false, Arrays.asList("name", "age")));
    forEachPrint(users);

    // ORDER BY 字段, ... ASC
    List<User> users1 = userMapper.selectList(new QueryWrapper<User>().orderByAsc(Arrays.asList("age", "name")));
    forEachPrint(users1);

    // ORDER BY 字段, ... DESC
    List<User> users2 = userMapper.selectList(new QueryWrapper<User>().orderByDesc(Arrays.asList("name", "age")));
    forEachPrint(users2);
}
逻辑查询
| 方法定义 | 含义 | 示例 |
|---|---|---|
or | 拼接 OR OR 嵌套 | eq("id",1).or().eq("name","老王")--->id = 1 or name = '老王'or(i -> i.eq("name", "李白").ne("status", "活着"))--->or (name = '李白' and status <> '活着') |
and | AND 嵌套 | and(i -> i.eq("name", "李白").ne("status", "活着"))--->and (name = '李白' and status <> '活着') |
使用示例:
java
@Test
public void testOrQuery() {
    // 拼接 OR
    // SELECT * FROM user WHERE (name = 'Sandy' OR age = 24)
    List<User> users = userMapper.selectList(new QueryWrapper<User>().eq("name", "Sandy").or().eq("age", 24));
    forEachPrint(users);

    // OR 嵌套
    // SELECT * FROM user WHERE (age > 21 OR (role_id BETWEEN 1 AND 4 AND name = 'Jack'))
    List<User> users1 = userMapper.selectList(new QueryWrapper<User>()
            .gt("age", 21)
            .or(i -> i.between("role_id", 1, 4).eq("name", "Jack")));
    forEachPrint(users1);
}

@Test
public void testAndQuery() {
    // AND 嵌套
    // SELECT * FROM user WHERE (age > 21 AND (role_id BETWEEN 1 AND 4 AND name = 'Tom'))
    List<User> users = userMapper.selectList(new QueryWrapper<User>()
            .gt("age", 21)
            .and(i -> i.between("role_id", 1, 4).eq("name", "Tom")));
    forEachPrint(users);
}
QueryWrapper
说明:继承自AbstractWrapper,自身的内部属性 entity 也用于生成 where 条件及 LambdaQueryWrapper,可以通过 new QueryWrapper().lambda() 方法获取
select 设置查询字段
java
select(String... sqlSelect)
select(Predicate<TableFieldInfo> predicate)
select(Class<T> entityClass, Predicate<TableFieldInfo> predicate)
在 MP 查询中,默认查询所有的字段,如果有需要也可以通过select方法进行指定字段。说明:以上方法分为两类。第二类方法为:过滤查询字段(主键除外),入参不包含 class 的调用前需要wrapper内的entity属性有值!这两类方法重复调用以最后一次为准
使用示例:
java
@Test
public void testSelect() {
    // 创建QueryWrapper条件查询器
    QueryWrapper<User> wrapper = new QueryWrapper<>();
    // 设置需查询的字段
    wrapper.select("id", "name").between("age", 20, 29)
            .orderByDesc("age");
    forEachPrint(userMapper.selectList(wrapper));
}
ActiveRecord
什么是 ActiveRecord
ActiveRecord 也属于 ORM(对象关系映射)层,由 Rails 最早提出,遵循标准的 ORM 模型:表映射到记录,记录映射到对象,字段映射到对象属性。配合遵循的命名和配置惯例,能够很大程度的快速实现模型的操作,而且简洁易懂。
ActiveRecord 的主要思想是:
- 每一个数据库表对应创建一个类,类的每一个对象实例对应于数据库中表的一行记录;通常表的每个字段在类中都有相应的 Field
- ActiveRecord 同时负责把自己持久化,在 ActiveRecord 中封装了对数据库的访问,即 CURD
- ActiveRecord 是一种领域模型(Domain Model),封装了部分业务逻辑
开启 ActiveRecord
在 MP 中,使用 ActiveRecord 只需要将相应的表实体类继承 com.baomidou.mybatisplus.extension.activerecord.Model 类即可。如:
java
/*
 *  MybatisPlus 要实现 ActiveRecord 的功能,
 *  需要继承 com.baomidou.mybatisplus.extension.activerecord.Model
 */
@EqualsAndHashCode(callSuper = true)
@Data
@Accessors(chain = true)
public class User extends Model<User> {

    private static final long serialVersionUID = 5734014396574993178L;

    // 配置主键生成策略
    @TableId(value = "id", type = IdType.AUTO)
    private Long id;
    private String name;
    private Integer age;
    private String email;
    private Long roleId;

    /**
     * 主键值。重写此方法
     * AR 模式这个必须有,否则 xxById 的方法都将失效!
     * 另外 UserMapper 也必须 AR 依赖该层注入,有可无 XML
     */
    @Override
    public Serializable pkVal() {
        return id;
    }
}
值得注意是:官方示例中,AR 模式必须需要有
pkVal方法,否则原 xxById 等方法会失效。
使用 ActiveRecord 示例
java
/**
 * ActiveRecord 新增
 */
@Test
public void testActiveRecordInsert() {
    User user = new User();
    user.setName("sunny")
            .setAge(25)
            .setEmail("miemie@moon.com")
            .setRoleId(1L);

    // 测试使用 ActiveRecord 新增数据
    Assertions.assertTrue(user.insert());
    // 新增成功后,可以直接成实体对象中获取主键 ID
    System.err.println("\n插入成功 ID 为:" + user.getId());
}

/**
 * ActiveRecord 根据 id 删除
 */
@Test
public void testActiveRecordDeleteById() {
    User user = new User();
    user.setId(7L);

    // 测试使用 ActiveRecord 根据id删除数据
    Assertions.assertTrue(user.deleteById());
}

/**
 * ActiveRecord 条件删除
 */
@Test
public void testActiveRecordDeleteByWrapper() {
    // 创建查询条件
    Wrapper<User> wrapper = new QueryWrapper<User>()
            .lambda()
            .eq(User::getName, "sunny");

    // 测试使用 ActiveRecord 根据条件删除数据
    Assertions.assertTrue(new User().delete(wrapper));
}

/**
 * ActiveRecord 根据 id 更新
 */
@Test
public void testActiveRecordUpdateById() {
    User user = new User();
    user.setId(11L).setName("长泽雅美").setRoleId(2L);

    // 测试使用 ActiveRecord 根据id更新数据
    Assertions.assertTrue(user.updateById());
}

/**
 * ActiveRecord 条件更新
 */
@Test
public void testActiveRecordUpdateByWrapper() {
    // 创建查询条件
    Wrapper<User> wrapper = new UpdateWrapper<User>()
            .lambda()
            .set(User::getAge, 18)
            .eq(User::getId, 11L);

    // 测试使用 ActiveRecord 根据条件删除数据
    Assertions.assertTrue(new User().update(wrapper));
}

/**
 * ActiveRecord 查询
 */
@Test
public void testActiveRecordQuery() {
    /* 根据id查询 */
    User user = new User().setId(11L);
    System.out.println(user.selectById());

    /* 根据条件查询 */
    Wrapper<User> wrapper = new QueryWrapper<User>().lambda().gt(User::getAge, 20);
    List<User> users = user.selectList(wrapper);
    users.forEach(System.out::println);
}
注:测试时可观察控制台中的最终生成的 sql 语句
Oracle 主键 Sequence
在 Oracle 数据库中,主键不能使用自增长了,需要使用 Sequence 序列生成 id 值
Oracle 数据库环境搭建
部署 Oracle 测试环境
使用 Docker 环境进行部署安装 Oracle
bash
#拉取镜像
docker pull sath89/oracle-12c

#创建容器
docker create --name oracle -p 1521:1521 sath89/oracle-12c

#启动
docker start oracle && docker logs -f oracle
连接 Oracle 数据库图形化客户端推荐使用 navicat12 的 oracle 版本,或者 PLSQL Developer
需要注意的是:由于安装的 Oracle 是 64 位版本,所以 navicat 也是需要使用 64 为版本,否则连接不成功。
创建表以及序列
sql
--创建表,表名以及字段名都要大写
CREATE TABLE "TB_USER" (
    "ID" NUMBER(20) VISIBLE NOT NULL ,
    "USER_NAME" VARCHAR2(255 BYTE) VISIBLE ,
    "PASSWORD" VARCHAR2(255 BYTE) VISIBLE ,
    "NAME" VARCHAR2(255 BYTE) VISIBLE ,
    "AGE" NUMBER(10) VISIBLE ,
    "EMAIL" VARCHAR2(255 BYTE) VISIBLE
)

--创建序列
CREATE SEQUENCE SEQ_USER START WITH 1 INCREMENT BY 1
安装 Oracle 驱动包到 maven 本地仓库
由于版权原因,不能直接通过 maven 的中央仓库下载 oracle 数据库的 jdbc 驱动包,所以手动需要将驱动包安装到本地仓库。maven 安装命令如下:
bash
mvn install:install-file -DgroupId=com.oracle -DartifactId=ojdbc8 -Dversion=12.1.0.1 -Dpackaging=jar -Dfile=ojdbc8.jar安装包在本地 [数据库驱动-oracle] 目录中
安装完成后的相应的 maven 坐标:
xml
<dependency>
    <groupId>com.oracle</groupId>
    <artifactId>ojdbc8</artifactId>
    <version>12.1.0.1</version>
</dependency>
修改数据库连接配置
yml
spring:
  datasource: # DataSource Config
    driver-class-name: oracle.jdbc.OracleDriver
    url: jdbc:oracle:thin:@192.168.96.111:1521:orcl
    username: root
    password: 123456
修改主键的生成策略
主键生成策略必须使用INPUT
- 修改全局配置(application.yml),增加主键生成策略
yml
mybatis-plus:
  # 配置 id 的生成策略
  global-config:
    db-config:
      id-type: input
properties
#id生成策略
mybatis-plus.global-config.db-config.id-type=input- 也可以单独相应的表实体类,通过
@TableId注解指定主键生成策略
java
@KeySequence(value = "SEQ_ORACLE_STRING_KEY", clazz = String.class)
public class YourEntity {

    @TableId(value = "ID_STR", type = IdType.INPUT)
    private String idStr;

}
配置序列生成器
在项目中,配置 MP 的序列生成器,并添加到 Spring 容器中。MP 内置支持:
DB2KeyGeneratorH2KeyGeneratorKingbaseKeyGeneratorOracleKeyGeneratorPostgreKeyGenerator
如果内置支持不满足你的需求,可实现IKeyGenerator接口来进行扩展
方式 1: Spring xml 配置
xml
<bean id="globalConfig" class="com.baomidou.mybatisplus.core.config.GlobalConfig">
   <property name="dbConfig" ref="dbConfig"/>
</bean>

<bean id="dbConfig" class="com.baomidou.mybatisplus.core.config.GlobalConfig.DbConfig">
   <property name="keyGenerator" ref="keyGenerator"/>
</bean>

<bean id="keyGenerator" class="com.baomidou.mybatisplus.extension.incrementer.H2KeyGenerator"/>
方式 2: 使用配置类
java
@Configuration
public class MybatisPlusConfig {
    /**
     * sequence主键,需要配置一个主键生成器
     * 配合实体类注解 {@link KeySequence} + {@link TableId} type=INPUT
     * @return
     */
    @Bean
    public OracleKeyGenerator oracleKeyGenerator(){
        return new OracleKeyGenerator();
    }
}
方式 3: 通过 MybatisPlusPropertiesCustomizer 自定义
java
@Bean
public MybatisPlusPropertiesCustomizer plusPropertiesCustomizer() {
    return plusProperties -> plusProperties.getGlobalConfig().getDbConfig().setKeyGenerator(new OracleKeyGenerator());
}
配置 @KeySequence 注解指定序列名称
实体类配置主键 Sequence 名称。
java
@TableName("TB_USER")
@Data
/*
 * @KeySequence 注解用于指定序列的名称
 * 3.1.2 版本后, clazz 属性自动匹配,无需指定,后面也移除了该属性
 *      @KeySequence(value = "SEQ_USER", clazz = String.class)
 */
@KeySequence(value = "SEQ_USER")
public class User {
    // 配置主键生成策略,必须使用 INPUT
    @TableId(value = "id", type = IdType.INPUT)
    private Long id;
    ....
}
注意事项:
- 支持父类定义
@KeySequence,子类使用,这样就可以几个表共用一个 Sequence。如果主键是String类型的,也可以使用 - oracle 的 sequence 返回的是
Long类型,如果主键类型是Integer,可能会引起ClassCastException
测试
java
@Test
public void testSequenceGenerate() {
    User user = new User();
    user.setAge(18);
    user.setEmail("test@moon.com");
    user.setName("sequence");
    userMapper.insert(user);
    Long id1 = user.getId();
    System.out.println(id1);
    Assertions.assertTrue(id1 >= 1000, "sequence start with 1000");

    user = new User();
    user.setAge(19);
    user.setEmail("test2@moon.com");
    user.setName("sequence2");
    userMapper.insert(user);
    Long id2 = user.getId();
    Assertions.assertTrue(id2 - id1 == 1, "squence increment by 1");
}
底层实现(了解)
mybatis 原生提供了接口。MP 提供的现实类 com.baomidou.mybatisplus.core.metadata.TableInfoHelper
java
/**
 * 自定义 KEY 生成器
 */
public static KeyGenerator genKeyGenerator(TableInfo tableInfo, MapperBuilderAssistant builderAssistant,
                                           String baseStatementId, LanguageDriver languageDriver) {
    IKeyGenerator keyGenerator = GlobalConfigUtils.getKeyGenerator(builderAssistant.getConfiguration());
    if (null == keyGenerator) {
        throw new IllegalArgumentException("not configure IKeyGenerator implementation class.");
    }
    String id = baseStatementId + SelectKeyGenerator.SELECT_KEY_SUFFIX;
    Class<?> resultTypeClass = tableInfo.getKeySequence().clazz();
    StatementType statementType = StatementType.PREPARED;
    String keyProperty = tableInfo.getKeyProperty();
    String keyColumn = tableInfo.getKeyColumn();
    SqlSource sqlSource = languageDriver.createSqlSource(builderAssistant.getConfiguration(),
        keyGenerator.executeSql(tableInfo.getKeySequence().value()), null);
    builderAssistant.addMappedStatement(id, sqlSource, statementType, SqlCommandType.SELECT, null, null, null,
        null, null, resultTypeClass, null, false, false, false,
        new NoKeyGenerator(), keyProperty, keyColumn, null, languageDriver, null);
    id = builderAssistant.applyCurrentNamespace(id, false);
    MappedStatement keyStatement = builderAssistant.getConfiguration().getMappedStatement(id, false);
    SelectKeyGenerator selectKeyGenerator = new SelectKeyGenerator(keyStatement, true);
    builderAssistant.getConfiguration().addKeyGenerator(id, selectKeyGenerator);
    return selectKeyGenerator;
}- 通过反射获取到实体的
@KeySequence注解,继而能拿到定义的Sequence序列名 - 然后产生
SelectKeyGenerator对象,这个对象是 mybatis 原生的主键生成器 - 将
SelectKeyGenerator绑定到insert/insertBatch的statement上面 - 通过上述 3 步,就完成了自动注入主键生成的 SQL
SelectKeyGenerator对象是 mybatis 原生的主键生成器, 会在:执行 sql 之前调用主键生成器的方法获取主键结果,插入到 insert 语句中;在执行成功之后把主键的值回塞到实体对象中,这样我们只需通过对象的 getId()方法就可以获取到主键值
Sql 注入器
在 MP 中,通过 AbstractSqlInjector 将 BaseMapper 中的方法注入到了 Mybatis 容器,基础的增删改查方法才可以正常执行。
如果想扩展 BaseMapper 中的方法,有以下两个步骤:
- 编写自定义的
Mapper接口,继承BaseMapper接口,在此自定义接口中新增一些方法,然后其他的Mapper接口都继承这个自定义Mapper接口即可,这样实现了统一的扩展。 - 编写自定义方法的逻辑处理类,继承抽象类
AbstractMethod,实现injectMappedStatement方法,此方法就是自定义方法处理逻辑 - 继承 MP 框架的
ISqlInjector接口默认实现类DefaultSqlInjector,重写getMethodList方法,增加扩展自定义的方法。
SQL 自动注入器接口 ISqlInjector
java
public interface ISqlInjector {
    /**
     * <p>
     * 检查SQL是否注入(已经注入过不再注入)
     * </p>
     *
     * @param builderAssistant mapper 信息
     * @param mapperClass      mapper 接口的 class 对象
     */
    void inspectInject(MapperBuilderAssistant builderAssistant, Class<?> mapperClass);
}
自定义自己的通用方法可以实现接口 ISqlInjector 也可以继承抽象类 AbstractSqlInjector 注入通用方法 SQL 语句,然后继承 BaseMapper 添加自定义方法,全局配置 sqlInjector 注入 MP 会自动将类所有方法注入到 mybatis 容器中。
编写接口继承 BaseMapper
编写 MyBaseMapper 接口(名称自取),此接口继承BaseMapper接口,相应扩展的方法都定义在此接口中。其他的 Mapper 接口都可以继承此 Mapper 接口,这样实现了统一的扩展。
java
/**
 * 扩展 BaseMapper 方法,在此接口中定义相应扩展的方法。
 * 其他 Mapper 继承此接口,也能获取相应的扩展
 */
public interface MyBaseMapper<T> extends BaseMapper<T> {

    List<T> findAll();

    int truncateAll();
}
编写自定义方法实现
自定义的 SQL 处理方法,需要继承 MP 框架的 AbstractMethod 抽象类,重写 injectMappedStatement 抽象方法,在方法中对 SQL 做自定义的处理。
java
public class FindAll extends AbstractMethod {
    /**
     * 注入自定义 MappedStatement
     *
     * @param mapperClass mapper 接口
     * @param modelClass  mapper 泛型
     * @param tableInfo   数据库表反射信息
     * @return MappedStatement
     */
    @Override
    public MappedStatement injectMappedStatement(Class<?> mapperClass, Class<?> modelClass, TableInfo tableInfo) {
        /* 组装待执行的 SQL ,动态 SQL 参考类 SqlMethod */
        // 1. 获取表名
        String tableName = tableInfo.getTableName();
        // 2. 拼接 sql
        String sql = "select * from " + tableName;
        // 3. 定义方法名称,与 mapper 接口方法名一致
        String sqlMethod = "findAll";
        // 4. 获取 sql数据源
        SqlSource sqlSource = languageDriver.createSqlSource(configuration, sql, modelClass);

        /*
         * 5. 返回查询的 MappedStatement
         * 方法参数:
         * Class<?> mapperClass : mapper 接口
         * String id : 方法名
         * SqlSource sqlSource : sql数据源
         * TableInfo table : 表信息
         */
        return this.addSelectMappedStatementForTable(mapperClass, sqlMethod, sqlSource, tableInfo);
    }
}
编写 SqlInjector 的实现
自定义通用方法可以实现接口 ISqlInjector,也可以继承抽象类 AbstractSqlInjector 来注入自定义通用方法。值得注意的是,如果直接继承 AbstractSqlInjector 的话,原有的 BaseMapper 中的方法将失效,所以一般选择继承 MP 的框架提供的默认实现 DefaultSqlInjector 进行扩展。
java
// 将自定义 SQL 注入器加入 Spring 容器中
@Component
/*
 * 如果自定义Injector是继承 AbstractSqlInjector,原有的 BaseMapper 中的方法将失效。
 * 所以选择继承默认实现 DefaultSqlInjector,在其基础上进行扩展
 */
public class MySqlInjector extends DefaultSqlInjector {
    /**
     * 在此方法中加入扩展的自定义方法
     *
     * @param mapperClass
     * @param tableInfo
     * @return
     */
    @Override
    public List<AbstractMethod> getMethodList(Class<?> mapperClass, TableInfo tableInfo) {
        // 1. 获取原有 BaseMapper 中的所有方法
        List<AbstractMethod> methodList = super.getMethodList(mapperClass, tableInfo);

        // 2. 增加自定义方法
        methodList.add(new FindAll());
        methodList.add(new TruncateAll());

        return methodList;
    }
}
注:此类需要注册到 spring 容器中
测试
编写 mapper 接口,继承自定义的 MyBaseMapper 接口
java
public interface UserMapper extends MyBaseMapper<User>测试接口调用自定义方法。
自动填充功能
在 MP 中提供了实现自动填充的功能,插入或者更新数据时,自动填充一些字段的数据。
@TableField 注解的 fill 属性
在实体类中,给需要自动填充的字段添加 @TableField 注解,fill 属性指定生成器的策略
java
public class User {
    // 注意!这里需要标记为填充字段
    @TableField(.. fill = FieldFill.INSERT)
    private String fillField;
    ....
}
fill 属性的取值是 FieldFill 枚举
java
public enum FieldFill {
    /**
     * 默认不处理
     */
    DEFAULT,
    /**
     * 插入时填充字段
     */
    INSERT,
    /**
     * 更新时填充字段
     */
    UPDATE,
    /**
     * 插入和更新时填充字段
     */
    INSERT_UPDATE
}
编写 MetaObjectHandler 的实现
自定义元对象处理器接口 com.baomidou.mybatisplus.core.handlers.MetaObjectHandler 的实现类。
java
@Slf4j
@Component
public class MyMetaObjectHandler implements MetaObjectHandler {

    @Override
    public void insertFill(MetaObject metaObject) {
        log.info("start insert fill ....");
        this.strictInsertFill(metaObject, "createTime", LocalDateTime.class, LocalDateTime.now()); // 起始版本 3.3.0(推荐使用)
        // 或者
        this.strictInsertFill(metaObject, "createTime", () -> LocalDateTime.now(), LocalDateTime.class); // 起始版本 3.3.3(推荐)
        // 或者
        this.fillStrategy(metaObject, "createTime", LocalDateTime.now()); // 也可以使用(3.3.0 该方法有bug)
    }

    @Override
    public void updateFill(MetaObject metaObject) {
        log.info("start update fill ....");
        this.strictUpdateFill(metaObject, "updateTime", LocalDateTime.class, LocalDateTime.now()); // 起始版本 3.3.0(推荐)
        // 或者
        this.strictUpdateFill(metaObject, "updateTime", () -> LocalDateTime.now(), LocalDateTime.class); // 起始版本 3.3.3(推荐)
        // 或者
        this.fillStrategy(metaObject, "updateTime", LocalDateTime.now()); // 也可以使用(3.3.0 该方法有bug)
    }
}
注:自定义处理器需要声明
@Component或@Bean注入 spring 容器中
注意事项
- 填充原理是直接给实体对象的属性设置值!!!
- 注解则是指定该属性在对应情况下必有值,如果无值则入库会是
null MetaObjectHandler提供的默认方法的策略均为:如果属性有值则不覆盖,如果填充值为null则不填充- 自动填充的字段必须声明
@TableField注解,属性fill选择对应策略,该声明告知 Mybatis-Plus 需要预留注入 SQL 字段 - 填充处理器
MyMetaObjectHandler在 Spring Boot 中需要声明@Component或@Bean注入 - 要想根据注解
FieldFill.xxx和字段名以及字段类型来区分必须使用父类的strictInsertFill或者strictUpdateFill方法 - 不需要根据任何来区分可以使用父类的
fillStrategy方法
逻辑删除
逻辑删除就是将数据标记为删除,而并非真正的物理删除(非DELETE操作),查询时需要携带状态条件,确保被标记的数据不被查询到。这样做的目的就是避免数据被真正的删除。
修改全局配置 DbConfig
修改com.baomidou.mybatisplus.core.config.GlobalConfig$DbConfig的配置。例:application.yml
yml
mybatis-plus:
  global-config:
    db-config:
      logic-delete-field: flag # 全局逻辑删除的实体字段名(since 3.3.0,配置后可以忽略不配置步骤2)
      logic-delete-value: 1 # 逻辑已删除值(默认为 1)
      logic-not-delete-value: 0 # 逻辑未删除值(默认为 0)
注:MP 的逻辑删除默认值为:1-已删除 0-未删除。如果表的代表逻辑删除的值与默认值一致,则可以不用修改
GlobalConfig$DbConfig的配置
添加 @TableLogic 注解
mp 实现逻辑删除,需要实体类相应的字段上加上 @TableLogic 注解
java
@TableLogic
private Integer deleted;
配置以上后,可以调用
BaseMapper接口的删除方法,测试是否实现逻辑删除。
特别说明
MP 的逻辑删除功能只对自动注入的 sql 起效,即原BaseMapper的方法与自定义的 SQL 注入器的方法才有效。
- 插入: 不作限制
- 查找: 追加
where条件过滤掉已删除数据,且使用wrapper.entity生成的where条件会忽略该字段 - 更新: 追加
where条件防止更新到已删除数据,且使用wrapper.entity生成的where条件会忽略该字段 - 删除: 转变为 更新操作
例如:
- 删除:
update user set deleted=1 where id = 1 and deleted=0 - 查找:
select id,name,deleted from user where deleted=0
字段类型支持说明:
- 支持所有数据类型(推荐使用
Integer、Boolean、LocalDateTime) - 如果数据库字段使用
datetime,逻辑未删除值和已删除值支持配置为字符串null,另一个值支持配置为函数来获取值如now()
扩展:逻辑删除实质还是代表删除数据,只是为了保存有价值的数据的一种方案。如果经常需要查询这些“已删除”的数据,建议使用一个字段用于表示该记录的状态会更加合理。
通用枚举
MP 提供通用枚举的功能,让 sql 的操作(新增、更新、查询)时,自动将转换相应的枚举值。
声明通用枚举属性
- 方式一:使用
@EnumValue注解枚举属性
java
@Getter
public enum RoleEnum {
    ADMIN(1L, "管理员"),
    CONSUMER(2L, "用户"),
    PROGRAMMER(3L, "程序猿");

    RoleEnum(Long code, String descp) {
        this.code = code;
        this.descp = descp;
    }

    // 标识此属性是数据库相应要转换的
    @EnumValue
    private final Long code;
    private final String descp;

    /**
     * 重写toString,输出的时显示相应的字段描述
     */
    @Override
    public String toString() {
        return this.descp;
    }
}- 方式二:枚举属性,实现
IEnum接口,需要实现getValue抽象方法
java
@Getter
public enum AgeEnum implements IEnum<Integer> {
    SIXTEEN(16, "十六岁"),
    EIGHTTEEN(18, "十八岁"),
    TWENTY(20, "二十岁");

    private final Integer value;
    private final String desc;

    AgeEnum(final Integer value, final String desc) {
        this.value = value;
        this.desc = desc;
    }

    /**
     * 枚举数据库存储值
     */
    @Override
    public Integer getValue() {
        return this.value;
    }

    /**
     * 重写toString,输出的时显示相应的字段描述
     */
    @Override
    public String toString() {
        return this.desc;
    }
}
实体属性使用枚举类型
将实体类相应需要转换的属性改成使用枚举
java
@TableName("user")
@Data
public class User {
    @TableId(value = "id", type = IdType.AUTO)
    private Long id;
    private String name;

    /**
     * IEnum接口的枚举处理
     * 数据库字段:age INT(11)
     */
    private AgeEnum age;
    private String email;

    /**
     * 原生枚举(带{@link com.baomidou.mybatisplus.annotation.EnumValue} 注解)
     * 数据库的值对应该注解对应的属性
     * 数据库字段:role_id BIGINT(20)
     */
    private RoleEnum roleId;
}
配置扫描通用枚举
配置typeEnumsPackage项,扫描通过枚举包的路径
yml
mybatis-plus:
  # 配置扫描通过枚举的包路径。支持统配符 * 或者 ; 分割
  type-enums-package: com.moon.mybatisplus.samples.enums.enums
  configuration:
    # 3.0.8之前版本问题默认将枚举注册为EnumOrdinalTypeHandler,这是错误的方式,默认是 org.apache.ibatis.type.EnumTypeHandler
    # 如果项目之中实体统一使用IEnum或注解的方式,可配置成 com.baomidou.mybatisplus.extension.handlers.EnumTypeHandler,也可省略上面的type-enums-package配置
    # 配置type-enums-package只对注解方式的枚举处理能提前加载缓存.
    default-enum-type-handler: org.apache.ibatis.type.EnumOrdinalTypeHandler
测试
java
/**
 * 测试插入数据时,通用枚举进行替换。
 * 查询数据时,根据值转换成相应枚举。
 */
@Test
public void testInsert() {
    User user = new User();
    user.setName("我是N");
    user.setAge(AgeEnum.EIGHTTEEN);
    user.setRoleId(RoleEnum.PROGRAMMER);

    /*
     * 测试新增,相应的枚举会替换成相应的数值。示例sql如下:
     *   Preparing: INSERT INTO user ( name, age, role_id ) VALUES ( ?, ?, ? )
     *   Parameters: 我是N(String), 18(Integer), 3(Long)
     */
    userMapper.insert(user);
    // 获取新增的记录id,查询刚刚新增的记录
    User userDb = userMapper.selectById(user.getId());
    // 查询时 MP 也会根据数据值替换成相应的枚举
    System.out.println("新增的用户记录:" + userDb);
}

/**
 * 测试查询时,查询条件的通用枚举转换
 */
@Test
public void testQueryWrapper() {
    // 创建查询条件
    LambdaQueryWrapper<User> wrapper = new QueryWrapper<User>()
            .lambda()
            .ge(User::getAge, AgeEnum.EIGHTTEEN)
            .eq(User::getRoleId, RoleEnum.CONSUMER);

    /*
     * 测试查询,查询条件会替换成相应的枚举值。示例sql如下:
     *   Preparing: SELECT id,name,age,email,role_id FROM user WHERE (age >= ? AND role_id = ?)
     *   Parameters: 18(Integer), 2(Long)
     */
    List<User> users = userMapper.selectList(wrapper);
    users.forEach(System.out::println);
}
代码生成器
代码生成器(历史版本)-待整理
示例代码位置:\mybatis-note\mybatis-plus-samples\03-mybatis-plus-generator\mp-generator-previous\
添加依赖
xml
<dependencies>
    <!-- mybatis-plus 代码生成器依赖 -->
    <dependency>
        <groupId>com.baomidou</groupId>
        <artifactId>mybatis-plus-generator</artifactId>
        <version>3.4.1</version>
    </dependency>
    <!--
        添加 模板引擎 依赖,MyBatis-Plus 支持 Velocity(默认)、Freemarker、Beetl,
        用户可以选择自己熟悉的模板引擎,如果都不满足您的要求,可以采用自定义模板引擎。
    -->
    <dependency>
        <groupId>org.freemarker</groupId>
        <artifactId>freemarker</artifactId>
        <version>2.3.31</version>
    </dependency>
    <!-- Velocity(默认):
    <dependency>
        <groupId>org.apache.velocity</groupId>
        <artifactId>velocity-engine-core</artifactId>
        <version>latest-velocity-version</version>
    </dependency>-->
    <!-- Beetl
    <dependency>
        <groupId>com.ibeetl</groupId>
        <artifactId>beetl</artifactId>
        <version>latest-beetl-version</version>
    </dependency> -->
    <!-- mysql 驱动 -->
    <dependency>
        <groupId>mysql</groupId>
        <artifactId>mysql-connector-java</artifactId>
    </dependency>

    <dependency>
        <groupId>ch.qos.logback</groupId>
        <artifactId>logback-classic</artifactId>
    </dependency>
</dependencies>
编写配置
java
/**
 * MyBatis-Plus 的代码生成器,通过 AutoGenerator 可以快速生成 Entity、Mapper、Mapper XML、Service、Controller 等各个模块的代码。
 *
 * @author MooNkirA
 * @version 1.0
 * @date 2021-10-25 17:01
 * @description
 */
public class CodeGenerator {
    /**
     * 读取控制台内容
     */
    public static String scanner(String tip) {
        Scanner scanner = new Scanner(System.in);
        StringBuilder help = new StringBuilder();
        help.append("请输入" + tip + ":");
        System.out.println(help.toString());
        if (scanner.hasNext()) {
            String ipt = scanner.next();
            if (StringUtils.isNotBlank(ipt)) {
                return ipt;
            }
        }
        throw new MybatisPlusException("请输入正确的" + tip + "!");
    }

    /* 执行 main 方法控制台输入模块表名回车自动生成对应项目目录中 */
    public static void main(String[] args) {
        // 代码生成器
        AutoGenerator mpg = new AutoGenerator();

        // 全局配置
        GlobalConfig gc = new GlobalConfig();
        // String projectPath = System.getProperty("user.dir");
        String projectPath = "E:\\00-Downloads\\temp_file\\mp-code-generator";
        gc.setOutputDir(projectPath + "/src/main/java");
        gc.setAuthor("MooNkirA");
        gc.setOpen(false);
        // gc.setSwagger2(true); 实体属性 Swagger2 注解
        mpg.setGlobalConfig(gc);

        // 数据源配置
        DataSourceConfig dsc = new DataSourceConfig();
        dsc.setUrl("jdbc:mysql://localhost:3306/mybatis_plus_sample_db?useUnicode=true&useSSL=false&characterEncoding=utf8");
        // dsc.setSchemaName("public");
        // dsc.setDriverName("com.mysql.jdbc.Driver"); // 过时的
        dsc.setDriverName("com.mysql.cj.jdbc.Driver");
        dsc.setUsername("root");
        dsc.setPassword("123456");
        mpg.setDataSource(dsc);

        // 包配置
        PackageConfig pc = new PackageConfig();
        pc.setModuleName(scanner("模块名"));
        pc.setParent("com.moon");
        mpg.setPackageInfo(pc);

        // 自定义配置
        InjectionConfig cfg = new InjectionConfig() {
            @Override
            public void initMap() {
                // to do nothing
            }
        };

        // 如果模板引擎是 freemarker
        String templatePath = "/templates/mapper.xml.ftl";
        // 如果模板引擎是 velocity
        // String templatePath = "/templates/mapper.xml.vm";

        // 自定义输出配置
        List<FileOutConfig> focList = new ArrayList<>();
        // 自定义配置会被优先输出
        focList.add(new FileOutConfig(templatePath) {
            @Override
            public String outputFile(TableInfo tableInfo) {
                // 自定义输出文件名 , 如果你 Entity 设置了前后缀、此处注意 xml 的名称会跟着发生变化!!
                return projectPath + "/src/main/resources/mapper/" + pc.getModuleName()
                        + "/" + tableInfo.getEntityName() + "Mapper" + StringPool.DOT_XML;
            }
        });
        /*
        cfg.setFileCreate(new IFileCreate() {
            @Override
            public boolean isCreate(ConfigBuilder configBuilder, FileType fileType, String filePath) {
                // 判断自定义文件夹是否需要创建
                checkDir("调用默认方法创建的目录,自定义目录用");
                if (fileType == FileType.MAPPER) {
                    // 已经生成 mapper 文件判断存在,不想重新生成返回 false
                    return !new File(filePath).exists();
                }
                // 允许生成模板文件
                return true;
            }
        });
        */
        cfg.setFileOutConfigList(focList);
        mpg.setCfg(cfg);

        // 配置模板
        TemplateConfig templateConfig = new TemplateConfig();

        // 配置自定义输出模板
        //指定自定义模板路径,注意不要带上.ftl/.vm, 会根据使用的模板引擎自动识别
        // templateConfig.setEntity("templates/entity2.java");
        // templateConfig.setService();
        // templateConfig.setController();

        templateConfig.setXml(null);
        mpg.setTemplate(templateConfig);

        // 策略配置
        StrategyConfig strategy = new StrategyConfig();
        strategy.setNaming(NamingStrategy.underline_to_camel);
        strategy.setColumnNaming(NamingStrategy.underline_to_camel);
        // strategy.setSuperEntityClass("你自己的父类实体,没有就不用设置!");
        strategy.setEntityLombokModel(true);
        strategy.setRestControllerStyle(true);
        // 公共父类
        // strategy.setSuperControllerClass("你自己的父类控制器,没有就不用设置!");
        // 写于父类中的公共字段
        // strategy.setSuperEntityColumns("id");
        strategy.setInclude(scanner("表名,多个英文逗号分割").split(","));
        strategy.setControllerMappingHyphenStyle(true);
        strategy.setTablePrefix(pc.getModuleName() + "_");
        mpg.setStrategy(strategy);
        // 注意!如果您选择了非默认引擎,需要在 AutoGenerator 中 设置模板引擎。
        mpg.setTemplateEngine(new FreemarkerTemplateEngine());
        mpg.execute();
    }
}
代码生成器(3.5.1+版本)
示例代码位置:\mybatis-note\mybatis-plus-samples\03-mybatis-plus-generator\mp-generator-latest\
添加依赖
xml
<dependencies>
    <!-- mybatis-plus 代码生成器依赖 -->
    <dependency>
        <groupId>com.baomidou</groupId>
        <artifactId>mybatis-plus-generator</artifactId>
        <version>3.5.1</version>
    </dependency>

    <dependency>
        <groupId>com.baomidou</groupId>
        <artifactId>mybatis-plus-core</artifactId>
        <version>3.4.3.4</version>
    </dependency>
    <!--
        添加 模板引擎 依赖,MyBatis-Plus 支持 Velocity(默认)、Freemarker、Beetl,
        用户可以选择自己熟悉的模板引擎,如果都不满足您的要求,可以采用自定义模板引擎。
    -->
    <dependency>
        <groupId>org.freemarker</groupId>
        <artifactId>freemarker</artifactId>
        <version>2.3.31</version>
    </dependency>
    <!-- Velocity(默认):
    <dependency>
        <groupId>org.apache.velocity</groupId>
        <artifactId>velocity-engine-core</artifactId>
        <version>latest-velocity-version</version>
    </dependency>-->
    <!-- Beetl
    <dependency>
        <groupId>com.ibeetl</groupId>
        <artifactId>beetl</artifactId>
        <version>latest-beetl-version</version>
    </dependency> -->
    <!-- mysql 驱动 -->
    <dependency>
        <groupId>mysql</groupId>
        <artifactId>mysql-connector-java</artifactId>
    </dependency>

    <dependency>
        <groupId>ch.qos.logback</groupId>
        <artifactId>logback-classic</artifactId>
    </dependency>
</dependencies>
编写配置
java
/**
 * MyBatis-Plus 的代码生成器(3.5.1+版本),通过 AutoGenerator 可以快速生成 Entity、Mapper、Mapper XML、Service、Controller 等各个模块的代码。
 *
 * @author MooNkirA
 * @version 1.0
 * @date 2021-10-26 13:58
 * @description
 */
public class MpFastAutoGenerator {

    /**
     * 执行初始化数据库脚本
     */
    public static void before() throws SQLException {
        /*Connection conn = DATA_SOURCE_CONFIG.build().getConn();
        InputStream inputStream = H2CodeGeneratorTest.class.getResourceAsStream("/sql/init.sql");
        ScriptRunner scriptRunner = new ScriptRunner(conn);
        scriptRunner.setAutoCommit(true);
        scriptRunner.runScript(new InputStreamReader(inputStream));
        conn.close();*/
    }

    /**
     * 数据源配置
     */
    private static final DataSourceConfig.Builder DATA_SOURCE_CONFIG = new DataSourceConfig
            .Builder("jdbc:mysql://localhost:3306/mybatis_plus_sample_db?useUnicode=true&useSSL=false&characterEncoding=utf8", "root", "123456");

    /**
     * 执行 run
     */
    public static void main(String[] args) throws SQLException {
        before();
        FastAutoGenerator.create(DATA_SOURCE_CONFIG)
                // 全局配置
                .globalConfig((scanner, builder) -> {
                    builder.author(scanner.apply("请输入作者名称?")) // 设置作者
                            // .enableSwagger() // 开启 swagger 模式
                            .fileOverride() // 覆盖已生成文件
                            .outputDir("E://00-Downloads/temp_file/mp-code-generator/src/main/java");
                })
                // 包配置
                .packageConfig((scanner, builder) -> builder.parent(scanner.apply("请输入包名?")))
                // 策略配置
                .strategyConfig(builder -> builder.addInclude("user"))
                /*
                    模板引擎配置,默认 Velocity 可选模板引擎 Beetl 或 Freemarker
                   .templateEngine(new BeetlTemplateEngine())
                 */
                .templateEngine(new FreemarkerTemplateEngine())
                .execute();
    }
}
MyBatis 插件
mybatis 的插件机制
MyBatis 允许在已映射语句执行过程中的某一点进行拦截调用。默认情况下,MyBatis 允许使用插件来拦截的方法调用包括:
- Executor (update, query, flushStatements, commit, rollback, getTransaction, close, isClosed)
- ParameterHandler (getParameterObject, setParameters)
- ResultSetHandler (handleResultSets, handleOutputParameters)
- StatementHandler (prepare, parameterize, batch, update, query)
可以拦截Executor接口的部分方法,比如update,query,commit,rollback等方法,还有其他接口的一些方法等。
总结:
- 拦截执行器的方法
- 拦截参数的处理
- 拦截结果集的处理
- 拦截 Sql 语法构建的处理
详细插件执行机制详见《MyBatis 源码笔记》的『插件模块源码分析』章节
MybatisPlusInterceptor 核心插件
该插件是 MP 核心插件,目前代理了 Executor#query 和 Executor#update 和 StatementHandler#prepare 方法
PaginationInnerInterceptor 分页插件
配置依赖
xml
<dependencies>
    <dependency>
        <groupId>org.springframework.boot</groupId>
        <artifactId>spring-boot-starter</artifactId>
         <version>latest-version</version>
    </dependency>
    <dependency>
        <groupId>mysql</groupId>
        <artifactId>mysql-connector-java</artifactId>
        <scope>runtime</scope>
        <version>latest-version</version>
    </dependency>
    <dependency>
        <groupId>com.baomidou</groupId>
        <artifactId>mybatis-plus-boot-starter</artifactId>
        <version>latest-version</version>
    </dependency>
</dependencies>
配置分页插件
spring xml 方式
xml
<!-- spring xml 方式 -->
<property name="plugins">
    <array>
        <bean class="com.baomidou.mybatisplus.extension.plugins.PaginationInterceptor">
            <property name="sqlParser" ref="自定义解析类、可以没有"/>
            <property name="dialectClazz" value="自定义方言类、可以没有"/>
            <!-- COUNT SQL 解析.可以没有 -->
            <property name="countSqlParser" ref="countSqlParser"/>
        </bean>
    </array>
</property>

<bean id="countSqlParser" class="com.baomidou.mybatisplus.extension.plugins.pagination.optimize.JsqlParserCountOptimize">
    <!-- 设置为 true 可以优化部分 left join 的sql -->
    <property name="optimizeJoin" value="true"/>
</bean>
Spring boot 方式
- 通过
@Bean注解配置新版分页插件加入到 spring 容器
java
@Configuration
@MapperScan("com.moon.mybatisplus.samples.pagination.mapper")
public class MybatisPlusConfig {
    // MyBatis-Plus的分页插件(旧版)
    /*@Bean
    public PaginationInterceptor paginationInterceptor() {
        PaginationInterceptor paginationInterceptor = new PaginationInterceptor();
        // 设置请求的页面大于最大页后操作, true调回到首页,false 继续请求  默认false
        // paginationInterceptor.setOverflow(false);
        // 设置最大单页限制数量,默认 500 条,-1 不受限制
        // paginationInterceptor.setLimit(500);
        // 开启 count 的 join 优化,只针对部分 left join
        paginationInterceptor.setCountSqlParser(new JsqlParserCountOptimize(true));
        return paginationInterceptor;
    }*/

    /**
     * 新的分页插件,一缓和二缓遵循mybatis的规则,需要设置 MybatisConfiguration#useDeprecatedExecutor = false
     * 避免缓存出现问题(该属性会在旧插件移除后一同移除)
     */
    @Bean
    public MybatisPlusInterceptor mybatisPlusInterceptor() {
        MybatisPlusInterceptor interceptor = new MybatisPlusInterceptor();
        PaginationInnerInterceptor mysqlPaginationInterceptor = new PaginationInnerInterceptor(DbType.MYSQL); // 此示例使用MySQL数据库
        // mysqlPaginationInterceptor.setOverflow(true); // 溢出总页数后是否进行处理(默认为false,不处理,可参考 插件#continuePage 方法)
        // mysqlPaginationInterceptor.setMaxLimit(1024L); // 单页分页条数限制(默认无限制,可参考 插件#handlerLimit 方法)
        // mysqlPaginationInterceptor.setDbType(DbType.MYSQL); // 数据库类型(根据类型获取应使用的分页方言,可参考 插件#findIDialect 方法)
        // mysqlPaginationInterceptor.setDialect(new MySqlDialect()); // 方言实现类(可参考 插件#findIDialect 方法)
        interceptor.addInnerInterceptor(mysqlPaginationInterceptor);
        return interceptor;
    }
}- 如果有配置 mapper 的 xml 映射文件,需要配置映射文件的位置
yml
spring:
  # DataSource Config
  datasource:
    driver-class-name: com.mysql.cj.jdbc.Driver
    url: jdbc:mysql://127.0.0.1:3306/mybatis_plus_sample_db?useSSL=false&useUnicode=true&characterEncoding=UTF-8
    username: root
    password: 123456

# MyBatis-Plus 配置
logging: # Logger Config
  level:
    com.moon.mybatisplus.samples.pagination.mapper: debug

mybatis-plus:
  mapper-locations: classpath:/mapper/*Mapper.xml
基于 BaseMapper 基础分页示例
java
/**
 * BaseMapper 自带分页测试
 */
@Test
public void testBaseMapperPagination() {
    // 创建分页对象
    Page<User> page = new Page<>(1, 2);
    printPageInfo(userMapper.selectPage(page, Wrappers.<User>lambdaQuery().gt(User::getAge, 19)));
}

/**
 * 测试分页只查询当前页的记录,不查询总记录数
 */
@Test
public void testPaginationNotSearchCount() {
    // 使用三参数的构造器创建Page对象
    // 第三个参数searchCount:传true则查询总记录数;传false则不查询总记录数(即不进行count查询)
    Page<User> page = new Page<>(1, 2, false);
    // 因为没有进行count查询,getTotal方法返回值为0
    printPageInfo(userMapper.selectPage(page, Wrappers.<User>lambdaQuery().gt(User::getAge, 19)));
}


private <T> void printPageInfo(Page<T> page) {
    if (page == null) {
        return;
    }
    System.out.println("总条数 -----> " + page.getTotal()); // 因为没有进行count查询,getTotal值为0
    System.out.println("当前页数 -----> " + page.getCurrent());
    System.out.println("当前每页显示数 -----> " + page.getSize());
    page.getRecords().forEach(System.out::println);
}
PaginationInnerInterceptor 分页插件相关属性介绍
| 属性名 | 类型 | 默认值 | 描述 |
|---|---|---|---|
overflow | boolean | false | 溢出总页数后是否进行处理(默认不处理,参见 插件#continuePage 方法) |
maxLimit | Long | 单页分页条数限制(默认无限制,参见 插件#handlerLimit 方法) | |
dbType | DbType | 数据库类型(根据类型获取应使用的分页方言,参见 插件#findIDialect 方法) | |
dialect | IDialect | 方言实现类(参见 插件#findIDialect 方法) |
建议单一数据库类型的均设置 dbType
自定义 mapper 接口分页查询
自定义分页方法的入参与出参的说明
- 如果返回类型是
IPage则入参的IPage不能为null,因为返回的IPage == 入参的IPage
java
IPage<User> selectByIPage(IPage<?> page, ...其他参数);- 如果返回类型是
List则入参的IPage可以为null(为null则不分页),但需要手动入参的IPage.setRecords(返回的List);
java
List<User> selectByIPage(IPage<User> page, ...其他参数);- 自定义分页对象,继承
Page<T>
java
MyPage selectByIPage(MyPage page, ...其他参数);注:如果 xml 需要从
page里取值,需要page.属性获取
自定义 mapper 接口分页示例
- 自定义分页类
java
@Data
@EqualsAndHashCode(callSuper = true)
public class MyPage<T> extends Page<T> {
    private static final long serialVersionUID = -344650460219713271L;

    private String name;

    public MyPage(long current, long size) {
        super(current, size);
    }
}- 在 mapper 接口定义分页查询的相关接口
java
/**
 * 自定义 mapper 方法分页。
 * 如果返回类型是 IPage 则入参的 IPage 不能为null,因为 返回的IPage == 入参的IPage
 *
 * @param page
 * @return
 */
IPage<User> selectReturnIPage(IPage<User> page, String name);

/**
 * 自定义 mapper 方法分页。
 * 如果返回类型是 List 则入参的 IPage 可以为 null(为 null 则不分页),但需要你手动 入参的IPage.setRecords(返回的 List);
 *
 * @param page
 * @return
 */
List<User> selectByIPage(IPage<User> page);

/**
 * 自定义分页对象
 *
 * @param myPage
 * @return
 */
MyPage<User> selectByMyPage(MyPage<User> myPage);- mapper 接口的映射文件,等同于编写一个普通 list 查询,mybatis-plus 会自动分页
xml
<select id="selectReturnIPage" resultType="com.moon.mybatisplus.samples.pagination.entity.User">
    select * from user
    <where>
        <if test="name!=null and name!=''">
            name like #{name}
        </if>
    </where>
</select>

<select id="selectByIPage" resultType="com.moon.mybatisplus.samples.pagination.entity.User">
    select * from user
    <where>
        <if test="name!=null and name!=''">
            name like #{name}
        </if>
    </where>
</select>

<select id="selectByMyPage" resultType="com.moon.mybatisplus.samples.pagination.entity.User">
    select * from user
    <where>
        <if test="name!=null and name!=''">
            name like CONCAT('%', #{name}, '%')
        </if>
    </where>
</select>- 测试示例
java
/**
 * 自定义的 mapper 方法使用分页,入参为IPage,返回IPage
 */
@Test
public void testSelectReturnIPage() {
    IPage<User> page = new Page<>(1, 2);
    // 如果返回类型是 IPage 则入参的 IPage 不能为null,因为 返回的IPage == 入参的IPage
    // 不进行 count sql 优化,解决 MP 无法自动优化 SQL 问题,这时候你需要自己查询 count 部分
    // page.setOptimizeCountSql(false);
    // 当 total 为小于 0 或者设置 setSearchCount(false) 分页插件不会进行 count 查询
    // 要点!! 分页返回的对象与传入的对象是同一个
    IPage<User> users = userMapper.selectReturnIPage(page, "%a%");
    printPageInfo(users);
}

/**
 * 自定义的 mapper 方法使用分页,入参为IPage,返回List
 */
@Test
public void testSelectByIPage() {
    IPage<User> page = new Page<User>(1, 2) {
        private static final long serialVersionUID = 6954054104022283002L;
        private String name = "%a%";

        public String getName() {
            return name;
        }

        public void setName(String name) {
            this.name = name;
        }
    };

    List<User> users = userMapper.selectByIPage(page);
    users.forEach(System.out::println);
    System.out.println("list.size=" + users.size());
    System.out.println("page.total=" + page.getTotal());
}

/**
 * 自定义的 mapper 方法使用分页,入参与返回均使用自定义分页对象
 */
@Test
public void testSelectByMyPage() {
    MyPage<User> page = new MyPage<>(1, 2);
    page.setName("%");

    MyPage<User> users = userMapper.selectByMyPage(page);
    users.getRecords().forEach(System.out::println);
    System.out.println("page.total=" + page.getTotal());
}
Pagehelper 分页助手
MP 除了框架自己本身的分页插件之外,也可以引入第三方的 Pagehelper 分页助手
配置依赖
xml
<dependencies>
    <dependency>
        <groupId>org.springframework.boot</groupId>
        <artifactId>spring-boot-starter</artifactId>
    </dependency>
    <dependency>
        <groupId>com.baomidou</groupId>
        <artifactId>mybatis-plus-boot-starter</artifactId>
        <!-- pagehelper 包含该依赖存在版本冲突,因此不建议和 mp 一起混用 -->
        <exclusions>
            <exclusion>
                <groupId>com.github.jsqlparser</groupId>
                <artifactId>jsqlparser</artifactId>
            </exclusion>
        </exclusions>
    </dependency>
    <dependency>
        <groupId>com.github.pagehelper</groupId>
        <artifactId>pagehelper</artifactId>
        <version>5.1.11</version>
    </dependency>
    <dependency>
        <groupId>mysql</groupId>
        <artifactId>mysql-connector-java</artifactId>
        <scope>runtime</scope>
    </dependency>
</dependencies>
配置分页插件
java
@Configuration
public class MybatisPlusConfig {
    /**
     * pagehelper的分页插件。
     * mp 的分页插件(MybatisPlusInterceptor)与 pagehelper 存在依赖 jsqlparser 冲突,不建议混用
     */
    @Bean
    public PageInterceptor pageInterceptor() {
        return new PageInterceptor();
    }
}
测试示例
示例直接使用BaseMapper的基础操作测试
java
@Test
public void testPagehelperBasic() {
    // 开启分页
    PageHelper.startPage(1, 2);
    PageInfo<User> users = new PageInfo<>(userMapper.selectList(new QueryWrapper<User>().gt("age", 20)));
    System.out.println("总页数pages:" + users.getPages());
    System.out.println("总记录数total:" + users.getTotal());
    users.getList().forEach(System.out::println);
}

@Test
public void testDoSelectPageInfo() {
    // 开启分页
    PageInfo<User> users = PageHelper.startPage(1, 2)
            .doSelectPageInfo(() -> userMapper.selectList(new QueryWrapper<User>().gt("age", 20)));
    System.out.println("总页数pages:" + users.getPages());
    System.out.println("总记录数total:" + users.getTotal());
    users.getList().forEach(System.out::println);
}
执行 SQL 分析插件
在 MP 中提供了对 SQL 执行的分析的插件SqlExplainInterceptor,可用作阻断全表更新、删除的操作。
Notes: 该插件仅适用于开发环境,不适用于生产环境。
在项目配置类中创建相应的插件(拦截器):
java
@Bean
public SqlExplainInterceptor sqlExplainInterceptor(){
    SqlExplainInterceptor sqlExplainInterceptor = new SqlExplainInterceptor();
    List<ISqlParser> sqlParserList = new ArrayList<>();
    // 攻击 SQL 阻断解析器、加入解析链
    sqlParserList.add(new BlockAttackSqlParser());
    sqlExplainInterceptor.setSqlParserList(sqlParserList);
    return sqlExplainInterceptor;
}官方示例所配置的插件BlockAttackInnerInterceptor,此插件针对 update 和 delete 语句。作用:阻止恶意的全表更新删除。
java
/**
 * 增加 MP 内置的执行分析插件 BlockAttackInnerInterceptor(攻击 SQL 阻断解析器),防止全表更新与删除
 *
 * @return
 */
@Bean
public MybatisPlusInterceptor mybatisPlusInterceptor() {
    MybatisPlusInterceptor interceptor = new MybatisPlusInterceptor();
    interceptor.addInnerInterceptor(new BlockAttackInnerInterceptor());
    return interceptor;
}
测试时进行一些全表的操作,观察是否被阻断。
性能分析插件
性能分析拦截器,用于输出每条 SQL 语句及其执行时间,可以设置最大执行时间,超过时间会抛出异常。
该插件只用于开发环境,不建议生产环境使用。
在全局配置文件中配置增加拦截器:
xml
<?xml version="1.0" encoding="UTF-8" ?>
<!DOCTYPE configuration
    PUBLIC "-//mybatis.org//DTD Config 3.0//EN"
    "http://mybatis.org/dtd/mybatis-3-config.dtd">
<configuration>
    <plugins>
        <!-- SQL 执行性能分析,开发环境使用,线上不推荐。 maxTime 指的是 sql 最大执行时长 -->
        <plugin interceptor="com.baomidou.mybatisplus.extension.plugins.PerformanceInterceptor">
            <property name="maxTime" value="100" />
            <!--SQL是否格式化 默认false-->
            <property name="format" value="true" />
        </plugin>
    </plugins>
</configuration>
以上示例中,如果 sql 执行时间为 11ms。那将maxTime设置为 1,那么,该操作会抛出异常。
注意:以上插件在 3.1.1 版本中生效,3.4.3.4 版本已无此插件
乐观锁插件
乐观锁实现方式
- 取出记录时,获取当前 version 字段值
- 执行更新时,使用版本做为条件。
set version = newVersion where version = oldVersion - 如果 version 不对,就更新失败
乐观锁插件配置
spring xml 方式:
xml
<bean class="com.baomidou.mybatisplus.extension.plugins.inner.OptimisticLockerInnerInterceptor" id="optimisticLockerInnerInterceptor"/>

<bean id="mybatisPlusInterceptor" class="com.baomidou.mybatisplus.extension.plugins.MybatisPlusInterceptor">
    <property name="interceptors">
        <list>
            <ref bean="optimisticLockerInnerInterceptor"/>
        </list>
    </property>
</bean>
spring boot 注解方式:
java
@Configuration
public class MybatisPlusConfig {
    /**
     * 旧版配置乐观锁插件 OptimisticLockerInterceptor
     */
    /*@Bean
    public OptimisticLockerInterceptor optimisticLockerInterceptor() {
        return new OptimisticLockerInterceptor();
    }*/

    /**
     * 新版,配置乐观锁插件 OptimisticLockerInnerInterceptor
     */
    @Bean
    public MybatisPlusInterceptor mybatisPlusInterceptor() {
        MybatisPlusInterceptor mybatisPlusInterceptor = new MybatisPlusInterceptor();
        mybatisPlusInterceptor.addInnerInterceptor(new OptimisticLockerInnerInterceptor());
        return mybatisPlusInterceptor;
    }
}
在实体类的字段上加上 @Version 注解
给实体类相应版本字段添加 @Version 注解
java
@Version
private Integer version;
特别说明:
- 支持的数据类型只有:
int、Integer、long、Long、Date、Timestamp、LocalDateTime - 整数类型下
newVersion = oldVersion + 1 newVersion会回写到entity中- 仅支持
updateById(id)与update(entity, wrapper)方法 - 在
update(entity, wrapper)方法下,wrapper不能复用!!!
测试示例
java
/**
 * 更新版本号
 */
@Test
public void testUpdateByIdSucc() {
    // 新增记录
    Goods goods = new Goods();
    goods.setName("篮球");
    goods.setVersion(1);
    goodsMapper.insert(goods);
    // 获取新增后 id
    Long id = goods.getId();

    Goods goodsUpdate = new Goods();
    goodsUpdate.setId(id);
    goodsUpdate.setName("衣服");
    goodsUpdate.setVersion(1);

    // 版本号一致,更新成功
    System.out.println("更新操作数:" + goodsMapper.updateById(goodsUpdate));
    // 更新后 newVersion 会回写到 entity 中
    System.out.println("new version:" + goodsUpdate.getVersion());
}

/**
 * 测试更新后,版本号更新写回原对象中。
 */
@Test
public void testUpdateByIdSuccVersion() {
    Goods goods = goodsMapper.selectById(1);
    int oldVersion = goods.getVersion();
    System.out.println("old version: " + oldVersion);
    int i = goodsMapper.updateById(goods);
    // 更新后 newVersion 会回写到 entity 中
    System.out.println("version: " + goods.getVersion());
}

/**
 * 不带版本号更新数据,更新后版本号不会改变
 */
@Test
public void testUpdateByIdSuccWithNoVersion() {
    // 新增记录
    Goods goods = new Goods();
    goods.setName("篮球");
    goods.setVersion(1);
    goodsMapper.insert(goods);
    // 获取新增后 id
    Long id = goods.getId();

    Goods goodsUpdate = new Goods();
    goodsUpdate.setId(id);
    goodsUpdate.setName("衣服");
    goodsUpdate.setVersion(null);
    // Should update success as no version passed in
    System.out.println("更新操作成功数量:" + goodsMapper.updateById(goodsUpdate));
    Goods updated = goodsMapper.selectById(id);
    // Version not changed
    System.out.println("更新后版本号:" + updated.getVersion());
    // Age updated
    System.out.println("商品的名称已经更新为:" + updated.getName());
}

/**
 * 测试不正确版本号,更新失败
 */
@Test
public void testUpdateByIdFail() {
    // 新增记录
    Goods goods = new Goods();
    goods.setName("篮球");
    goods.setVersion(1);
    goodsMapper.insert(goods);
    // 获取新增后 id
    Long id = goods.getId();

    Goods goodsUpdate = new Goods();
    goodsUpdate.setId(id);
    goodsUpdate.setName("排球");
    // 设置不正确的版本号
    goodsUpdate.setVersion(3);
    // 没有更新到数据
    System.out.println("操作的记录数: " + goodsMapper.updateById(goodsUpdate));
}

/**
 * 批量更新带乐观锁
 * <p>
 * update(et,ew) et:必须带上version的值才会触发乐观锁
 */
@Test
public void testUpdateByEntitySucc() {
    QueryWrapper<Goods> ew = new QueryWrapper<>();
    ew.eq("version", 1);
    long count = goodsMapper.selectCount(ew);
    System.out.println("版本号是1的记录数:" + count);

    Goods entity = new Goods();
    entity.setName("篮球");
    entity.setVersion(1);

    // updated records should be same
    Assertions.assertEquals(count, goodsMapper.update(entity, null));

    ew = new QueryWrapper<>();
    ew.eq("version", 1);
    // No records found with version=1
    System.out.println("批量更新后版本号是1的记录数:" + goodsMapper.selectCount(ew));

    ew = new QueryWrapper<>();
    ew.eq("version", 2);
    // All records with version=1 should be updated to version=2
    System.out.println("批量更新后版本号是2的记录数:" + goodsMapper.selectCount(ew));
}
原理分析
SQL 注入的原理
MP 在启动后会将BaseMapper中的一系列的方法注册到meppedStatements中,下面分析是如何注入与流程。
在 MP 中,ISqlInjector负责 SQL 的注入工作,它是一个接口,AbstractSqlInjector是它的实现类,实现关系如下:
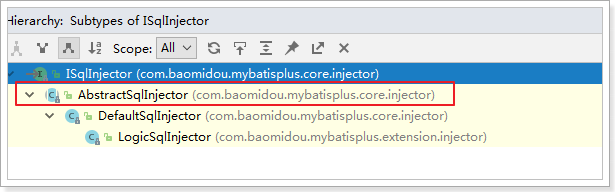
在AbstractSqlInjector中,主要是由inspectInject()方法进行注入的,如下:
java
@Override
public void inspectInject(MapperBuilderAssistant builderAssistant, Class<?> mapperClass) {
    Class<?> modelClass = extractModelClass(mapperClass);
    if (modelClass != null) {
        String className = mapperClass.toString();
        Set<String> mapperRegistryCache = GlobalConfigUtils.getMapperRegistryCache(builderAssistant.getConfiguration());
        if (!mapperRegistryCache.contains(className)) {
            List<AbstractMethod> methodList = this.getMethodList();
            if (CollectionUtils.isNotEmpty(methodList)) {
                TableInfo tableInfo = TableInfoHelper.initTableInfo(builderAssistant, modelClass);
                // 循环注入自定义方法
                methodList.forEach(m -> m.inject(builderAssistant, mapperClass, modelClass, tableInfo));
            } else {
                logger.debug(mapperClass.toString() + ", No effective injection method was found.");
            }
            mapperRegistryCache.add(className);
        }
    }
}在实现方法中,methodList.forEach(m -> m.inject(builderAssistant, mapperClass, modelClass, tableInfo));是关键,循环遍历方法,进行注入。最终调用抽象方法injectMappedStatement进行真正的注入:
java
/**
 * 注入自定义 MappedStatement
 *
 * @param mapperClass mapper 接口
 * @param modelClass  mapper 泛型
 * @param tableInfo   数据库表反射信息
 * @return MappedStatement
 */
public abstract MappedStatement injectMappedStatement(Class<?> mapperClass, Class<?> modelClass, TableInfo tableInfo);
查看该方法的实现:
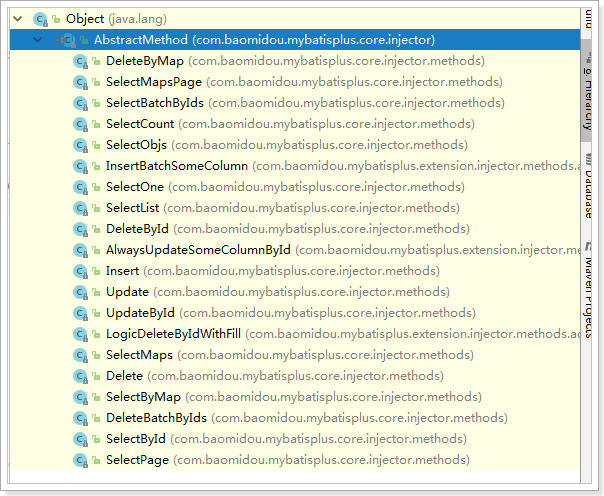
以SelectById为例查看:
java
public class SelectById extends AbstractMethod {

    @Override
    public MappedStatement injectMappedStatement(Class<?> mapperClass, Class<?> modelClass, TableInfo tableInfo) {
        SqlMethod sqlMethod = SqlMethod.LOGIC_SELECT_BY_ID;
        SqlSource sqlSource = new RawSqlSource(configuration, String.format(sqlMethod.getSql(),
            sqlSelectColumns(tableInfo, false),
            tableInfo.getTableName(), tableInfo.getKeyColumn(), tableInfo.getKeyProperty(),
            tableInfo.getLogicDeleteSql(true, false)), Object.class);
        return this.addSelectMappedStatement(mapperClass, sqlMethod.getMethod(), sqlSource, modelClass, tableInfo);
    }
}可以看到,生成了SqlSource对象,再将 SQL 通过addSelectMappedStatement方法添加到meppedStatements中。