Appearance
项目介绍
对于企业中的项目绝大多数都需要进行用户权限管理、认证、鉴权、加密、解密、XSS防跨站攻击等。这些功能整体实现思路基本一致,但是大部分项目都需要实现一次,这无形中就形成了巨大的资源浪费。本项目就是针对这个问题,提供了一套通用的权限解决方案 - 品达通用权限系统。
品达通用权限系统基于SpringCloud(Hoxton.SR12) + SpringBoot(2.3.12.RELEASE) 的微服务框架,具备通用的用户管理、资源权限管理、网关统一鉴权、XSS防跨站攻击等多个模块,支持多业务系统并行开发,支持多服务并行开发,可以作为后端服务的开发脚手架。核心技术采用 SpringBoot、Zuul、Nacos、Fegin、Ribbon、Hystrix、JWT Token、Mybatis Plus 等主要框架和中间件。
本项目具有两个主要功能特性:
- 用户权限管理:具有用户、部门、岗位、角色、菜单管理,并通过网关进行统一的权限认证
- 微服务开发框架:本项目同时也是一个微服务开发框架,集成了基础的公共组件,包括数据库、缓存、日志、表单验证、对象转换、防注入和接口文档管理等工具。
业务架构
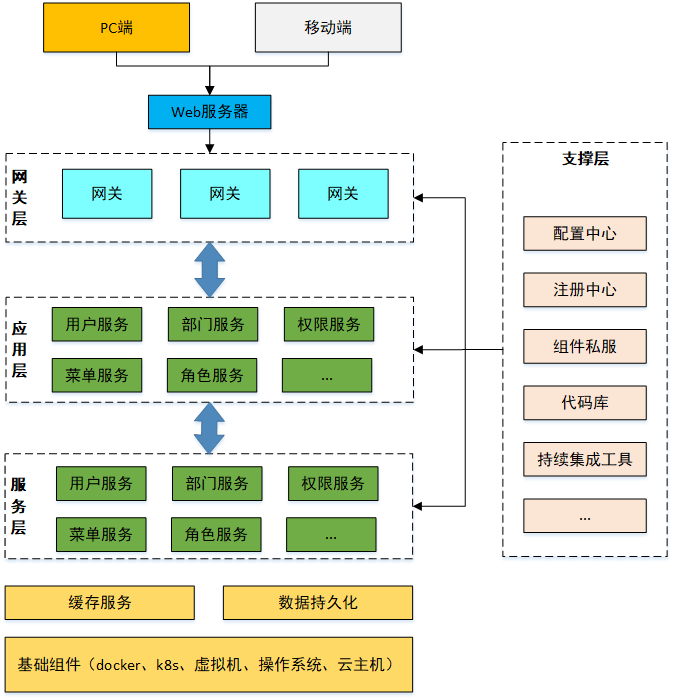
技术架构
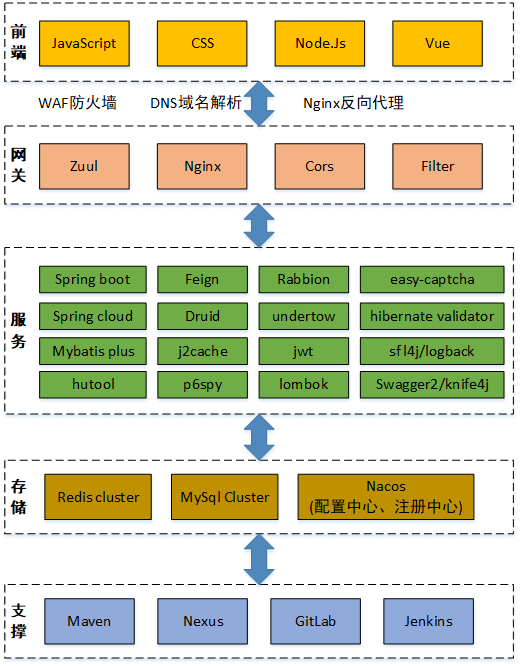
环境要求
Spring Boot starter 介绍
Spring Boot 大大简化了项目初始搭建以及开发过程,而这些都是通过 Spring Boot 提供的 starter 来完成的。品达通用权限系统就是基于 Spring Boot 进行开发,而且一些基础模块其本质就是 starter,所以先对 Spring Boot 的 starter 做全面深入的了解,这是开发品达通用权限系统的必备知识。
starter 介绍
spring boot 在配置上相比 spring 要简单许多,其核心在于 spring-boot-starter,在使用 spring boot 来搭建一个项目时,只需要引入官方提供的 starter,就可以直接使用,免去了各种配置。starter 简单来讲就是引入了一些相关依赖和一些初始化的配置。
Spring 官方提供了很多starter,第三方也可以定义starter。为了加以区分,starter从名称上进行了如下规范:
- Spring Boot 官方提供的 starter 名称格式为:
spring-boot-starter-xxx。例如 Spring Boot 官方提供的 spring-boot-starter-web - 第三方提供的 starter 名称格式为:
xxx-spring-boot-starter。 例如由 mybatis 提供的 mybatis-spring-boot-starter
Spring Boot 之所以能够简化项目的搭建和开发过程,主要是基于它提供的起步依赖和自动配置。
starter 起步依赖原理
起步依赖,其实就是将具备某种功能的坐标打包到一起,可以简化依赖导入的过程。例如,在导入 spring-boot-starter-web 这个 starter,则和 web 开发相关的 jar 包都一起导入到项目中了。如下图所示:

starter 自动配置原理
自动配置,即无须手动配置 xml,会使用默认的配置来自动配置并管理bean,从而简化开发过程。Spring Boot 完成自动配置主要涉及到如下几个关键步骤:
- 基于 Java 代码的 Bean 配置
- 自动配置条件依赖
- Bean 参数获取
- Bean 的发现
- Bean 的加载
下面通过一个实际的例子 mybatis-spring-boot-starter 来说明自动配置的实现过程。
基于 Java 代码的 Bean 配置
当在项目中导入了 mybatis-spring-boot-starter 这个jar后,可以看到它包括了很多相关的jar包,如下图:

其中在 mybatis-spring-boot-autoconfigure 这个 jar 包中名为 MybatisAutoConfiguration 的自动配置类:
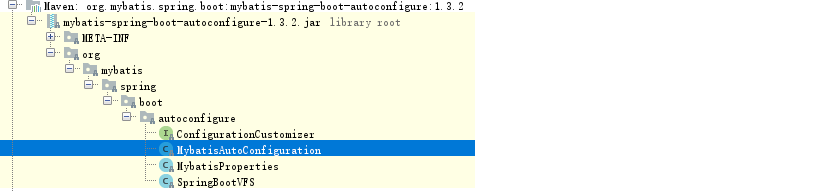
该类的关键代码如下:
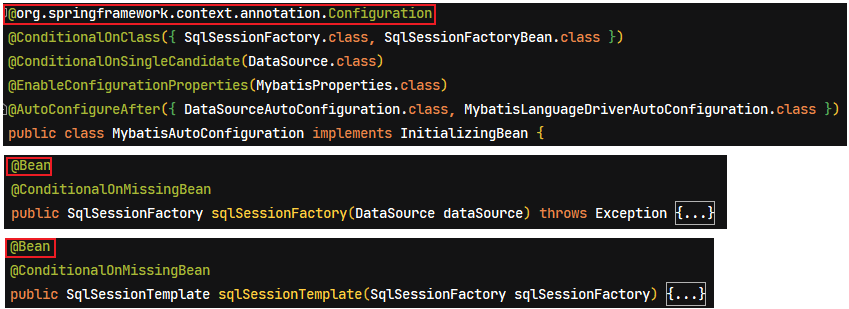
其中 @Configuration 和 @Bean 这两个注解配置使用就可以创建一个基于 java 代码的配置类,可以用来替代传统的 xml 配置文件。
@Configuration注解的类可以看作是能生产让 Spring IoC 容器管理的 Bean 实例的工厂@Bean注解的方法返回的对象可以被注册到 Spring 容器中
所以上面的 MybatisAutoConfiguration 类,会自动生成了 SqlSessionFactory 和 SqlSessionTemplate 这两个 Mybatis 的重要实例并交给 Spring 容器管理,从而完成 bean 的自动注册。
自动配置条件依赖
从 MybatisAutoConfiguration 类中使用的注解可以看出,要完成自动配置是有依赖条件的。

所以要完成 Mybatis 的自动配置,需要在类路径中存在 SqlSessionFactory.class、SqlSessionFactoryBean.class 这两个字节码文件,同时 Spring 容器中需要存在 DataSource 这个 bean 且该 bean 完成自动注册。
Notes: 以上
@ConditionalXxx注解是 Spring Boot 特有的条件依赖注解,具体的介绍与用法详见《Spring Boot 注解汇总》笔记
Bean 参数获取(配置获取)
要完成 mybatis 的自动配置,需要使用者在配置文件中提供数据源相关的配置参数,例如数据库驱动、连接url、数据库用户名、密码等。Spring Boot 是读取 yml 或者 properties 配置文件的的属性来创建数据源对象的过程如下:
在导入 mybatis-spring-boot-starter 的 jar 包后,其中依赖包含一个 spring-boot-autoconfigure 包,在此包中有一个自动配置类 DataSourceAutoConfiguration,如下所示:
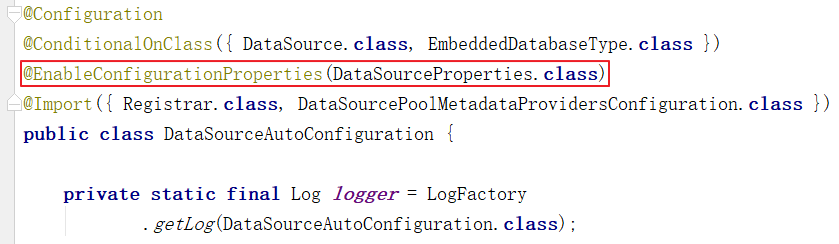
该类上标识 @EnableConfigurationProperties 注解,跟踪查看 DataSourceProperties 类的源码,如下:
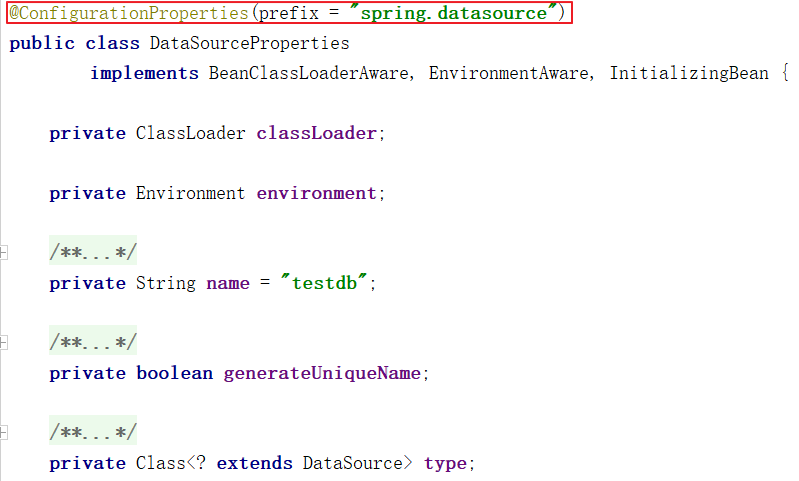
可以看到该类上标识了 @ConfigurationProperties 注解,该注解的作用就是将 yml 或者 properties 配置文件中的配置参数信息封装到 ConfigurationProperties 注解标注的 bean(即DataSourceProperties 类)的相应属性上。
其中 @EnableConfigurationProperties 注解的作用就是让 @ConfigurationProperties 注解生效,并且注册其标识的类实例到 Spring 容器中。
Bean 的发现(自动配置类的发现)
Spring boot 默认扫描启动类所在的包下的主类与子类的所有组件,但并没有包括依赖包中的类,具体依赖包中的 bean 是的发现和加载的实现流程如下:
从 Spring Boot 项目的启动类开始跟踪,在启动类上一般会加入 @SpringBootApplication 注解,此注解的源码如下:
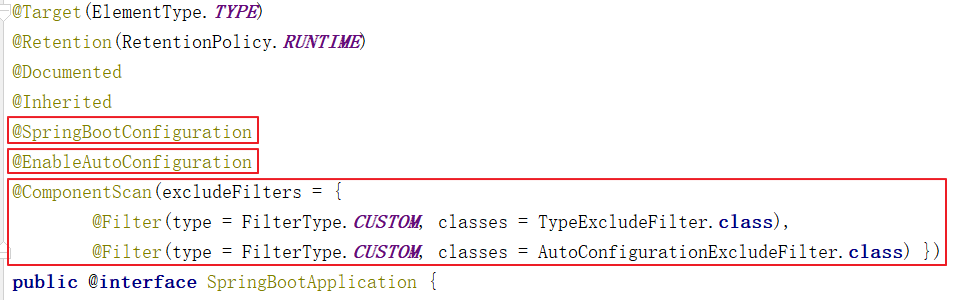
其中包含三个重要的注解:
@SpringBootConfiguration:作用就相当于@Configuration注解,被注解的类将成为一个 bean 配置类@ComponentScan:作用就是自动扫描并加载符合条件的组件,最终将这些 bean 加载到 spring 容器中@EnableAutoConfiguration:此注解很重要,借助@Import的支持,收集和注册依赖包中相关的 bean 定义
跟踪 @EnableAutoConfiguration 注解源码如下:
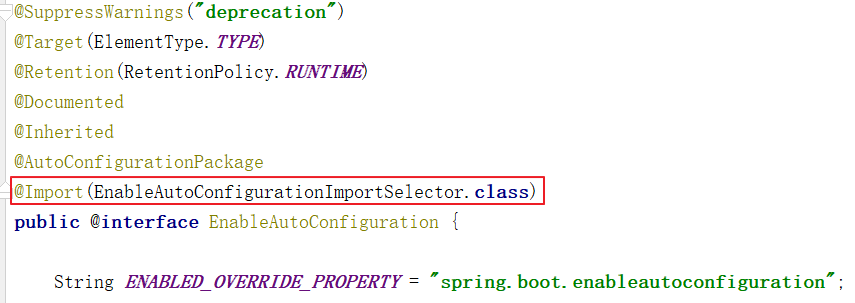
@EnableAutoConfiguration 注解又引入了 @Import 这个注解,@Import 注解作用是导入需要自动配置的组件,此处为 EnableAutoConfigurationImportSelector 类
查看 EnableAutoConfigurationImportSelector 类源码如下:
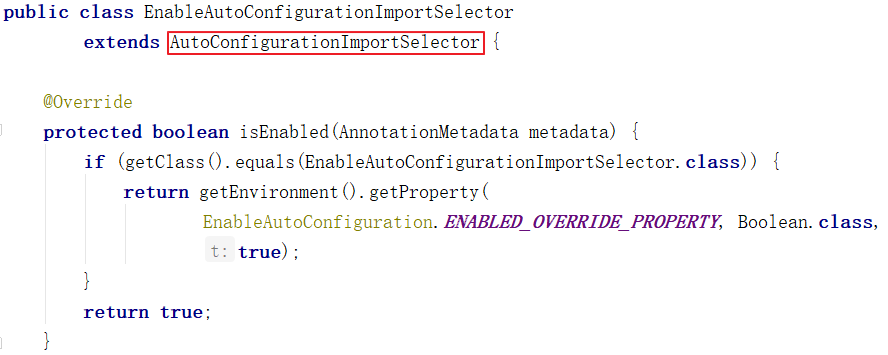
EnableAutoConfigurationImportSelector 继承了 AutoConfigurationImportSelector 类,跟踪查看 AutoConfigurationImportSelector 类源码:
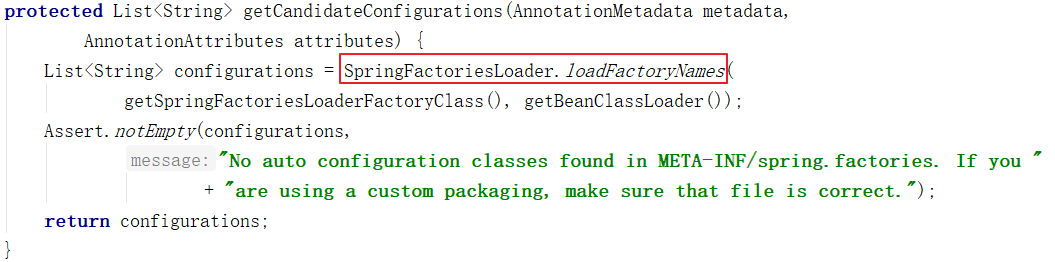
AutoConfigurationImportSelector 类的 getCandidateConfigurations 方法中的调用了 SpringFactoriesLoader 类的 loadFactoryNames 方法,继续跟踪源码:
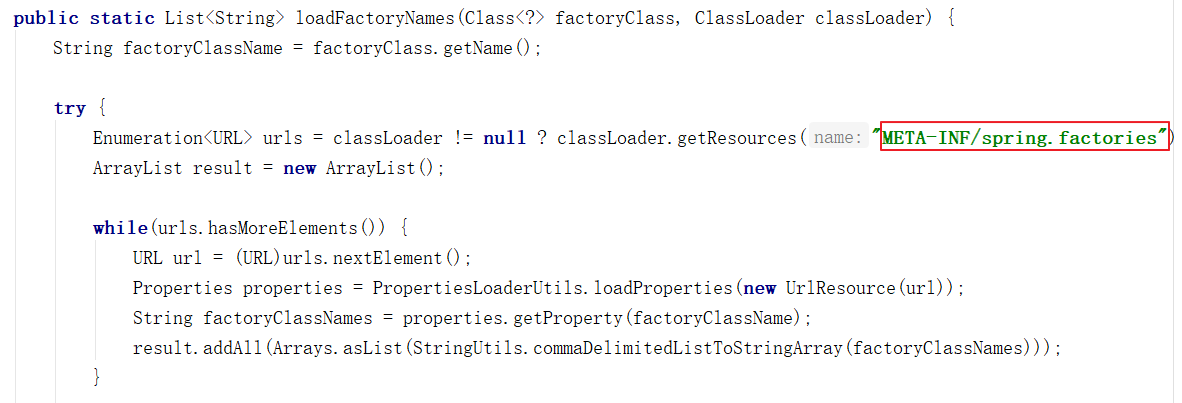
SpringFactoriesLoader 的 loadFactoryNames 静态方法可以从所有的 jar 包中读取 META-INF/spring.factories 文件,而自动配置的类就在这个文件中进行配置:
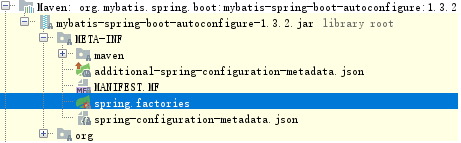
spring.factories 文件内容如下:

最终 Spring Boot 就可以加载到 MybatisAutoConfiguration 配置类了。
Bean 的加载
在 Spring Boot 应用中要让一个普通类交给 Spring 容器管理,通常有以下方法:
- 使用
@Configuration与@Bean注解 - 使用
@Controller、@Service、@Repository、@Component注解标注该类并且使用@ComponentScan注解启用自动扫描 - 使用
@Import方法批量导入
其中 Spring Boot 实现自动配置使用的是 @Import 注解这种方式,在 AutoConfigurationImportSelector 类的 selectImports 方法返回一组从 META-INF/spring.factories 文件中读取的 bean 的全类名,这样 Spring Boot 就可以加载到这些 Bean 并完成实例的创建工作。
自动配置总结
自动配置的关键几步以及相应的注解总结如下:
@Configuration与@Bean:基于 Java 代码的 bean 配置@Conditional:设置自动配置条件依赖@EnableConfigurationProperties与@ConfigurationProperties:读取配置文件转换为 bean@EnableAutoConfiguration与@Import:实现 bean 发现与加载
自定义 starter
更多自定义 starter 细节详见《Spring Boot 基础篇》笔记的“自定义 starter”章节
示例一:基础应用
- 第1步:创建 starter 工程 hello-spring-boot-starter 并配置 pom.xml 文件依赖依赖
xml
<?xml version="1.0" encoding="UTF-8"?>
<project xmlns="http://maven.apache.org/POM/4.0.0"
         xmlns:xsi="http://www.w3.org/2001/XMLSchema-instance"
         xsi:schemaLocation="http://maven.apache.org/POM/4.0.0
                             http://maven.apache.org/xsd/maven-4.0.0.xsd">
    <parent>
        <groupId>org.springframework.boot</groupId>
        <artifactId>spring-boot-starter-parent</artifactId>
        <version>2.2.2.RELEASE</version>
        <relativePath/>
    </parent>

    <modelVersion>4.0.0</modelVersion>
    <groupId>com.moon</groupId>
    <artifactId>hello-spring-boot-starter</artifactId>
    <version>1.0-SNAPSHOT</version>
    <dependencies>
        <dependency>
            <groupId>org.springframework.boot</groupId>
            <artifactId>spring-boot-starter</artifactId>
        </dependency>
        <dependency>
            <groupId>org.springframework.boot</groupId>
            <artifactId>spring-boot-autoconfigure</artifactId>
        </dependency>
    </dependencies>
</project>- 第2步:创建配置属性类 HelloProperties
java
/*
 * 读取配置文件,并将属性转换为bean
 */
@ConfigurationProperties(prefix = "hello")
public class HelloProperties {
    private String name;
    private String address;
    // ...省略 getter/setter
}- 第3步:创建服务类
HelloService
java
public class HelloService {
    private String name;
    private String address;

    public HelloService(String name, String address) {
        this.name = name;
        this.address = address;
    }

    public String sayHello(){
        return "你好!我的名字叫 " + name + ",我来自 " + address;
    }
}- 第4步:创建自动配置类
HelloServiceAutoConfiguration
java
/*
 * 配置类,基于Java代码的bean配置
 */
@Configuration
@EnableConfigurationProperties(HelloProperties.class)
public class HelloServiceAutoConfiguration {
    private HelloProperties helloProperties;

    // 通过构造方法注入配置属性对象 HelloProperties
    public HelloServiceAutoConfiguration(HelloProperties helloProperties) {
        this.helloProperties = helloProperties;
    }

    // 实例化HelloService并载入Spring IoC容器
    @Bean
    @ConditionalOnMissingBean
    public HelloService helloService(){
        return new HelloService(helloProperties.getName(), helloProperties.getAddress());
    }
}- 第5步:在 resources 目录下创建 META-INF/spring.factories
properties
org.springframework.boot.autoconfigure.EnableAutoConfiguration=\
com.moon.config.HelloServiceAutoConfiguration
以上 starter 工程已经开发完成了,可以将当前 starter 安装到本地 maven 仓库供其他应用来使用。
- 第6步:创建 maven 工程 myapp 并配置 pom.xml 文件引入自定义的 starter
xml
<?xml version="1.0" encoding="UTF-8"?>
<project xmlns="http://maven.apache.org/POM/4.0.0"
         xmlns:xsi="http://www.w3.org/2001/XMLSchema-instance"
         xsi:schemaLocation="http://maven.apache.org/POM/4.0.0 http://maven.apache.org/xsd/maven-4.0.0.xsd">

    <parent>
        <groupId>org.springframework.boot</groupId>
        <artifactId>spring-boot-starter-parent</artifactId>
        <version>2.2.2.RELEASE</version>
        <relativePath/>
    </parent>

    <modelVersion>4.0.0</modelVersion>
    <groupId>com.moon</groupId>
    <artifactId>myapp</artifactId>
    <version>1.0-SNAPSHOT</version>
    <dependencies>
        <dependency>
            <groupId>org.springframework.boot</groupId>
            <artifactId>spring-boot-starter-web</artifactId>
        </dependency>
        <!-- 导入自定义starter -->
        <dependency>
            <groupId>com.moon</groupId>
            <artifactId>hello-spring-boot-starter</artifactId>
            <version>1.0-SNAPSHOT</version>
        </dependency>
    </dependencies>
</project>- 第7步:创建 application.yml 文件并配置自定义 starter 的相关属性
yml
server:
  port: 8080
hello:
  name: xiaoming
address: beijing- 第8步:创建
HelloController
java
@RestController
@RequestMapping("/hello")
public class HelloController {
    // HelloService 在自定义的 starter 中已经完成了自动配置,因此此处可以直接注入
    @Autowired
    private HelloService helloService;

    @GetMapping("/say")
    public String sayHello(){
        return helloService.sayHello();
    }
}- 第9步:使用者工程创建启动类
HelloApplication
java
@SpringBootApplication
public class HelloApplication {
    public static void main(String[] args) {
        SpringApplication.run(HelloApplication.class,args);
    }
}
执行启动类 main 方法运行 web 项目,访问地址:http://localhost:8080/hello/say

示例二:记录日志拦截器
在前面的案例一中通过定义 starter,自动配置了一个 HelloService 实例。本案例需要通过自动配置来创建一个拦截器对象,通过此拦截器对象来实现记录日志功能。
可以在案例一的基础上继续开发案例二
- 第1步:在 hello-spring-boot-starter 的 pom.xml 文件中追加 web 项目的依赖
xml
<dependency>
    <groupId>org.springframework.boot</groupId>
    <artifactId>spring-boot-starter-web</artifactId>
    <optional>true</optional>
</dependency>
<dependency>
    <groupId>org.springframework.boot</groupId>
    <artifactId>spring-boot-configuration-processor</artifactId>
</dependency>- 第2步:自定义
@MyLog注解
java
@Target(ElementType.METHOD)
@Retention(RetentionPolicy.RUNTIME)
public @interface MyLog {
    /**
     * 方法描述
     */
    String desc() default "";
}- 第3步:自定义日志拦截器
MyLogInterceptor
java
import org.springframework.web.method.HandlerMethod;
import org.springframework.web.servlet.ModelAndView;
import org.springframework.web.servlet.handler.HandlerInterceptorAdapter;
import javax.servlet.http.HttpServletRequest;
import javax.servlet.http.HttpServletResponse;
import java.lang.reflect.Method;

/**
 * 日志拦截器
 */
public class MyLogInterceptor extends HandlerInterceptorAdapter {
    private static final ThreadLocal<Long> startTimeThreadLocal = new ThreadLocal<>();

    public boolean preHandle(HttpServletRequest request, HttpServletResponse response,
                             Object handler) throws Exception {
        HandlerMethod handlerMethod = (HandlerMethod)handler;
        Method method = handlerMethod.getMethod(); // 获得被拦截的方法对象
        MyLog myLog = method.getAnnotation(MyLog.class); // 获得方法上的注解
        if(myLog != null){
            // 方法上加了MyLog注解,需要进行日志记录
            long startTime = System.currentTimeMillis();
            startTimeThreadLocal.set(startTime);
        }
        return true;
    }

    public void postHandle(HttpServletRequest request, HttpServletResponse response,
                           Object handler, ModelAndView modelAndView) throws Exception {
        HandlerMethod handlerMethod = (HandlerMethod)handler;
        Method method = handlerMethod.getMethod(); // 获得被拦截的方法对象
        MyLog myLog = method.getAnnotation(MyLog.class); // 获得方法上的注解
        if(myLog != null){
            // 方法上加了MyLog注解,需要进行日志记录
            long endTime = System.currentTimeMillis();
            Long startTime = startTimeThreadLocal.get();
            long optTime = endTime - startTime;

            String requestUri = request.getRequestURI();
            String methodName = method.getDeclaringClass().getName() + "." + method.getName();
            String methodDesc = myLog.desc();

            System.out.println("请求uri:" + requestUri);
            System.out.println("请求方法名:" + methodName);
            System.out.println("方法描述:" + methodDesc);
            System.out.println("方法执行时间:" + optTime + "ms");
        }
    }
}- 第4步:创建自动配置类
MyLogAutoConfiguration,用于自动配置拦截器、参数解析器等 web 组件
java
/**
 * 配置类,用于自动配置拦截器、参数解析器等web组件
 */
@Configuration
public class MyLogAutoConfiguration implements WebMvcConfigurer{
    //注册自定义日志拦截器
    public void addInterceptors(InterceptorRegistry registry) {
        registry.addInterceptor(new MyLogInterceptor());
    }
}- 第5步:在 spring.factories 中追加
MyLogAutoConfiguration配置
java
org.springframework.boot.autoconfigure.EnableAutoConfiguration=\
com.moon.config.HelloServiceAutoConfiguration,\
com.moon.config.MyLogAutoConfiguration
Tips: 在 hello-spring-boot-starter 中追加了新的内容,需要重新打包安装到 maven 仓库
- 第6步:在 myapp 工程的 Controller 方法上加入
@MyLog注解
java
@RestController
@RequestMapping("/hello")
public class HelloController {
    // HelloService 在自定义的 starter 中已经完成了自动配置,因此此处可以直接注入
    @Autowired
    private HelloService helloService;

    @MyLog(desc = "sayHello方法") // 日志记录注解
    @GetMapping("/say")
    public String sayHello(){
        return helloService.sayHello();
    }
}请求uri:/hello/say
请求方法名:com.moon.controller.HelloController.sayHello
方法描述:sayHello方法
方法执行时间:36mslombok 工具类库
Lombok 是一个开源的代码生成库,能以简单的注解形式来简化 Java 类中的大量样板代码,提高开发人员的开发效率。例如开发中经常需要写的 javabean,都需要花时间去添加相应的 getter/setter,也许还要去写构造器、equals 等方法,而且需要维护,当属性多时会出现大量的 getter/setter 方法,这些显得很冗长也没有太多技术含量。
lombok 能通过注解的方式,在编译时自动为属性生成构造器、getter/setter、equals、hashcode、toString 方法,使代码看起来更简洁。
Lombok 更多使用说明详见《Lombok 工具插件》笔记